Saturday, October 30, 2010

Oh, Alice! CHAPTER 37: Hallowe'en in Wonderland!

 Click to enlarge

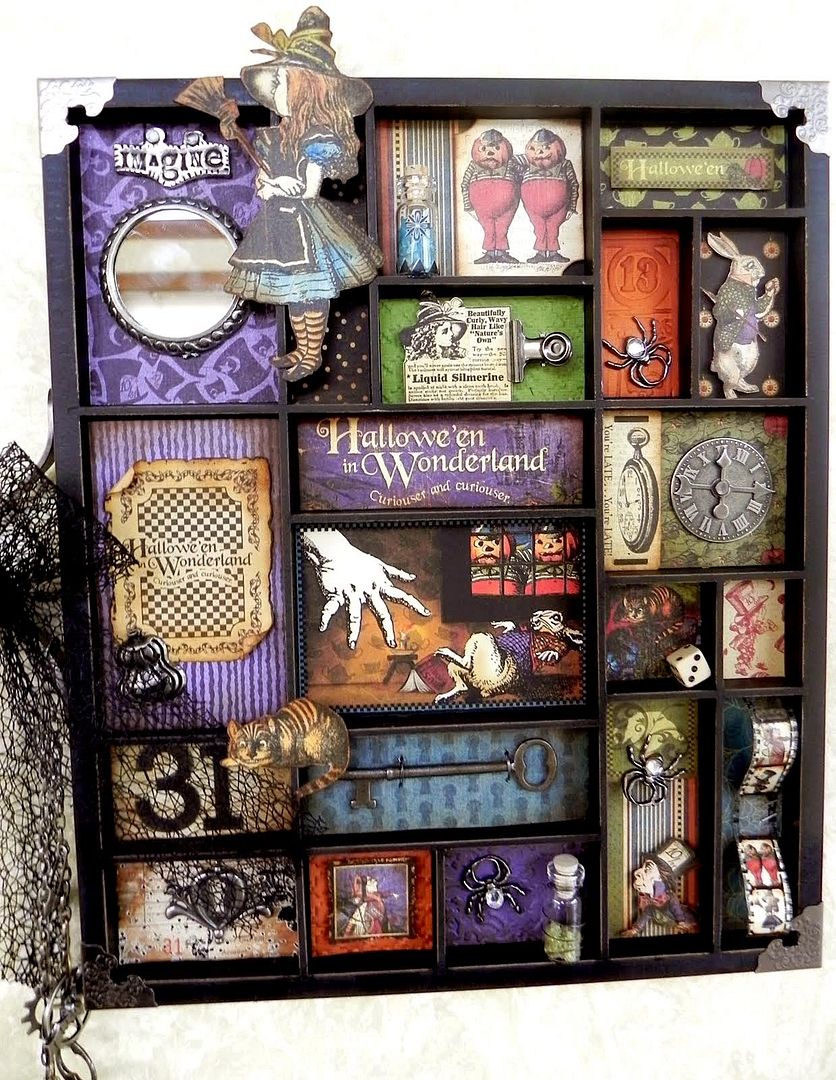
We have a "just for fun" post today here in Wonderland that doesn't follow a book excerpt or poem...just a good ol' fashioned HALLOWEEN theme! After all, tomorrow IS Halloween and it's time to showcase some fun projects, and many of us are using the Graphic 45 special line of papers, Hallowe'en in Wonderland!

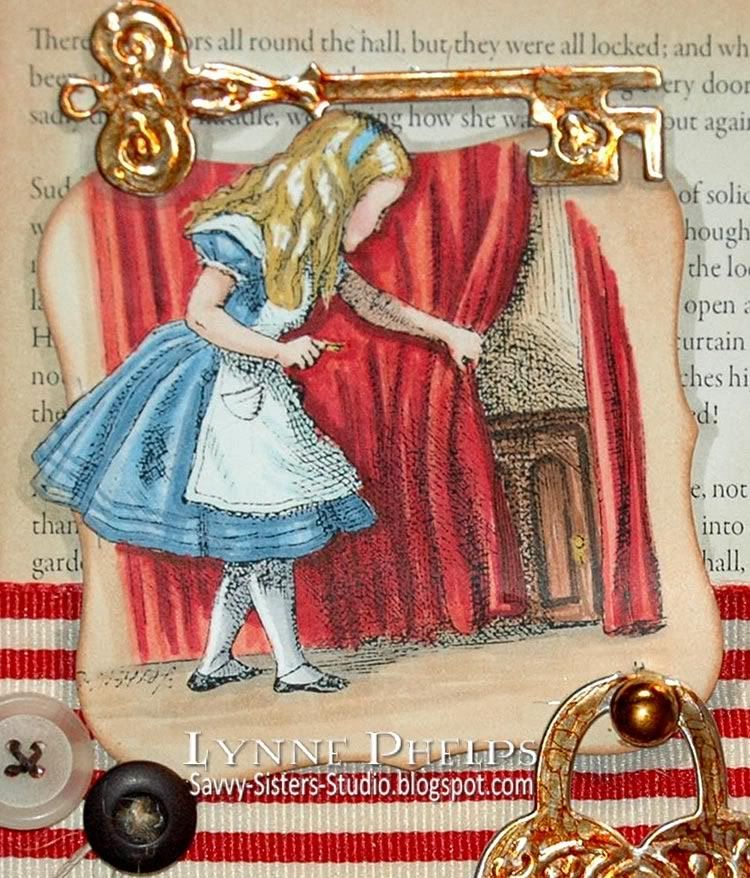
Today our VERY generous DT member Ky is offering up a set of Alice stamps by Elaine Cox! Even more of a reason to get creepy or crafty this week and show us what you can do!

My card is using a snippet of one of the Graphic 45 papers. This collection features the original Tenniel Alice in Wonderland illustrations with a twist - for instance Alice now has pointy-toed shoes, a black pinafore and a witch's hat! The paper I used had ivory and black Alice figures against the green background, so I colored Alice and the table with Copic markers, trimmed it out and then matted it on a rust paper.

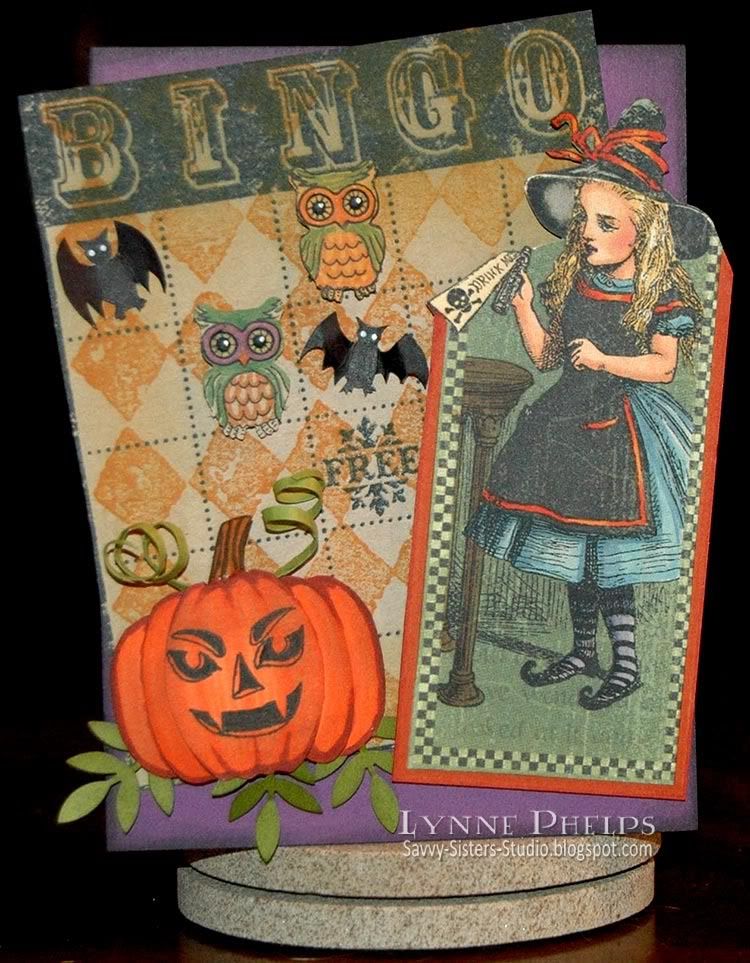
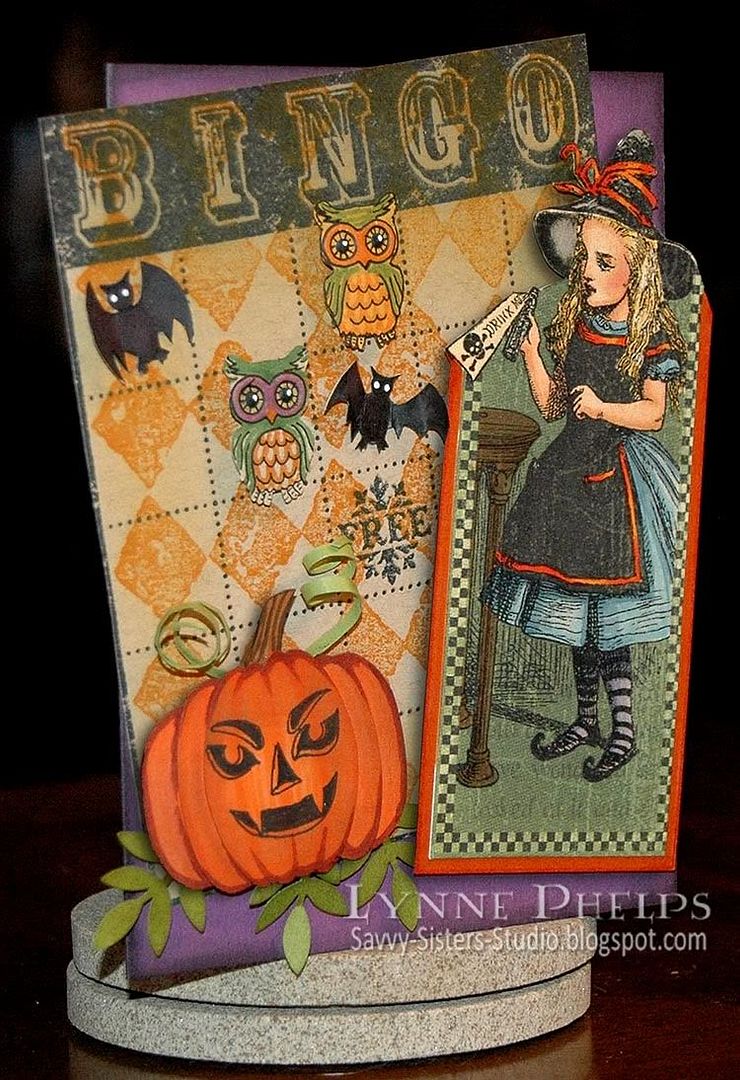
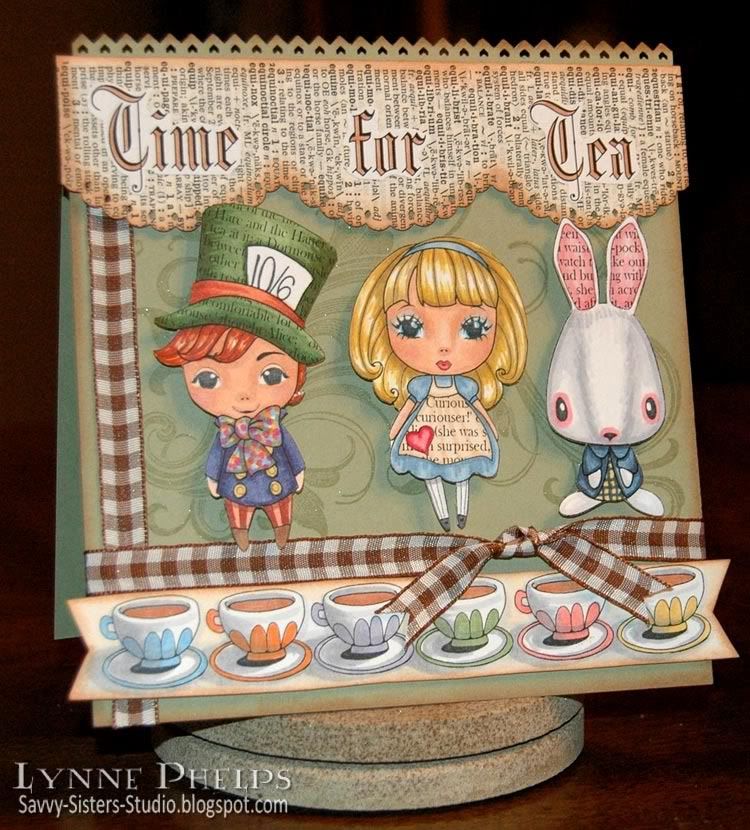
I also stamped one of my new FAVORITE stamps - the distressed bingo card - onto kraft card! Isn't it great? It is in the Stampin' Up! Holiday Mini catalog, and you can order it through my sister if you like! I overstamped it with another SU stamp in orange Distress Ink and sponged it with gold.

Click to enlarge

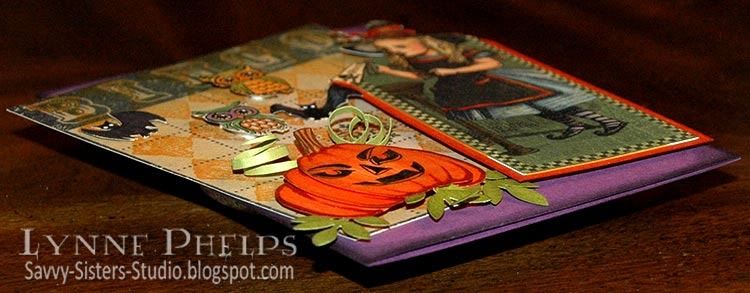
I made a stacked orange pumpkin by layering oval punches, so it is three layers deep and has a lot of dimension. I colored the orange paper with orange and rust markers to add the pumpkin lines and shadows, sponged it with Distress orange, drew on a fun fanged vampire face and assembled the layers with foam mounting tape. I added some leafy punches beneath and a brown stem, then curled skinny strips of olive card stock to make the curly tendrils of vine. I sponged the purple card base with black Distress Ink, then adhered the bingo card with ATG tape. Then the pumpkin and Alice panel were adhered with more foam tape; you can see all the dimension in the photo above.

Click to enlarge

I punched embossed owls from gold and kraft card and drew in details with a black pen and colored them in. Then I drew some little bats, coloring them in and adding white gel pen dots for the eyes. The owls were adhered with more dimensional foam mounting tape. The bodies of the bats were glued down and the wings were curved up away from the base.
Be sure to stop by the blogs of my TEAm Mates:
We really hope you enjoy our projects today and that you feel like playing along! You can link your Halloween Wonderland creations on Oh, Alice! for a chance to win a set of fabulous Elaine Cox Alice stamps!

Please leave me a comment and let me know what you think about my Wonderland Halloween card! Remember that I will be giving away a digital stamp set on THIS post, there is still time to leave a comment!

Stamps: Stampin' Up! - Bingo Card, retired Print Pattern background.
Paper: Stampin' Up! - purple, rust, mustard, olive and kraft card stock.
Ink: Memento - Tuxedo Black; Ranger Distress Ink - Black Soot, Spiced Marmalade, Peeled Paint, Scattered Straw. Copic - black Multiliner, Sketch markers.
Tools: Stampin' Up! - Wide Oval, Oval punches; Ranger Inksentials blending tool; Martha Stewart Crafts - Embossed Owl Punch.
All Stampin' Up! supplies can be ordered from my sister, Janet Moredock!

Wednesday, October 27, 2010

Happy Belated Birthday Card, Dear Da-ad, and Happy BLOG CANDY to YOU!

(New BLOG CANDY below, so stick with me!)  I did remember my Dad's birthday ON the correct day. I just didn't remember it ahead of time, like make-a-card-and-mail-it ahead of time! Our family has been scattered for a long time, so we always call each other and sing Happy Birthday on the phone. I know I never feel like it's really my birthday until I get that phone call. I do (finally) have his card ready and here it is!

Click to enlarge

I am using my favorite new Let's Communicate set again that I designed with Amber of Amber INK! My idea and her fabulous drawing skills created this set, which was my prize for winning the Amber INK challenge a couple months ago! This time I colored the figure to look like me. She is wearing my ultimate favorite lime green and turquoise.  She has my red hair and hazel eyes. I cannot even tell you how fun this set is to color!  I went a little crazy on the purse with a mod polka dot pattern, and of course I love to color jeans.  There is no paper piecing, this was all done with Copic markers. I had printed the figure out with a black and white laser printer onto color laser printer paper, which works great for blending Copics.  After coloring, I adhered the figure to white card for stiffness and trimmed her out with scissors and a Fiskars fingertip craft knife for the interior cuts, very easy to do.  Then I added one lime green crystal for a fun earring!  I computer generated the sentiment and bubble, adding some musical symbols so you know she is singing.

I sponged around the edges of this 5 x 6.5 inch kraft card (Recollections) with Broken China Distress Ink. I adhered two strips of ribbon to the card front with Fast Grab Tacky Glue, then added my bow, tied with the Bow-Easy, with the same glue. This glue is thick enough that it does not saturate through the ribbon and is so much less expensive than ScorTape and glue dots; it really holds the slippery ribbon securely in place.

The Spellbinders Mega Ovals with their elongated shape are the perfect backdrop for figures like this. The scalloped oval was not the right color of green, so I colored it lime green all around the edges where it showed to match the figure, and edged it with a turquoise marker to make it stand out better from the kraft background. The turquoise layer (SU Cool Caribbean) was sponged with Broken China Distress Ink while it was still in the die to highlight the embossed edge. Each layer is adhered to the front with dimensional foam mounting tape, so by the time I got to the figure it was three layers of foam tape high. Since one foot was hanging out in space, I layered three pieces of foam tape to stick behind the leg to secure it at the right level. It looks great from the front but a bit odd from the side, as you can see below.  If I had considered it earlier, I would have used a tan Copic marker to color the sides of the foam tape to match the card base, so it would have blended in better.

 Click to enlarge

Whenever I complain about my birthdays (how old I am getting) my Dad always says that the alternative to birthdays is grim!  I sure would rather continue to have birthdays than not, LOL!  So when I found this sentiment in a Hero Arts clear set, I had to buy it. It had a turtle on the same stamp but I carefully trimmed it so I could use the sentiment on it's own!  It says "Birthdays are good for you. The more you have, the longer you live."  Isn't that perfect?  I stamped it with Peeled Paint Distress Ink onto the turquiose card stock and sponged around the edges of the punched shape (SU - Curly Label Punch) with Broken China Distress Ink. I used foam tape to mount it over a piece of loosely folded, notched ribbon, then added a twine-threaded button just for fun.

Happy belated birthday card to you, Da-ad, Happy birthday to you!

Blog Candy!
In honor of my Dad's birthday, I am going to give away a Let's Communicate digital stamp set to one lucky commenter. Just tell me what kinds of cards YOU would like to make with this set, and if you will enter the Amber INK challenges!   You do not need a blog to enter, but if you use anonymous be sure to list your name in the comment!  I'll draw the evening of Nov. 12th.  Check back on Saturday, Nov. 13th to see if you've won!
Leave a comment here to enter for the Let's Communicate digi stamp set before you go!

Saturday, October 23, 2010

Oh, Alice! CHAPTER 36: Chess, Chessboard, Chessmen

Click to enlarge
"They don't keep this room so tidy as the other,' Alice thought to herself, as she noticed several of the chessmen down in the hearth among the cinders: but in another moment, with a little `Oh!' of surprise, she was down on her hands and knees watching them. The chessmen were walking about, two and two!

`Here are the Red King and the Red Queen,' Alice said (in a whisper, for fear of frightening them), `and there are the White King and the White Queen sitting on the edge of the shovel -- and here are two castles walking arm in arm..."
                     --Ch. 1: Through the Looking Glass
The challenge this week is again the brainchild of DT member Lynne (me!) - to use some aspect of the game of chess! You might want to use a checkerboard pattern, or feature a King, Queen, Knight or Castle (Rook), or some other aspect of the game we haven't thought of - we just need to be able to clearly see CHESS in your creation!

We are THRILLED to announce that there's a prize this week, too! Thanks to our generous sponsor, PAPER MANIAC, we are giving away a set of Artistic Outpost Alice in Wonderland mini-stamps AND a sheet of E.A.D. Designs Stickerz! How awesome is that?


My Card: Sometimes you play the GAME, and sometimes the game plays YOU!

I almost used the image which actually illustrates this week's chapter today, but I kept coming back to this image of the king, so indignant and outraged when Alice scooped him into the air! I printed out the image of the king and the knight and colored them with Copics. I used a glue stick to adhere the colored images to white card stock and trimmed them out.


Click to enlarge

The card is kraft card stock (PTI). I did not have a checkerboard stamp, but I thought the diamonds (Stampers' Anonymous) resembled a checkerboard viewed from an angle! I stamped the chess pieces (Hampton Arts), trimmed them out and glued them to th ebackground. The knight and king were popped up on thick foaam mounting tape, but I used glue to stick the edges down flush to the card.  I did not have a sentiment to go, and I don't know if I heard this one before or not, but I thought it captured the way the king feels! I wrote it down on a piece of punched and sponged card stock. For embelliishment, I made a sailor's knot, adhering it to the card with fast grab tacky glue.

Here's some inspiration from the DT before we 'pawn' you off on your own to create this week:
Checkmate! Have YOU met your match? You have until FRIDAY, October 29th to enter your creation on Oh, Alice! and throw your hat (or should I say, crown?) in the ring for this awesome PAPER MANIAC prize this week!

Also, there is amazing Alice blog candy on The Altered Alice. Go take a look to see how you can enter for a chance to win this incredible Printer's tray, created by Donna, our October guest designer! You have until Oct. 30 to enter the drawing, winner announced on Halloween! Be sure to hurry on over, don't be late for this important date!

Please leave me a comment, they really make my day!

Friday, October 22, 2010

Hey Jess - You ROCK!


Jess Diedrich of The Whimsical Butterfly is the creator and coordinator of the Oh, Alice! challenge blog, where I am on the design team. She is also the Creative Coordinator for The Greeting Farm, which includes being editor of The Greeting Farm Newsletter and coordinator of their three (or four?) design teams. She's an Ippity Chick and a Unity DT gal. But most importantly, Jess is the mother of four children!  Jess rocks!

When I received my digital copy of the More to Love - Let's Communicate set, I thought I saw a resemblence!  I told Jess if I put glasses on her and put a pink streak in her hair, nobody would be able to tell the difference. So. . . whatcha think?
Click to enlarge

Yup, that's what I thought too! It looks just like Jess! Now you might think it is funny to have Jess saying that Jess rocks, but what is actually happening here is that Jess is listening to the phone and my voice is coming out of the phone saying that she rocks!

I thought I would make her a card, which is my second entry to the Amber INK INKredible 21 day challenge, where the theme this month is RAKs!  You need to use at least one Amber INK product to enter. Just think - you could download this AMAZING digi set, which includes the figure (without glasses and pink streak), two speech bubbles and TEN sentiments, for only $7, and then you could have fun coloring her too! And if you prefer clear stamps, that's an option too! Just think, if you win the challenge, you too could design a stamp set with Amber!!!

Let's take a look at the whole card:

Click to enlarge

Doesn't Jess look hot in her great jeans and those super cool leather boots! Gosh, I sure love boots and Amber drew my favorite style!  And I totally LOVE to color jeans - look at all the great details Amber drew , she even gave me a watch pocket, gotta love that!  Instead of smooth leather like the last card, I gave Jess a trendier bag, gathered into soft folds. I'm thinkin' this leather came from a psychadelic ostrich, know what I mean?  Last time I colored in a quick and easy flower pattern on her jacket. Today I went for plaid, which is so easy to draw and pretty forgiving - just curve the stripes a little, don't even try to make the plaid perfect and straight. (See another drawn plaid example on this card.) This is also an awesome set for paper piecing!

I punched a big scalloped border on the black card stock and wrapped a ribbon around it that I colored with Copics to match the pink streak in Jess' hair, adding a little triple loop bow, made on the Bow-Easy and adhered with Fast Grab Tacky Glue. I used the same pink marker to edge the polka dot paper. The twine-threaded buttons were attached with glue dots. Then I had to add the bling, because it is made up of "rocks" and hey, Jess ROCKS, right? We all agree that Jess ROCKS! These were sparkly clear crystals until I colored them with Copic markers to match the jacket. I had to cut one of the flourishes, so I used the leftover crystals for an earring and jacket buttons! The figure was cut out and adhered with thick foam tape so it has a lot of dimension, as does the speech bubble!

Click to enlarge

Lousy angle but you see how high she is popped up, which looks pretty cool when you see it head on. I thought I'd show this view as the flash destroys the shadows in  the normal views. 

Click to enlarge

Answering some questions about my last post:

While I had the camera out for today's card, I took a "dimensional view" of my previous card to try to explain about the ribbon treatment. I took an inch wide strip of scrap card stock and ran adhesive down both long edges. This adhesive was just used to position the ribbon, which I pinched up every so often as I stuck it down. I used my Sew Mini to stitch right down the middle, where there was NOT any adhesive, so as not to gunk up my machine.  You usually have to use a heavy duty super high-tack tape like ScorTape to get ribbon to stick securely to paper. The stitching is actually what is holding the ribbon to the strip of card stock - I don't need to worry that it will come off. In fact the ribbon has already lifted up from the adhesive at the edges, which gives it even more dimension. This allows me to use my normal (super inexpensive) Scotch ATG adhesive to stick the beribboned strip of card stock to the card front, because now I am making a paper-to-paper bond.  Hope this helps!

Someone else was astute enough to suck up comment on how incredible I am with my super jeans coloring skills and all, so I guess I'll reveal that I use B91-B95-B99 coz I like my jeans all comfy and broken in and faded. How about you?

So, are you loving my challenge winning stamp set as much as I am?  I hope it will be a huge hit for Amber INK! You can read more about it on my last blog post! :-)   I can't wait until Jess sees this - watch for her to comment, LOL! The hard part actually getting it in the mail as I'm out of stamps! I already owe two other RAKs that are just waiting for me to get to the post office before they close, as I live in a small town with really short Post Office hours! Please leave me a comment about the stamp set, my amazing jeans coloring skills, or how much Jess ROCKS, hahaha!

Wednesday, October 20, 2010

Say Hello to My New Stamp Set: More to Love - Let's Communicate!!!!

As you may remember, I WON the September Amber INK INKredible 21 Day Challenge and the grand prize was Amber designed my dream stamp set! So without further ado, welcome More to Love - Let's Communicate!!!

Click to enlarge

Isn't she fabuous!  I told Amber I wanted a full-figured, hip, sassy, fashionable Amber woman (NOT a skinny Amber Girl!) talking on the phone, with all kinds of sentiments for any occasion, and I wanted to call it "Let's Communicate!"  Well Amber did such a fantastic job and she liked the idea of more full-figured sets, so she is calling the series "More to Love!"  I wanted jeans, and just LOOK at that fantastic jeans detailing!! I wanted simple shapes on the purse and clothes so they would be perfect for coloring and paper piecing and LOOK at how great it turned out! I wanted chunky heeled boots because they are a lot of fun to color and so much easier to cut out than the original stiletto open toed pumps (and now with one curved line on each foot I can still have pumps, but that's our secret!) and look at those GREAT boots!  I am SO HAPPY!  The digi set is only $7 and includes this fabulous lady and  a great batch of sentiments and two sizes of empty speech bubbles, so you could easily add your own words!!!

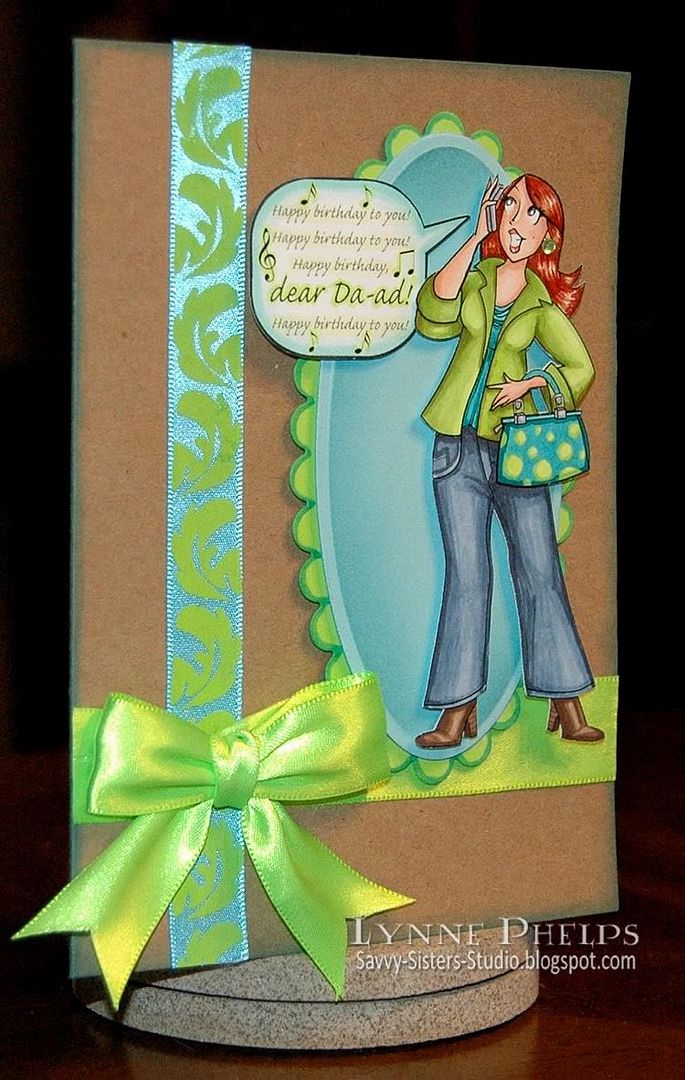
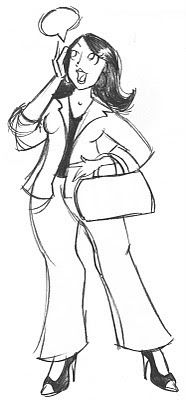
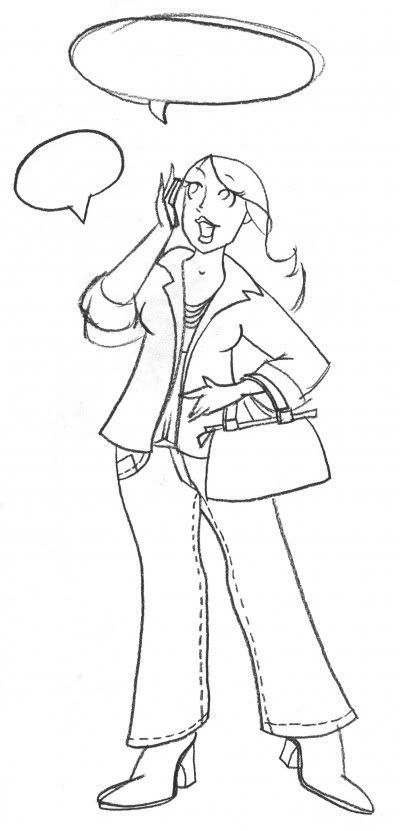
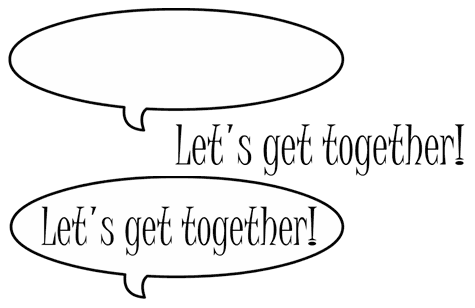
As a bonus in the digi set, the sentiments come both solo and combined with the bubble. >>
I even got to decide on what sentiments include, so I came up with a list sure to work for almost any occasion:
  • Coffee?
  • Howdy!
  • You rock!
  • Shopping?
  • You need anything?
  • I'll be there!
  • Happy Birthday!
  • Let's get together
  • Thanks, you're the best!
  • I've been thinkin' about you!

Now I mentioned paper piecing, and that is not so much fun with digi sets. Not all of Amber INK stamps are available in clear stamps but guess what? YES! More to Love - Let's Communicate is also available in a CLEAR SET for $14!!!!  Yippeeeee!!!
So please go buy this set in either digi or clear right now! I want this set to be a HUGE success for Amber INK, because it is my concept (brought to life by Amber's amazing talent!), and also because I have a plan! I have more ideas for some GREAT stamp sets, so I am going to try to win another challenge so I can do this again!

Let's take a closer look:

Click to enlarge

I colored the girl and the speech bubble with Copic markers and cut them out. It does not show in the photo, but they are popped up high on dimensional foam tape. Kraft card base sponged with Distress Ink in Marmalade around the edges, a piece of dictionary page rimmed with light brown Copic markers, and a bright orange and white striped grosgrain ribbon that I colored with yellow and pink Copics to better match my project. I stitched the ribbon to a strip of card stock and adhered it to the base - it is a LOT easier to adhere the card stock securely than to get the ribbon to stick with normal adhesives. Buttons were colored with Copics to match her jeans, threaded with twine, and stuck on with glue dots! 

You should enter the new challenge also, it is so much fun! I did not win the grand prize for the October Challenge, but my Creeptacular Witch won a prize for the Top Three, so I received a $15 gift certificate to the Amber INK store, how fab is that?

This month's challenge is to make a RAK for someone you don't know (random act of kindness) OR an AK for someone you DO know (act of kindness), use at least one Amber INK product, and tell about who the RAK or AK is for or why you are sending it!  FUN!

So this card is my first AK entry. You can enter more than once, but you can't win more than one prize. It is an Act of Kindness for a friend who has been having a rough time with her health - shingles topped by bursitis, OUCH, and yet she remains unfailingly cheerful and generous with her time and resources. I appreciate the effort she goes to in having get togethers for our little stamping group!

I have entered this card in the following challenges:
Please leave a comment and let me know what you think about my new set and/or my card! Would you like to see more sets in a "More to Love" line by Amber? Let me know!

Saturday, October 16, 2010

Oh, Alice CHAPTER 35: Knock, Knock, Knockin' on Wonderland's Door

Click to enlarge
"Alice laughed so much at this, that she had to run back into the wood for fear of their hearing her; and when she next peeped out the Fish-Footman was gone, and the other was sitting on the ground near the door, staring stupidly up into the sky.

Alice went timidly up to the door, and knocked.

`There's no sort of use in knocking,' said the Footman, `and that for two reasons. First, because I'm on the same side of the door as you are; secondly, because they're making such a noise inside, no one could possibly hear you.' And certainly there was a most extraordinary noise going on within--a constant howling and sneezing, and every now and then a great crash, as if a dish or kettle had been broken to pieces.

`Please, then,' said Alice, `how am I to get in?'
                     ~Chapter 6, Alice's Adventures in Wonderland
Have you ever felt like Alice? Not sure which door, window, or keyhole will be opened or closed next? Not sure which direction you're going but curiouser and curiouser about them all?

What a PERFECT opportunity to explore some new avenues,and walk through new doors we bring you at Oh, Alice! this week. Thats right! Your challenge this week is to create a card or project using a Door, Gate, or Keyhole. Now, you can also get creative and do a gatefold technique, etc. As long as we can see it's a "Gatefold" or that there is a door, gate, or keyhole somewhere on your project! How FUN is this?

The best part? There's no time limit to play this week, so have fun and here's to opening lots of new doors in the future!

My Card:

Click to enlarge

Of course I immediately thought of the original Tenniel illustration of Alice trying to figure out how it get through the tiny locked door into Wonderland!  I printed the illustration on color laser printer paper with a black and white laser - the toner is heat fused to the paper so it is perfect for coloring with Copics!  I then did some creative snipping to allow me to cut it out with a Nestability with her head and skirt extending beyond the die.

Then I glued a piece of heavy aluminum to card stock and die cut and embossed a key and heart-shaped padlock and colored them with Copic markers. I copied the text of this chapter from Lenny's Alice in Wonderland site (this is also where I get my illustrations) and set it with an old-fashioned Garamond font to look like book text. I trimmed it out and sponged the whole thing with Old Paper Distress Ink, with Tea Dye color sponged around the edges. I love this touch as I don't actually have a copy of Alice that I'm willing to sacrifice to the cause, LOL! It makes me happy that the text behind my image is actually describing the scene in the image; you know how I love the little details!

Click to enlarge

I glued the psuedo book text to the red card base. The padlock was attached through a hole pierced in the image and ribbon by splitting the brad legs around the hasp of the padlock, then squeezed back together to go through to the back. The back of the ribbon and image were covered with ATG adhesive, as was the key. Twine was laced through buttons which were then adhered with glue dots. A warm gray marker was used to add some shadows around the different elements on the card.

Of course this image is one of my favorites - I used it on the header for my new blog, The Altered Alice. Stop by and see some great Alice artwork in this virtual art gallery, and grab the blog badge while you are there! We are on a countdown to Halloween between now and the end of October and I have all kinds of artists lined up for your Alice viewing pleasure!

Check out what the rest of the Oh, Alice design team has done with this gatefold-key-keyhole challenge. I hope it will inspire you to enter your own new creation using the link system on Oh, Alice!
I hope you enjoy all of our efforts to inspire you! Please leave me a comment before you hop on to your next blog!  Your comments are what make all the effort worthwhile!

Monday, October 11, 2010

Please VOTE for my Creeptacular Witch!!!

Photobucket
Click to enlarge

Edited to add: This month, you get one vote when you vote for your top pick, not three! Thanks!
I am entering the Amber INK INKredible Challenge, squeaking in just under the deadline! The theme this month is Trick or Treaty, Amber Inky, and my Creeptacular Witch is ready for the big day!  And YOU can help! Please go to the Amber INK challenge blog and VOTE for your favorite, and of course I am hoping that my witch will your top pick! Voting opens tomorrow, Tuesday October 12 and ends on October 14. The winners will be announced on the 20th!

I was totally inspired by this super cool Polka Dot Spider iPaper from Amber INK. Aren't those spiders fun? It was a black and white print until I sponged it with purple, green and orange. I loved the idea that I could make this paper any color I wanted! After sponging, I dotted the shine in their eyes with a white gel pen. I created my own large version of the spider with a ¾ inch circle punch and some twine I colored black. I drew in the eyes with a white gel pen and then added a clear dome of dimensional glue.  In retrospect this would have been a good time to whip out the googly eyes, but you know I don't use them very often and I'd have to find them first, LOL!!!

Then I turned to my favorite Amber INK set of digi stamps: Rainy Day! She is so much fun to color! I drew in some lines to turn her umbrella into a huge spider web, with one creepy spider dangling from the edge, whick I positioned so that they are looking at each other! I also drew in a witch's hat, and arched "Hope your Halloween is" text over the top of the umbrella.  Then I tucked the Happy Pumpkin in at her feet. Is this pumpkin cute or what? I got it while it was a freebie on the Amber INKlings blog, and it will be available for sale Oct. 20th, 2010. You can see her without all these additions on this card.

Photobucket

Next I cut out the "Creeptacular" word I had printed. I colored the strip eggshell with parchment edges and rolled the ends tightly, trying to make it like a little scroll that might have had a spell written on it! I cut out the witch with a fingertip craft knife - love the control this gives - and mounted it with dimensional foam tape on some mega-oval nestabilities. I adhered a strip of insanely bright orange ribbon around the card front - the ends meet under the witch panel.  The ribbon really IS that bright!!!  I tied a little piece of fine twine around the ribbon, knotting it where I intended to stick the center of the bow, pinching the ribbon as it would be if it was actually tied into a bow. Then I made the bow and stuck it on with glue dots. I mounted the witch panel, scroll, and creepy spider with dimensional foam tape and it was done!

So remember to vote! I know I probably won't be lucky enough to win the grand prize again, but if I do, I have plans!!! The winner gets a digi stamp set they design with Amber! I won last month and it is SO MUCH FUN! You can see the process on my posts here and here, and also on the developments page on the challenge blog! My new set, called Let's Communicate, will be unveiled on Oct. 20th and I can't wait for you to see it!  The second and third place winners also get goodies - I think they win a gift certificate to Amber's shop. That would be fab too because I've gotta tell you, I have this LIST!

Please think about entering next month's challenge, which starts Oct. 20th. You have to use at least one Amber INK item, but as long as you have that, you CAN use other stamps.  iPaper would be a GREAT way to start, it is only $1 and there are so many great designs! I love all the fall plaids and the cute gingham released last month.

In addition to the Amber INK challenge, I have also entered this in
Please VOTE for for your top pick on the Amber INK INKredible Challenge Blog during the voting period, Oct. 12-14. Thanks for your support!!!  And please leave me a comment to let me know how you like my witch, or that you voted!  THANKS!

Saturday, October 9, 2010

Oh, Alice! CHAPTER 34: A Mad Tea Party - It's Always Time for Tea!

Click to enlarge
`And ever since that,' the Hatter went on in a mournful tone, `he won't do a thing I ask! It's always six o'clock now.'

A bright idea came into Alice's head. `Is that the reason so many tea-things are put out here?' she asked.

`Yes, that's it,' said the Hatter with a sigh: `it's always tea-time, and we've no time to wash the things between whiles.'

`Then you keep moving round, I suppose?' said Alice.

`Exactly so,' said the Hatter: `as the things get used up.'

`But what happens when you come to the beginning again?' Alice ventured to ask.


                   ~Chapter 7, Alice's Adventures in Wonderland
Can you believe summer is fairly over? It's time to change from iced teas over to hot teas. I love autumn and all the wonderful warm drinks, wonderful sweaters and gorgeous colors it brings. In Wonderland, it was perpetually tea time and I could live that life for a long, long time!

Your challenge this week is to explore things that could make up your tea-time activity. Use tea bag folding in the construction of your project. This is a great resource: Tea Bag Folding (not only do they show the folds, but you can also print tiles at your specified size and color). Anything relating to time would pair perfectly with this challenge, but isn't a requirement! Show us your fab folding abilities, doing it Alice-style!

My Card

I thought this image of the Mad Hatter proclaiming during the Mad Tea Party scene was perfect for today's chapter! I had a good bit of fun coloring him in with Copics after printing him on color laser printer paper on my black and white laser. I glue-sticked it to white card, trimmed the panel and edged it with Walnut Stain Distress Ink.  I adhered it with mounting foam to a burgundy panel, also edged with Walnut. Then I ran the green layer though the Cuttlebug with a textured embossing folder, edged with Walnut and lightly brushed Walnut over the high points of the embossing to accentuate the relief.  I tied some brown and white gingham ribbon around the base of the panel and tied it into a knot.


For the teabag folding, I chose to make a half- medallion using four 1¾-inch circles folded in the Dahlia fold. You can see a dahlia fold tutorial on Splitcoaststampers. The stripe was a little tricky to work with as I had to be sure the scallops lined up to the stripes exactly the same way each time I punched, but I love the effect it gives as it creates chevrons where the pieces meet!  I mounted the four pieces to a circle I had cut out and covered with adesive. The panel had been folding in half in both directions, so the quadrants where clearly marked with the score lines. Then I just had to make sure that each two pieces filled a quarter of the circle. The whole circle had been covered with adhesive and the four dahlia pieces were only covering up half, so the other half of the circle is what is sticking it to the textured green panel. The whole thing was mounted with pop dots onto the base.

Click to enlarge

The base is an odd shape - The same width as an A4 but longer. The front was scored each half inch, then Walnut was brushed around the edges and across the raised scored lines.  I love the look this gives, like clapboards on the side of a building. It makes the whole Mad Hatter panel with the fan above look kind of like an old-fashioned sign, which is the look I was going for.

I have been really inspired by design team-mate Tasha's use of single word stickers to make up the sentiments on her fabulous cards! The sentiment was computer generated, colored eggshell with Copics and a bit darker on the letters, then each word was trimmed closely and sponged round the edges with green Peeled Paint Distress Ink. These were mounted deliberately askew on the scored base using foam mounting tape..

Now, here's what the Twisted Thirteen have to inspire you!
Now for some more personal news! Have you noticed that new blog badge in the right column? I'll be making a more formal post about it later, but I couldn't wait to tell about my newest blog, The Altered Alice! On our beloved Oh, Alice!, the challenges come FROM Alice in Wonderland and Through the Looking Glass. On The Altered Alice, the artwork must FEATURE some aspect of Alice in Wonderland, and it is not a challenge blog but rather an online art gallery of Alice in Wonderland pieces! 

There is so much GREAT Alice artwork out there, but it can be hard to find again as you are going from blog to blog. I wanted to make a place where I could showcase great Alice artwork by various artists, and also to centralize the links into a big virtual art exhibit! I have already had a GREAT reception in less than a week of being live. I have some AMAZING Alice projects by several wonderful artists and lots more is on the way!  I hope you will visit and be inspired!  Several of the artists have played in the Oh, Alice challenges before, and more Oh, Alice! players will be featured soon.  Please take a look, it is a labor of love and I hope you will enjoy it!

Please leave me a comment, they mean the world to me! I'd love to hear what your thoughts are on tea bag folding, my card, mad tea parties, drinking hot tea (I'm a PG Tips addict!), and The Altered Alice! 

Stamps: Free alice digi from Lenny's Alice in Wonderland site, computer generated sentiment.
Ink: Copic - Sketch markers; Ranger Distress Ink - Walnut Stain, Peeled Paint.
Paper: Stampin' Up! - Soft Suede, Burgundy (available through my sister and on sale through October!!!), Papertrey Ink - Spring Moss; unknown double-sided striped paper.
Miscellaneous: Gingham brown & white ribbon
Tools: 2-inch scallop circle punch; Stampin' Up! - Square Lattice embossng folder (available through my sister!!!); Ranger - Inksentials Blending Tool and foam pads.

Thursday, October 7, 2010

Stamped, Embossed, and Sponged Background Paper Technique!

I have a tendency to hoard patterned paper; after all, if I use it, I won't HAVE it anymore, now will I? So I really love stamping my backgrounds as I can endlessly recreate the pattern, or create endless variations of the design!

My dear little sister Janet (see how cute she is in the left sidebar!!!) has just started a Stampin' Up! business, which you can see at her nifty new blog, And She's Still Stamping. To celebrate the "grand opening" she is offering 15% on all solid colored cardstock, ink, and markers. Basically, if it is in the Shop by Color section, it's on sale.  Click here to see the Sale details!

To celebrate the special, I thought I would do some stuff with cardstock and ink, and I have had this design in mind since I first saw the fabulous Artistic Etchings stamp set.  Once I had my sheet fully stamped and clear embossed on kraft (Crumb Cake) card stock, I sponged part of it in rich deep Christmas colors and the other part just highlighted with white for a lacy look . Go to And She's Still Stamping for the details!

SU

I really love Stampin' Up!'s cardstock. I think they have one of the most sophisticated color palettes out there, and the perfectly matching inks and markers are so cool!  I have a big wish list - I know I *need* Cherry Cobbler, which is such a fabulous rich red for Christmas!  I LOVE the new Cajun Craze, which is a wonderful paprika color! They brought back River Rock, Pink Pirrouette and Baja Breeze and I'm pretty happy about that too. And Concord Crush is the most amazing deep violet-blue, a really imperial purple!  They also have the most inexpensive re-inkers in the business, so I have all the new color family ink spots (love those little ink pad cubes) and refills on my wish list as well. The ink spots are a really inexpensive way to get a ton of colors at a great price.

SU
2010 In Colors
SU
Well, I am sure hoping some of you need to stock up on paper and ink with the Christmas card-making season looming ahead! We live in a very small town, so  we are hoping to get Janet's SU business launched through the internet with the Grand Opening Sale.

Wednesday, October 6, 2010

Amber INK - Happy Pumpkin Freebie and Progress on my Stamp Set!!!

Whoo hoo! Amber has released a darling Happy Pumpkin digi that is free for 24 hours, so you had better grab this cutie NOW!  Go to her blog, Amber Inklings, to read all about it right now! Tick tock, tick tock, that pumpkin won't be free for long!

Then, once you have this Happy Pumpkin, you can use it to enter the Amber INK INKredible 21 Day Challenge!  The theme this month is "Trick or Treaty Amber Inky" and you have until Oct. 11th to get your project submitted! Remember, I won the last challenge and the grand prize was a stamp set designed to my specifications, and the other two of the top three winners get a prize too!

Speaking of MY STAMP SET (I just LOVE being able to say that, LOL!) Amber has made great progress! If you go back to my original post about this, you will see that Amber gave me three "proof of concept" drawings of my full-figured girl in a set I wanted to call "Let's Communicate!"

Although I had originally thought I wanted her texting, the drawing I just fell in love with was the girl talking on the phone! Changes from the first drawing include more jeans/khakis detailng, details on her FAB purse, and great chunky heeled boots! The original set had her in some snazzy open-toed high heels but I asked for boots and Amber delivered! She comes with a large and a small speech bubble, and I have a list of FUN sentiments that will fit in the bubbles!!!

Original concept sketch ( left) and tweaked sketch (right).
Amber INK        Amber INK

Go to Amber's developments page to see them full sized!  The set will be available Oct. 20th and I hope that you will love her as much as I do!!!

Saturday, October 2, 2010

Oh, Alice! CHAPTER 33:DICTIONARY of Nonsense

Alice in Wonderland
Click to enlarge
Alice didn't dare to argue the point, but went on: `-- and I thought I'd try and find my way to the top of that hill -- ' `
When you say "hill,"' the Queen interrupted, `I could show you hills, in comparison with which you'd call that a valley.'
`No, I shouldn't,' said Alice, surprised into contradicting her at last: `a hill can't be a valley, you know. That would be nonsense -- '
The Red Queen shook her head, `You may call it "nonsense" if you like,' she said, ` but I've heard nonsense, compared with which that would be as sensible as a dictionary!' --
                             -- Ch. 2: Through the Looking Glass
Greetings from Wonderland! Before we commence this week's challenge, LOTS of tea-toasting to our FABULOUS new October Guest at Tea: DONNA BUDZYNSKI! Donna's amazing work caught our eye a while back and we are thrilled to have her joining us! A VERY MERRY unbirthday to you, Donna! WELCOME!

This week I am challenging you to use TEXT in a NONSENSE way - not to read, but as a pattern in your card. Use a page from an old dictionary or other book, stamp a background text stamp or use a text-patterned paper in your creation. Link up your NEW CREATIONS and the design team will stop by to do some CREATIVE READING as we look at your entries this week!

The Greeting Farm is our SPONSOR this week, and not only are we thrilled to have them again, the prize just got sweeter! There is a RUBBER SINGLE OF CHOICE up for grabs for this challenge AS WELL as the highly-sought after "Wonderland" digital stamp set!

My Card:

Photobucket
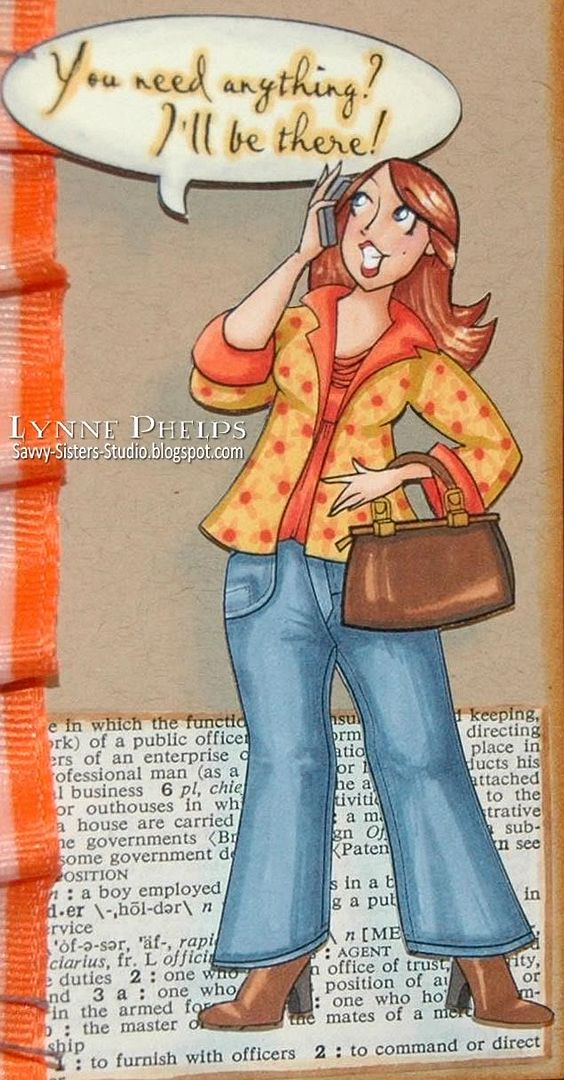
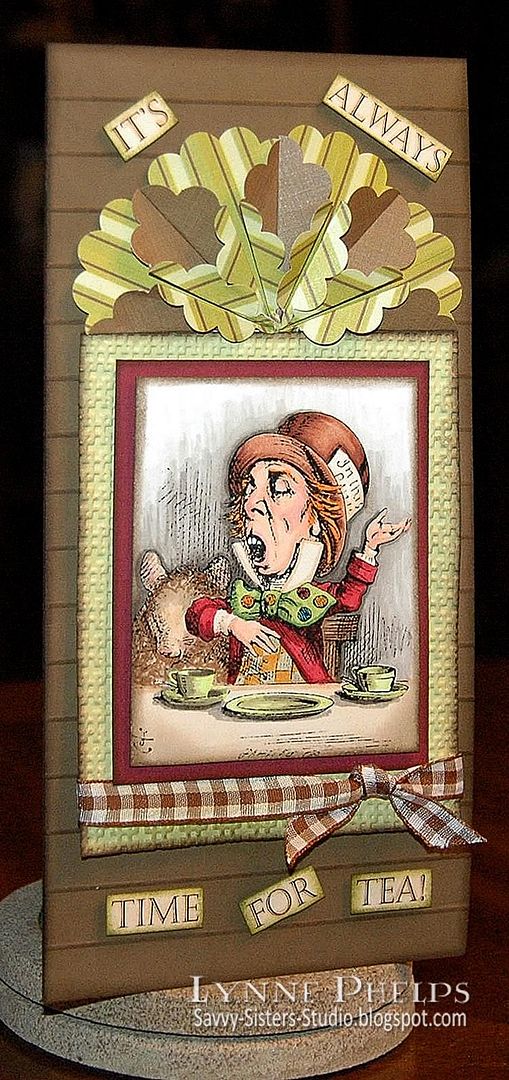
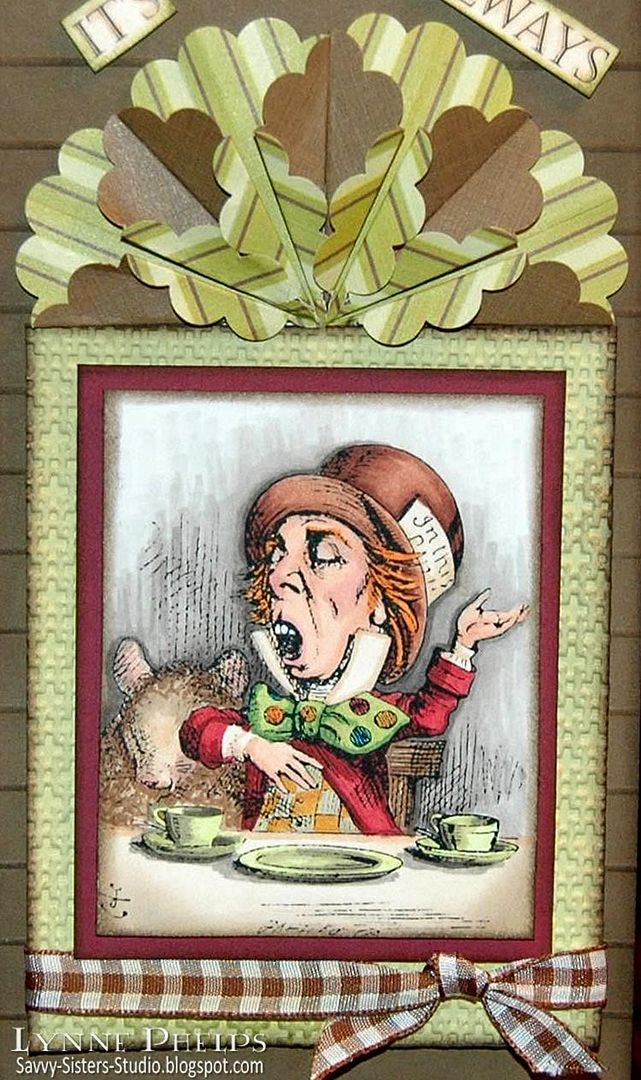
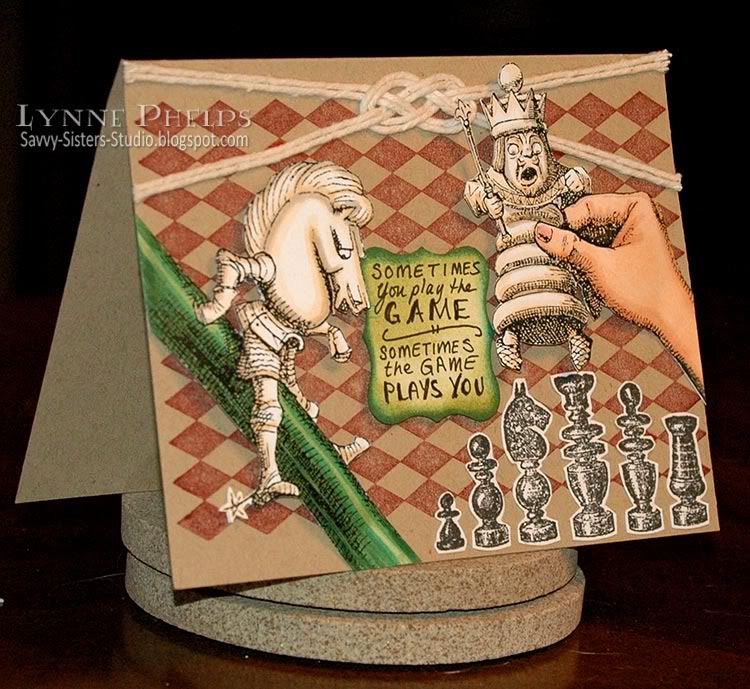
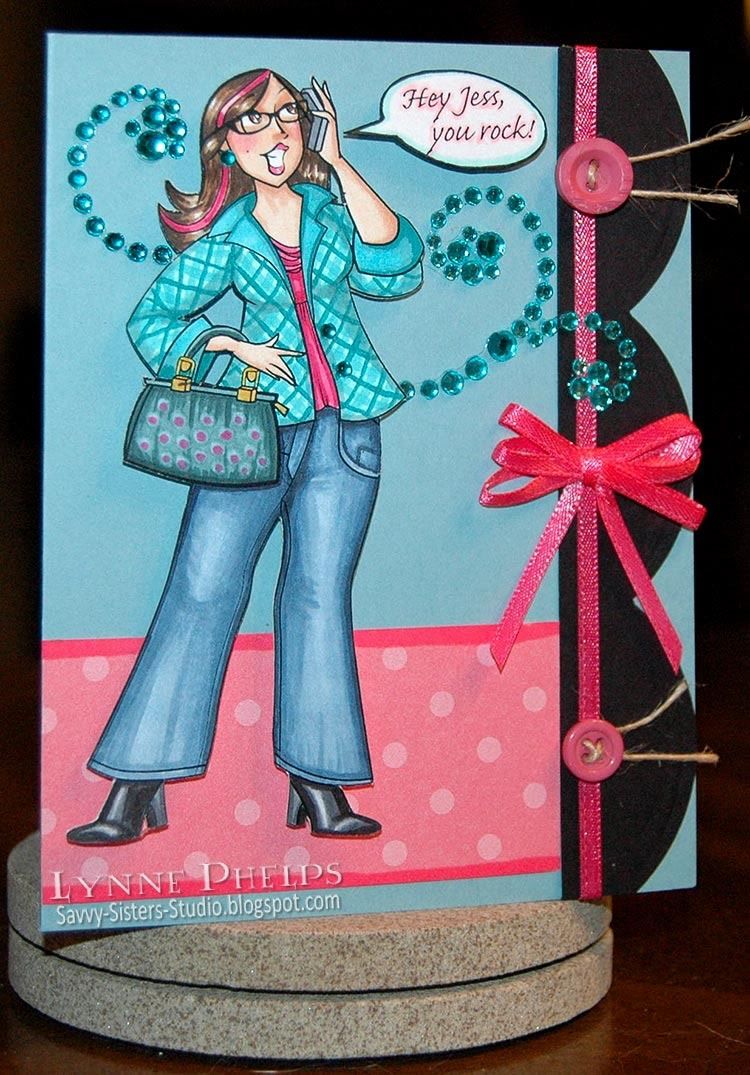
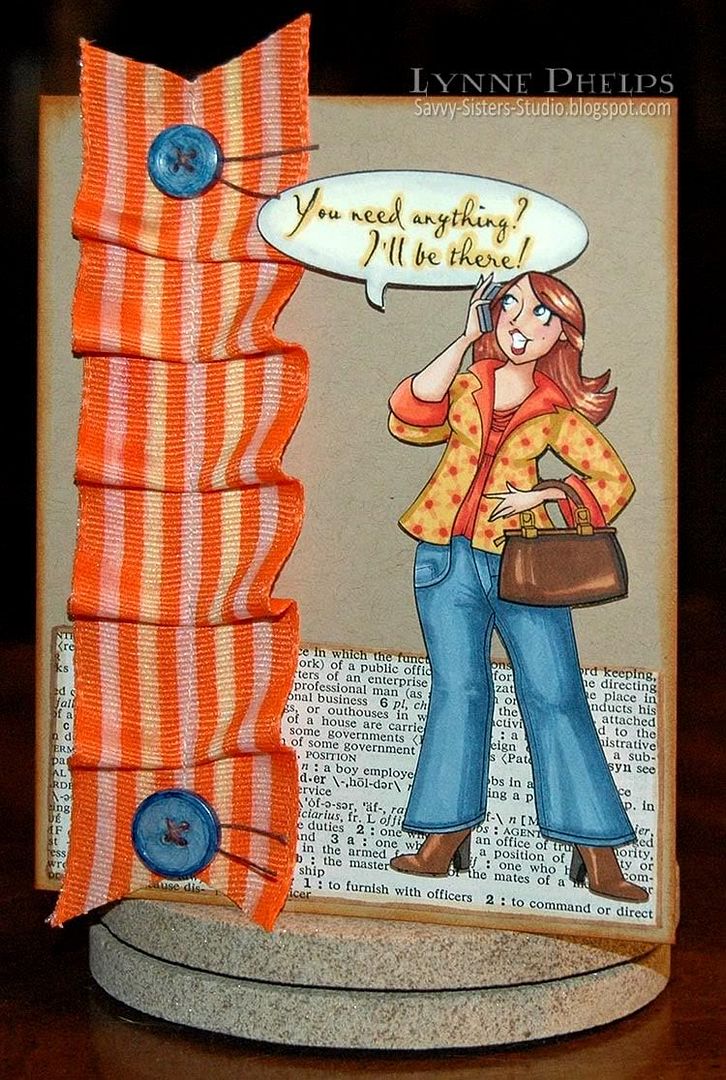
Happy World Card Making Day! I am going out for crafty shopping and brunch with a stamping friend, followed by playtime in her stamp room! Hope you have some stamp-related plans too! I also hope you are enjoying our nonsense text, because this is the very first challenge that I've framed for Oh, Alice!  I was thrilled when our Mad Hatter, Jess, asked for input from the design team and even more excited when she accepted this challenge for the blog!  I am showing off the wonderful Wonderland digi stamp set that is part of this week's prize. The only stamp in the set that I didn't use was the mushrooms, just couldn't figure out how to wedge them into my usual kitchen sink style!

Alice in Wonderland
Click to enlarge

I adhered a dictionary page to a piece of white card using a gluestick. I like gluesticks for this application as it does not wrinkle the paper. I put the gluestick on the card and then smooth on the thin paper, then I run over it with a brayer and some pressure to ensure that I have a good bond. I punched my scallop border and sponged around the edges with, of course, Tea Dye Distress Ink! 

I printed the images onto color laser printer paper using my black and white laser printer. In keeping with our "text as pattern" theme, I did a little bit of editing to put text into the Mad Hatter's hat, Alice's apron, and the White Rabbit's ears.  If you look very closely you will see that the text in each case refers to the character it is on. What can I say; I am easily amused and these little details make me happy! I colored each character with Copic markers, adhered them to white card and trimed them closely with a fine sharp scissors. I also colored the row of cups I had created, adding shadows and coloring the background an eggshell color to match the dictionary paper.

I trimmed the row of teacups and sponged the edges with Tea Dye.  I sponged Tea Dye around the edges of the card base, but it needed something - it looked too flat. I stamped a large flourish with Versamark Champagne Dazzle and it was just the touch I needed. I mounted the teacups and scallops with foam mounting tape. I tied the brown gingham ribbon around and tied a knot.  Hmmm. Everything was too horizontal. I added a vertical strip of ribbon which really helped, not only be added a vertical element but it also served to connect the teacups and scallops.  I arranged my characters this way and that but there was no room for my "Time for Tea" sentiment that I had generated on the computer, no matter how closely I trimmed it. Then I had a brainwave and trimmed each word very closely and adhered one word in the center of each scallop. Perfect! I adhered the three characters with thick mounting foam squares. It still needed something. I added a punched strip of green card stock, sponged with Tea Dye, to the very top of the card. Now it is finished!

Check out what kind of nonsense the rest of the Twisted Tea Party has created for you!
Nonsense you say? Believe it! You have through Friday, October 8th at 8pm CST to enter to WIN the above prizes by linking your card at Oh, Alice! We'll announce our lucky winner on Saturday, October 9th along with the next challenge.  Good luck to all who enter our little Challenge here in Wonderland!

Please leave a comment - I'd love to hear what you think about my card and about the challenge! Your comments are what make blogging worthwhile and it makes my day everytime a new one arrives! Thanks so much for visiting!

Stamps: The Greeting Farm - Wonderland digi set; Hero Arts - large flourish stamp.
Paper: Stampin' Up! - Mellow Moss card stock; Georgia Pacific - white card stock; HP - color laser printer paper.
Ink: Copic - Sketch markers; Ranger Distress Ink: Tea Dye; Versamark Dazzle - Champagne.
Miscellaneous: Ribbon.
Tools: EK Success - scallop border, pinking hearts border punches.
Related Posts with Thumbnails