Sunday, February 27, 2011

Altered Alice Chapter 1: One side makes you smaller, and one side makes you tall!

This is my final bit of inspiration for The Altered Alice Chapter 1 challenge! You can see more design team inspiration and the winner and honorable mentions here.  I hope you will leave a comment there for the design team, and one here for me!

I was really intrigued by the idea of putting the classic Tenniel Caterpillar on top of the Stampotique Giant Shroom! I used the free digi images from Lenny's Alice in Wonderland site and carefully edited away everything except the caterpillar, hookah and smoke. I printed this on a B&W laser printer (best for Copic coloring) near the top of a piece of HP color laser printer paper. It is thicker and much smoother than regular laser printer paper and colors beautifully with Copics, and at a fraction of the cost of Copic-friendly card stock. After I colored the caterpillar image, I carefully went over the entire colored area with a Versamarker and heat embossed it with clear detail powder.  This effectively masked the image, so it would resist the ink when I stamped the Giant Shroom in black Memento ink.

Tim Holtz Idea-Ology Mask Sheets, 2-PackI use these mushrooms together so often that I have created masks for them out of Tim Holtz Idea-ology Mask Sheets. I by far prefer this masking material to any other. The sheets are the same super tough film that his precut image masks are made of, and unlike other brands of masking material it is very resistant to tearing. I know I will be using these mushrooms again and again so it was worth making some sturdy masks.

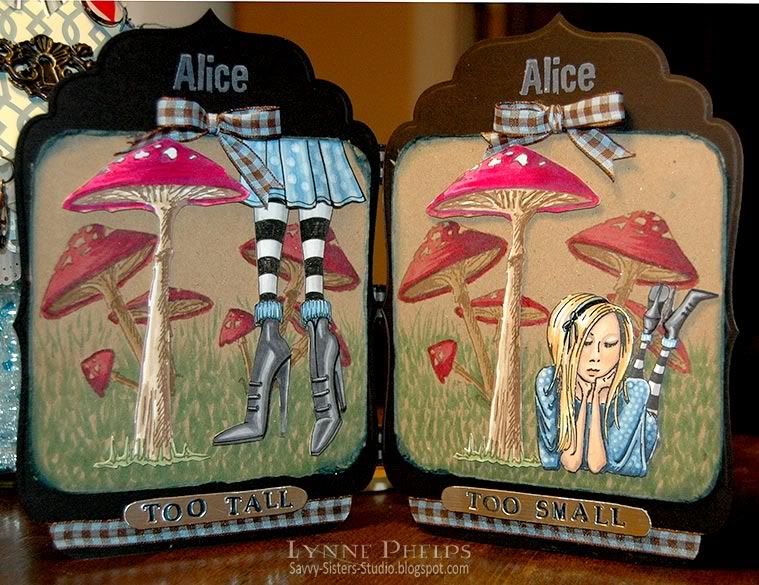
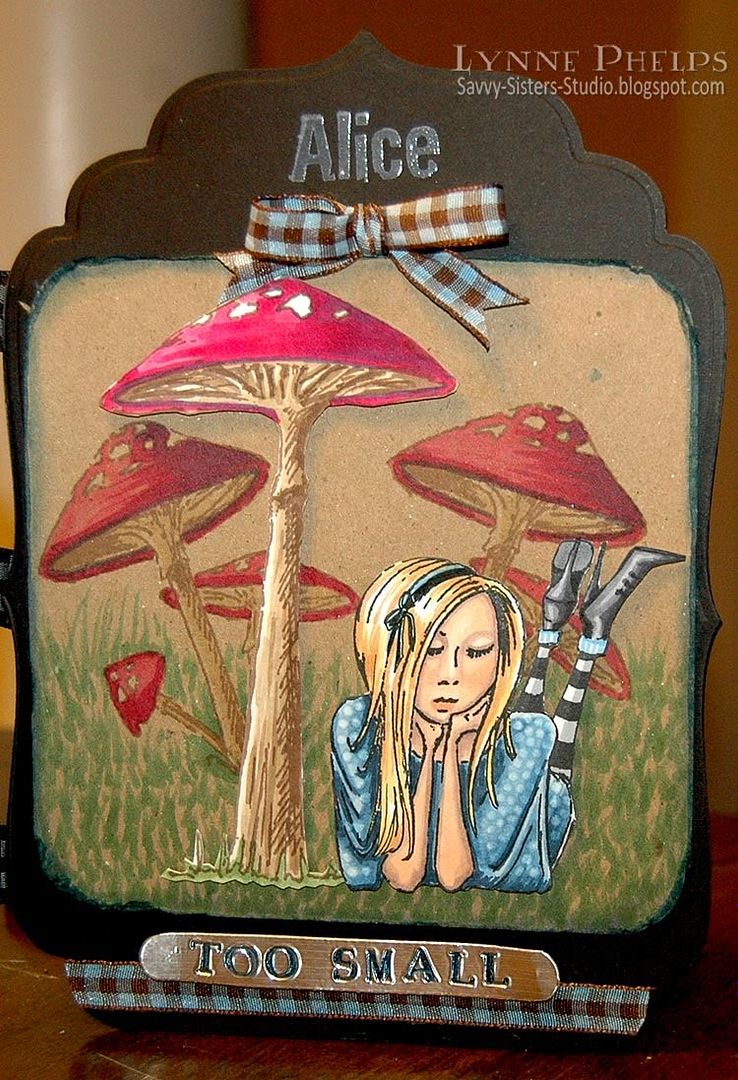
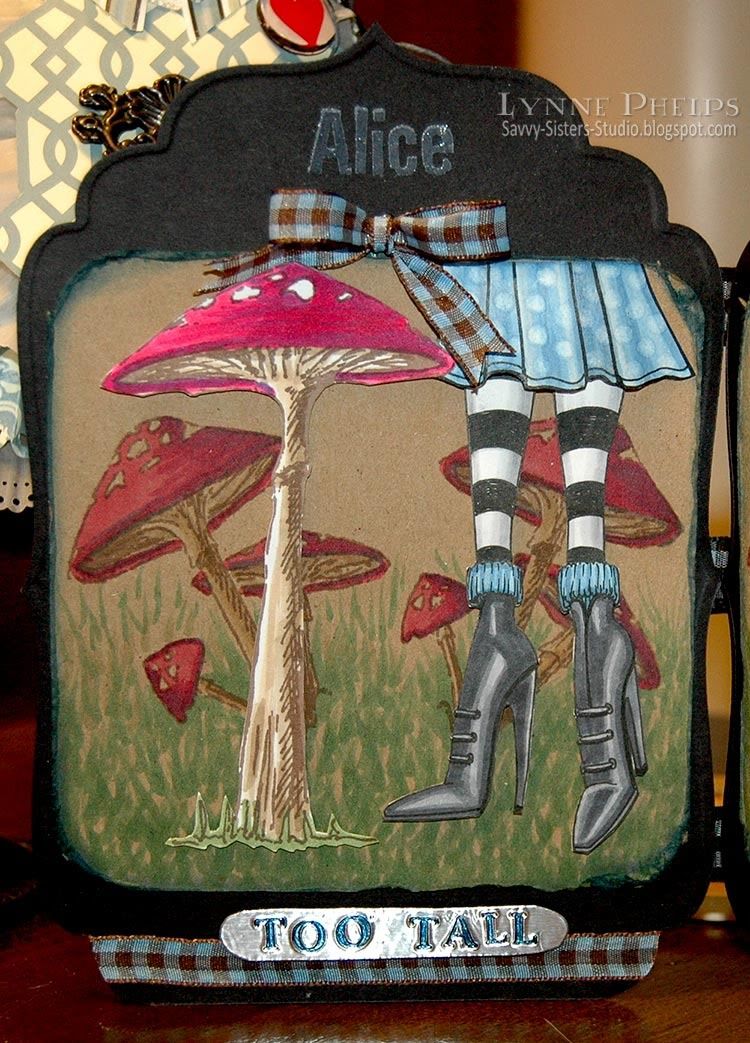
This allowed me to easily put two of the Stampotique Mushroom Group behind the Giant Shroom. I wanted to give it some depth, so I stamped them in London Fog gray Memento, which makes the black-stamped Giant Shroom to seem much closer. I colored them with Copics, added some grass, moving to lighter colors as I moved up the page which also adds to the illusion of depth. I cut out the panel, edged it in green Copic, and let the smoke drift out beyond the box. I love the energy it gives to a composition when you let things break out of their boundaries!

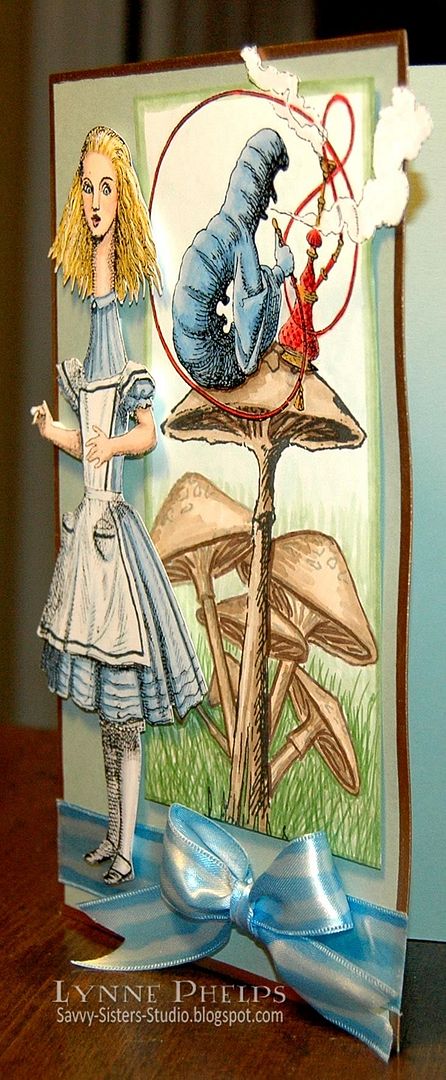
I used a free program called SmillaEnlarger to pump up the resolution in the tall Alice image. It would have printed with jaggy pixels showing if I had not enlarged it first. I carefully erased everything except the Alice figure and removed a lot of the sketchy shading on her face. I colored her in with Copics. Then I used a glue stick to adhere both colored images to card stock and cut them out. The card based was edged with a pale gold Krylon leafing pen. Then I used 1/16 inch thick foam mounting tape to pop-up the caterpillar image. The Alice image is popped up higher on 1/8 inch thick mounting foam after I adhered the ribbon with Alene's Fast Grab Tacky Glue. This glue works perfectly with ribbon as it does not saturate through the ribbon at all and holds on like iron! I added the fun stripes on the ribbon with a Copic marker. It actually matches the dress very closely, but the camera picks up the shiny surface differently than the colored matte paper.

This is a large card. The base is 5 inches wide and it is 8.5 inches tall. This means it is 5 1/2 inches wide with the smoke and her hand extending, so it will still fit in a standard greeting sized envelope!

Thanks SO MUCH to Carol at Stampotique Originals for supplying me with the two mushroom stamps for this challenge, in addition to the generous prize for the challenge winner! Remember to go to this post to see who won the $30 Stampotique gift certificate!

Please leave me a comment, I would love to know what you think about my card!

Sunday, February 20, 2011

The Altered Alice CHAPTER 1 - Week 4: Too Tall or Too Small!


We are in the final week of the February challenge at The Altered Alice, so be sure to submit your projects before 8:00 p.m. EST (GMT -5:00).  I will announce the winner of the drawing for a $30 gift certificate from Stampotique Originals, our generous sponsor! While it is not required that your creation use Alice in Wonderland, we do encourage it! Entries that feature some aspect of Wonderland will have their name put into the drawing twice.

Carol of Stampotique very kindly supplied the design team with some free stamps to show off! I chose mushrooms and my friend and fellow design team member, Terri DeVine, chose Jasmin. I love the Jasmin character and thought she would make an awesome modern day Alice, so I used Terri's stamp at our weekly stamping get together!  Actually the first thing I thought was "check out those SHOES!!!"  I thought it would be a lot of fun to make one scene with the mushrooms where the Jasmin Alice was so small that she was lounging in the shade of a mushroom, and another with those fab shoes at a large scale so you would know she was now huge! I love to draw, so I drew some shoes and legs!

I made the "Too Small" version first. Take a look:


Zutter Distrezz-It-All 7608On white card stock, I stamped the Giant Shroom with brown Memento ink and Jasmin in black. Both were colored with Copics, and the polka dots on her dress were made with the colorless blender. I used a Copic Mulitliner to add a hair ribbon to make her a bit more Alice-y! I wanted to create a sense of depth, so I made the background more muted by stamping the Mushroom group onto kraft card stock. They were  colored with Copics and the grass was created with flicking motions of the marker. The Giant Mushroom and Jasmin were mounted with foam tape to give some dimension. I love how they look closer because they were stamped on white, so the colors are much clearer and stronger.  I distressed the edges with my newest toy, the Zutter Distrezz-It-All! I love how easy it is to tatter the edges, which I then sponged with ink.


Now, aren't those insanely high-heeled boots even more fun when they are big? I drew the boots and stockings with a black Copic Multiliner pen and colored them in with Copics, using my favority "shiny shoes" shading technique, and cut them out. When I mounted them on the kraft background, it did not look right having the legs showing all the way to the top of the panel, so I drew a skirt. I colored it with Copics and used the colorless blender to move the ink to make polka dots, making sure to make the dots themselves much larger in scale than the "too small" version. I put foam tape in the center of the skirt to pop it out more over the legs, but glued down the top and left and right edges of the skirt flush with the page, which looks so neat as the skirt bells out over the legs!

Spellbinders Grand Nestabilities Grand Labels Four Die TemplatesI decided a little tabletop bi-fold would be a fun way to present these. I had orginally thought to make them into two separate cards but they really belong together! I cut the second from the largest Grand Label Four nestie on my Cuttlebug using black card stock, trimming the lower point off to make a straight bottom edge. I purchased the extended 13-inch long plates online when they were on sale, so I can cut all but the largest die in this set on my Cuttlebug. I don't have the Grand Calibur. I have been longing for an electric Vagabond die cutting machine, but then they came out with the oversized Grand Calibur and I love that large platform.  So now my dream machine would be a Grand Vagabond!!!  The Grand Calibur fits the new Grand nesties but it will not accomodate the Sizzix Bigz dies. The Vagabond fits the Bigz but it won't cut a Grand nestie larger than what I can already do with my Cuttlebug! What to do? I can't afford both, nor do I have the space for two machines!


I wanted some labels saying "Too Tall" and "Too Small" so I adhered aluminum HVAC tape to card stock and used a Karen Foster Click-It tool with the add on Alphabet dies. I colored in the depression of each letter with a blue Copic marker and trimmed them out by hand. They were mounted with foam tape over a ribbon I had glued to the black base. The kraft panel was glued on, and the panels were hinged together with strips of gingham ribbon and more glue. It still needed something, so I stamped the "Alice" at the top of each panel with white pigment ink and embossed it with clear powder. This worked out just as I had hoped - the clear powder softened the bright white of the pigment so it is there, but not attention stealing. A bow was glued on to match the brown and white gingham at the bottom; both were colored with a blue Copic marker to change the color.

I hope you enjoyed my funny bi-fold display!  Please leave a comment, I love hearing from you and your comments make it all worthwhile. Go to this post to see the amazing creations from the rest of the design team during the final week of the February challenge, and be sure to get your own creations linked by Friday!

Monday, February 14, 2011

March is The Octopode Factory Month!

I am thrilled to announce that The Octopode Factory, the slightly mad brainchild of 17 year old artist Lily Chilvers, is going to be the March Sponsor on The Altered Alice!

Lily is on a drive for followers of her Octopode Factory blog! To sweeten the deal, she has a wonderful giveaway which includes a bunch of her new rubber stamps! That's right - RUBBER STAMPS! The Octopode Factory will have both digital stamps AND rubber stamps on some of her most popular images.

Sign up BEFORE February 18th at midnight, UK time, which is Eastern Standard Time + 5 hours. So Lily's midnight is my 7 p.m. 
And stay tuned for Octopode March on The Altered Alice!!!!

Sunday, February 13, 2011

More Inspiration from The Altered Alice

Most of you know that I am the "Mad Hatter" of The Altered Alice design team! The challenges now run on a monthly cycle with weekly doses of design team inspiration.

Please check out week two and week three for lots of fabulous Alice inspiration from the talented design team, and I'll be back next week with some Stampotique creations of my own!

Remember that you have until 8 p.m. EST (GMT - 5) on Friday, February 25th to enter your Chapter 1 Challenge creation on The Altered Alice! The February challenge is to make something featuring a dress form or something that changes in form. 

Entering puts your name in the hat for a generous $30 gift certificate from Stampotique Originals, our February sponsor. While it is not required that you use Alice in Wonderland in your creations, we do encourage it, so submissions that feature some aspect of Wonderland get their name put in the hat twice!

Come play along with The Altered Alice!
Related Posts with Thumbnails