 Today is the big day for Amber INK - the August Release stamps will be in the store today. Most are available as both digital or clear stamps, so there is something to please everybody! The Baby Mermaid sets from last month and this month play well together, so just think of all the fun scenes you could make!
 But the big news is that Amber and Pam have started a new challenge blog, and in keeping with our back to school focus, the theme for the first challenge is BOOKS! There will be prizes as Amber INK is a built in sponsor! And, typically, this is not your average challenge blog!! How is it different?
AmberINK's INKredible 21 Day Challenge...
- You will have three weeks (21 days) to enter your project(s)
- When submissions are closed, you have three days VOTE on the three you like the best!
- The design team will pick a winner from the top three that YOU have selected!
- Everyone can play, the only requirement is that you MUST use at least one Amber INK product. If you don't have any products (and why don't you? They're adorable!) check Amber's store, some images and the iPaper are $1 or less so you can totally do this!
- Check it out at http://amberinkchallenges.blogspot.com/
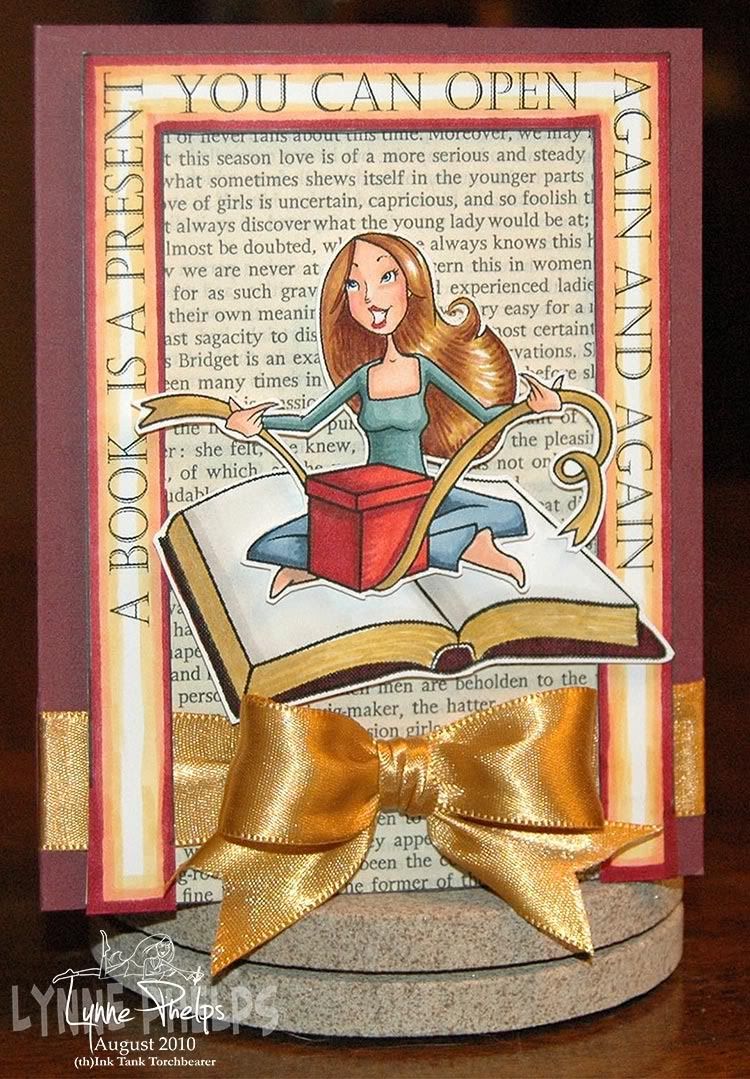
So, with all that, here is my entry:
I hope you will vote for me, after you have voted for your own entry of course!
 See, won't this be FUN? Like a mini stamping royalty contest each month!
I made an 8 x 10.5 inch 300 dpi document in my photo editor. I found some free clip art of an open book and modified it a bit, then I copied it into my file. Then I set the text in a square and copied in this wonderful Amber INK "Amber Girl" image from "You're the Perfect Package" digi set. So in my file, I had all three elements but they were separate on the page. I printed in on my black and white laser printer on color laser printer paper. I colored in the book and the girl with Copic markers.
I decide to draw some bounding lines around the text with a 0.5 Multiliner, then I drew in bands of color to highlight the text. I thoroughly glue-sticked the back of each element and I adhered the whole page to a piece of white card stock, then I cut out each item.
I took a page from a book (purchased specifically for this purpose at a Friends of the Library book sale, where I also buy stacks of old dictionaries), trimmed it down and used foam mounting tape to adhere my "U" of text over it like a frame, except that I left the bottom 1.5 inches open on each side to allow me to add the ribbon later. Then I used thicker mounting squares to adhere the book and added the girl last. When I set the text, I made sure to add an extra space so there would be room for the end of her ribbon at the left, so it wouldn't cover up any words.
Almost done! I cut a slit in the fold of the card to pass my gold double-faced satin ribbon through. The two ends are adhered underneath one of the text bands, so it looks nice inside the card too. I tied the bow separately using a Bow-Easy. I'm a perfectionist, so I used some fine twine to tie around the ribbon to pinch it in the center, then I stuck on the bow with Fast-Grab Tacky Glue, which is what Sharon Johnson recommends for adhering ribbon. It is thick enough that it does not soak through and show on the front of the ribbon. All done!
I love to read and I love books, so this is one of my favorite cards! Perfect to use for a book store gift card, I think! Submit your own book-inspired project (and vote for me and you!
 ) on AmberINK's INKredible 21 day challenge! And be sure to go to Amber INK to see the new August releases!
Be sure to check out the other August torch-bearers creations!
- Lisa Coe
- Tanis Palmer
- Lynne Phelps (me!)
- Wendy Price
- Thanh Vo






.jpeg)







Your card is absolutely beautiful.. puts my little project to shame !cant wait to see the entries .. but will have a problem choosing my favourites i just know it.. wouldn't be any good on Simon Cowells judging panel lol!
ReplyDeletehave a great day
Lisa ;)
Gorgeous coloring. LOVE your card!
ReplyDeleteHugs and smiles
Your card is really lovely - our librarian would love your sentiment! Thanks for playing with us at Stampin' Royalty.
ReplyDelete