Tuesday, December 21, 2010

Oh Alice! CHAPTER 44: Curioser and Curioser - Winter Wonderland!

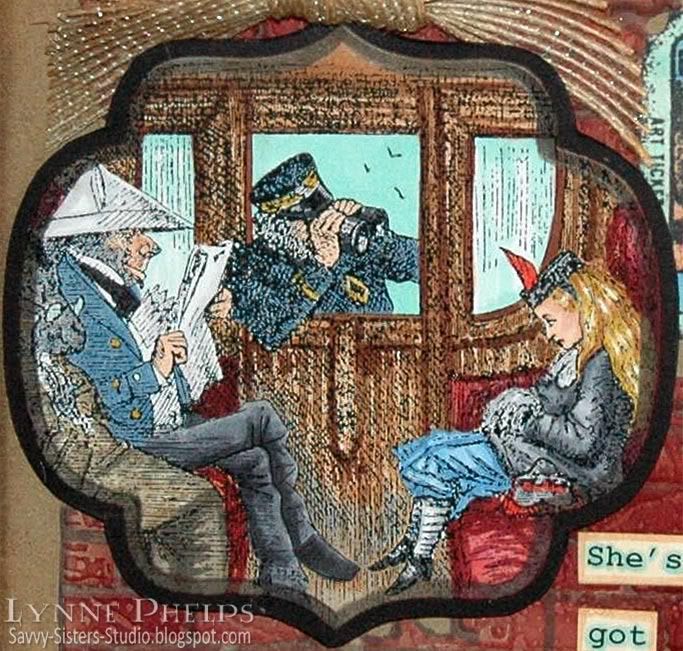
Click to enlarge;  Collage stamp © Stampin' Up!

`Curiouser and curiouser!' cried Alice (she was so much surprised, that for the moment she quite forgot how to speak good English); `now I'm opening out like the largest telescope that ever was! Good-bye, feet!' (for when she looked down at her feet, they seemed to be almost out of sight, they were getting so far off). `Oh, my poor little feet, I wonder who will put on your shoes and stockings for you now, dears? I'm sure _I_ shan't be able! I shall be a great deal too far off to trouble myself about you: you must manage the best way you can; --but I must be kind to them,' thought Alice, `or perhaps they won't walk the way I want to go! Let me see: I'll give them a new pair of boots every Christmas.'
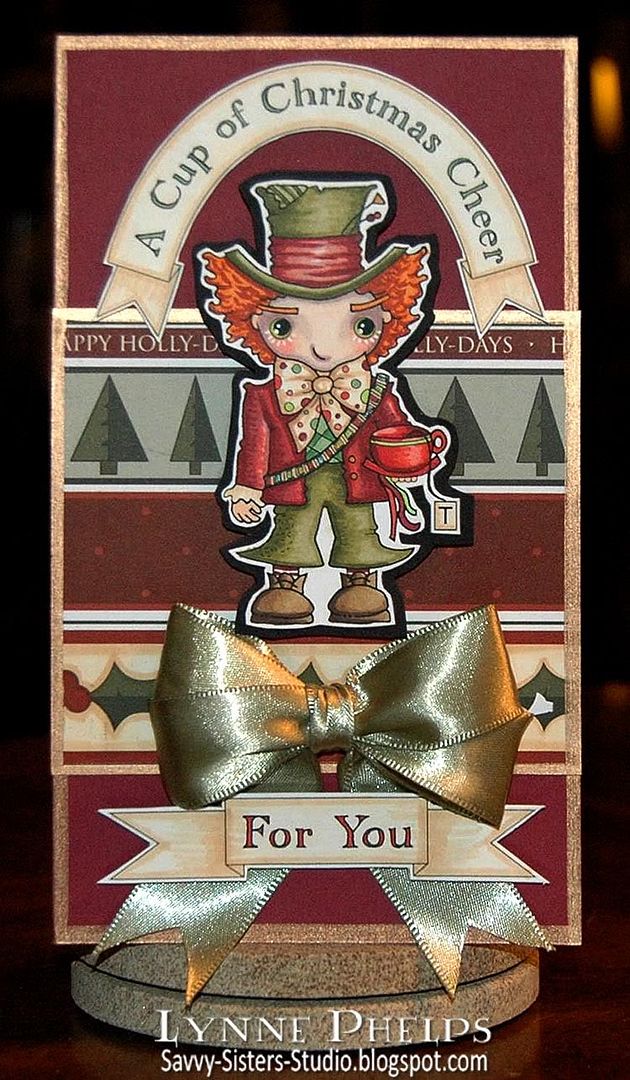
Hello from all of us here in Wonderland! This week we are Curiouser and curiouser to see if you are willing to play along with our weekly challenge. The challenge is a simple one, and one that most of us should be able to play along with, we would like to take Wonderland and turn it into a Winter Wonderland! Yes, that's right.....put your boots on, hats, mittens and lets play in the snow! Alice, with a hat on? Rabbit in the snow? Anything that reflects a Winter Wonderland. Have fun with it!

This week we are being sponsored by SUGAR NELLIE / FUNKYKITS. They are a fabulous company and you really should go over and take a peek.
Sugar Nellie is a small Scottish company that brings you fantastic rubber stamps from some amazing artists. Funky Kits is the sole online retailer for Sugar Nellie stamps - so head on over to grab yourself some of that sugary goodness!

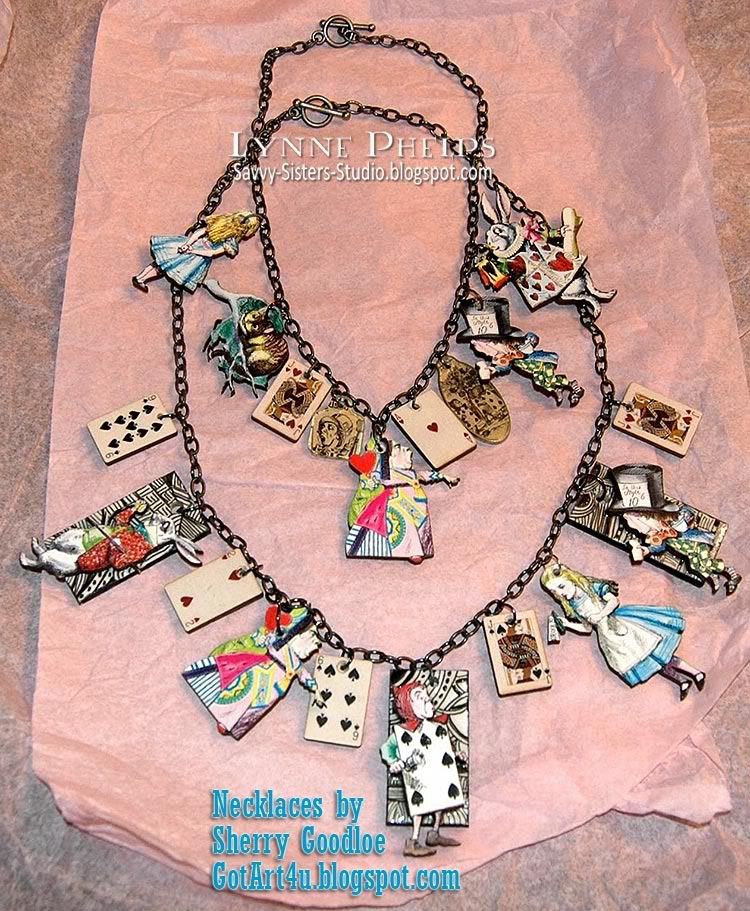
The prize for this week will be 1 set of 6, yes, I said 6 Leanne Ellis Alice in Wonderland stamps. I sure wish I was able to win this one. This set of stamps are fantastic!
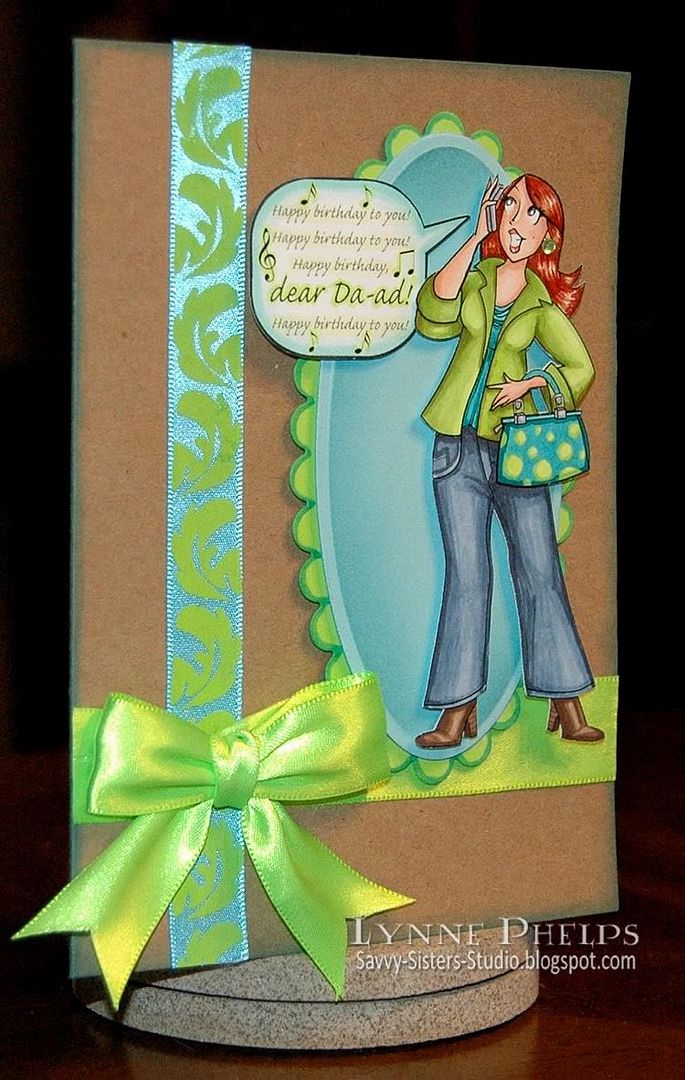
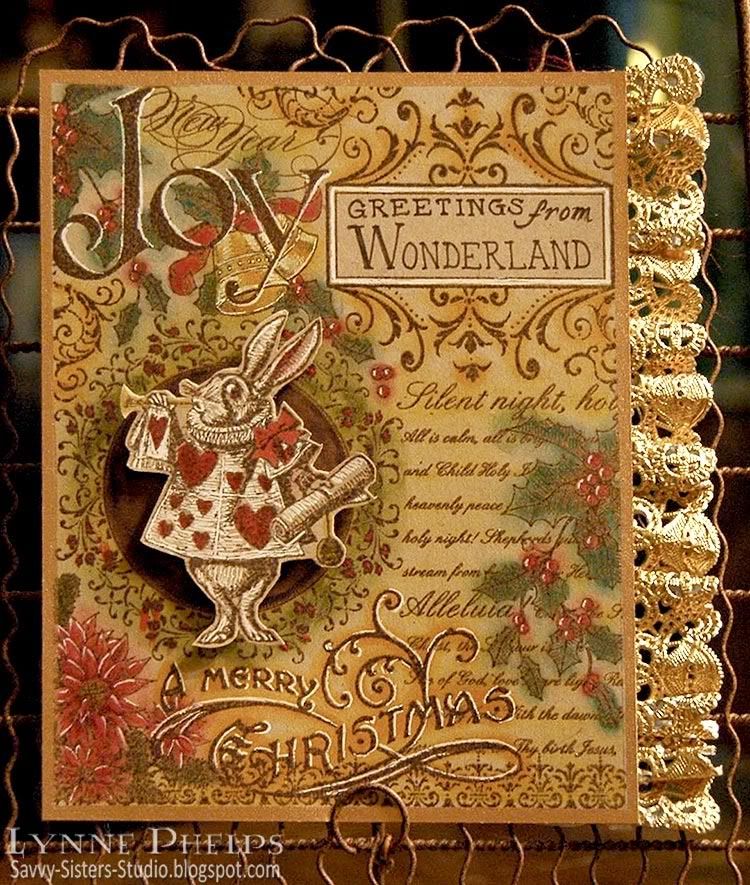
My Card: Christmas Greetings from Wonderland!

I just received my order from the Stampin' Up! Holiday Mini Catalog, and this fabulous Christmas Collage stamp was at the top of my list! Isn't it just gorgeous? I started with kraft card stock, inking up the stamp first with Versamark and then with dark brown before stamping, which allowed me to heat emboss the image with clear detail powder. TIP: by inking up the stamp first with Versamark
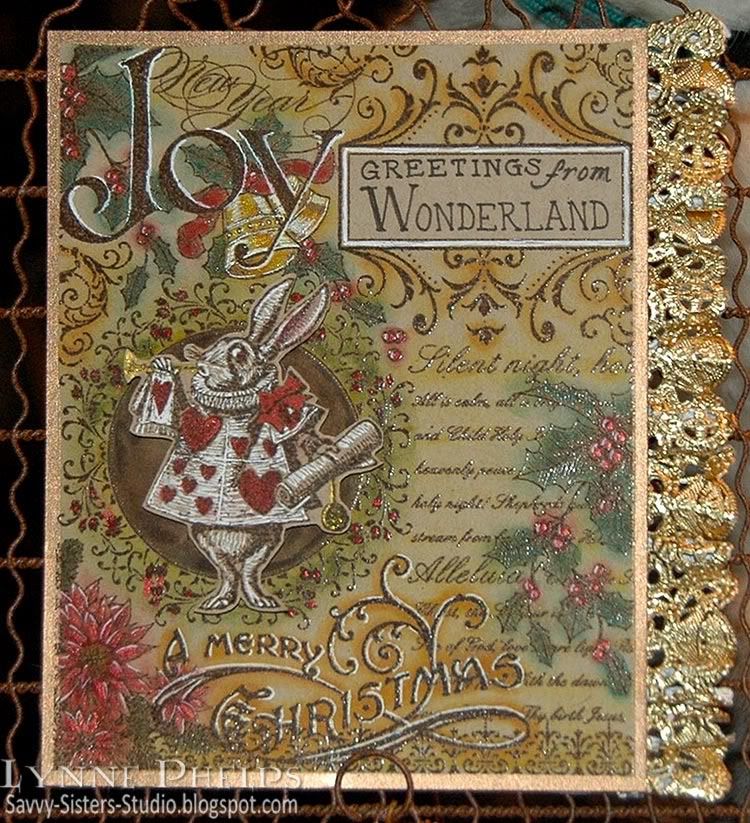
, I can turn any color of dye ink into an embossable ink. Otherwise I would need to use a Distress ink or a pigment ink to get the ink to stay wet long enough to emboss.  Then I sponged color into the image, applying Distress inks with Tsukinko Fantastix tools. I used the pointed tip for the red and green shades where I needed to pinpoint the color, and the rounded tip for the golds and yellows in the background. Highlights were added with a white gel pen and Smooch for touches of sparkle in gold, pearl moon, and red!


Click to enlarge

Then I stamped the White Rabbit the same way, sponging with the Fanstastix and highlighting with white gel pen and Smooch. I really love the way this looks on the natural colored kraft card stock.  I filled in the circle on the collage stamp with sponged brown ink and then adhered the White Rabbit cutout with a ⅛-inch thick pop dot. I edged it all the way around with a Krylon Leafing Pen in my favorite Pale Gold.

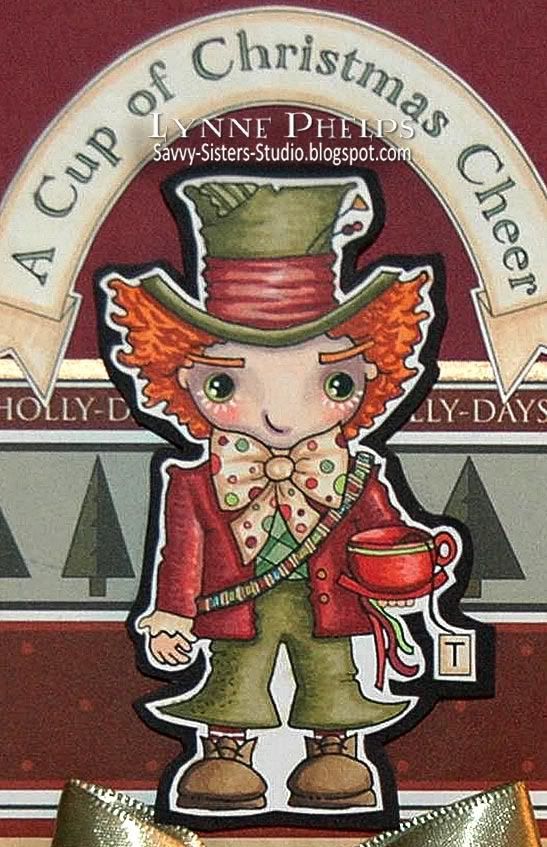
I love it that this collage stamp includes an open rectangle for you to really personalize the design! I wrote "Greetings from Wonderland" in the space using a dark brown Marvy marker.  I could have computer generated the sentiment, but with the vintage look of the collage stamp I thought handwriting would be ok. TIP: Draw a box on scratch paper and write in the words so you can see what kind of space each word will take. Then compensate for irregularities by changing letter style. My "greetings" was a little wider than I planned, so the "from" would not fit. I just changed to a narrower italic style and dropped down a bit to write the "from" so it looked like I planned it that way! ;-)

The final touch was added by cutting the lacy edge from a small gold paper doily. TIP: Make wonderful ruffled edging with a paper doily! When you trim the edging from the center of the doily, trim as closely to the lace edge as possible. Then straighten out the edge, carefully bending the edge back and forth about every eighth to fourth inch. As you straighten the curve, a wonderful ruffle will form as the outer edge is much fuller than the inner edge. Doesn't it look fantastic?  So rich and glitzy and textured!  Don't you think it adds a lot?

Check out the rest of the design team's creations at Oh, Alice! and enter your own Winter Wonderland card there!

Please leave me a comment and let me know what you think of my Greetings from Wonderland card, sponging, Smooch, or ruffled doily edgings! I love hearing from you and seeing your comments always makes my day!!!

Saturday, December 18, 2010

Oh, Alice! Winter Wonderland - Tomorrow!

I am on another business trip - the last of the year, thank goodness. I had hoped to be home by now creating an Oh, Alice! card for you, but it turns out I won't be able to make it home until tomorrow. In the meantime, please check out the fabulous Winter Wonderland creations created by my design team sisters to inspire you, and I'll have my card for you tomorrow!

>> Go to Oh, Alice! to see the Winter Wonderland inspiration creations

Saturday, December 11, 2010

Oh Alice! CHAPTER 43: Christmas Greetings - "From a Fairy to a Child"


Click to enlarge

LADY dear, if Fairies may
For a moment lay aside
Cunning tricks and elfish play,
'Tis at happy Christmas-tide.

We have heard the children say—
Gentle children. whom we love—
Long ago, on Christmas Day,
Came a message from above.

Still, as Christmas-tide comes round,
They remember it again—
Echo still the joyful sound
"Peace on earth, good-will to men!"

Yet the hearts must childlike be
Where such heavenly guests abide;
Unto children, in their glee,
All the year is Christmas-tide!

Thus, forgetting tricks and play
For a moment, Lady dear,
We would wish you, if we may,
Merry Christmas, glad New Year!
Christmas, 1867.

Welcome down the rabbit hole once again my friends!  DT sister Erin found this poem by Lewis Carroll in the back of a copy of Through the Looking-Glass and What Alice Found There. In researching the history of this poem, Erin found the The Lewis Carroll Memorial Window at Daniell Chapel in England. 

The 3 center panels contain verses from the Lewis Carroll poem used as today's inspiration!  The window was designed by the stained glass artist Geoffrey Webb and depicts a Nativity scene.  This is a must see for anyone that loves Wonderland. Notice Lewis Carroll and Alice in the left panel, and the bottom section of each panel includes characters from Wonderland - the White Rabbit, Dodo, the Caterpillar, Mad Hatter, and more!

For our Oh, Alice! challenge this week let's get into the Christmas spirit. The challenge is to use red, green, + one color.  You can still use other colors for hair and skin.  Just make the main use of color red, green, + one.
Our wonderful sponsor this week is Pixie Dust Studio.  The lucky winner will win their choice of 2 digital images.

My "Touch of Depp" Card

I am using one of the charming Pixie Dust Studio Wonderland images called "A Touch of Depp" and it is so much fun to color - and how can you go wrong with a Johnny Depp inspired image! I printed this Mad Hatter image with a black and white laser onto color laser printer paper and colored with Copic markers. I tried to match the look of Johnny Depp in the Alice in Wonderland movie, but shifted his outfit into various colors of rich reds and greens in keeping with today's challenge. I also made the sentiments and banners on my computer and printed and colored them the same way. I covered the back of all my colored images with glue stick and adhered them to cheap white card stock and trimmed them out.


Click to enlarge
 My colors were inspired by this great patterned paper from Nikki Sivils. I love the rich muted colors of this Happy Holly-Days Christmas collection, and this page of border patterns was the inspiration for this week's card.  To help the Mad Hatter stand out better against the bold prints, I mounted my cutout on black and then trimmed it again and mounted it with pop dots. The banner sentiments were adhered with foam mounting tape that gives it dimension but not as high as the pop dots.

Click to enlarge

Finishing touches included rimming all the edges with a Krylon Pale Gold Leafing Pen, and a double-looped bow  of soft sage green satin ribbon made on my Bow-Easy.

Now let's see what the rest of my design team sisters have created for you this week!

So get your Santa hat on, turn on your favorite holiday music and get crafty for your chance to win your choice of 2 digital images!  You have until 8 p.m. on Friday the 17th of Dec to play along by entering your creation at Oh, Alice!

Please leave me a comment, they really make my day!

Saturday, December 4, 2010

Oh Alice - I'm running late

I am rearranging my craft room and it is still in a state of chaos, but friends are coming over later today to help me make it workable! Please check back, I will have my Oh, Alice! card up in a day or two. In the meantime, please visit Oh, Alice! and see the rest of the design team's wonderful creations featuring hand made flowers and Some Odd Girl stamps!

Saturday, November 27, 2010

Oh, Alice CHAPTER 41: Off With Their Heads!


`Let's go on with the game,' the Queen said to Alice; and Alice was too much frightened to say a word, but slowly followed her back to the croquet-ground.

The other guests had taken advantage of the Queen's absence, and were resting in the shade: however, the moment they saw her, they hurried back to the game, the Queen merely remarking that a moment's delay would cost them their lives.

All the time they were playing the Queen never left off quarrelling with the other players, and shouting `Off with his head!' or `Off with her head!' Those whom she sentenced were taken into custody by the soldiers, who of course had to leave off being arches to do this, so that by the end of half an hour or so there were no arches left, and all the players, except the King, the Queen, and Alice, were in custody and under sentence of execution.
Welcome back to the land of wonder and where the saying, 'Off with her head' is a regular statement! Well here in wonderland this week, that is exactly what we want you to do. This week we want you to take your stamps and yep you guessed it,'Off with their heads'. So we are asking you to alter your stamps and mix it up a little by giving them a new head or body. Ohhh this is going to be sooo much fun seeing what you come up with!!!

Well, I have to admit that I did not come up with anything at all, but I did spend a good bit on my two newest treasures so I thought I'd share them with you!  I have another blog, The Altered Alice, which features various artists and their Alice in Wonderland creations. Someone suggested I visit Sherry Goodloe's "Got Art?" blog because of her mixed media necklace workshops and her own necklace creations, some of which feature Alice in Wonderland!  I won't say too much as I'll be featuring her on The Altered Alice a little later, but I asked her to let me know if she rounded up anymore Alice charms or necklaces. I was THRILLED when she emailed me to say she had just added two necklaces to her Etsy store. I couldn't decide so I bought BOTH, LOL!!!  I figure they are great as my inspiration for this week's Off with their heads challenge as they feature the Queen and they are worn around the neck!


I also finally got LAST week's challenge entry completed, which uses "Mad Fancy," one of the whimsical creations of Maigan Lynn that was provided to the design team as black and white line art by last week's generous sponsor! The challenge, besides the coloring of this fantastically detailed image, was to use a butterfly. Better late than never, right?


Coloring Tips: It was quite a job - a fun job! - to color in this image as the foreground, focal point, and background are all equally detailed. I had a lot of shading within each area but it was all just merging together into a bright pattern. To help the viewer to focus where I wanted them to, I outlined just outside major elements with a dark warm gray (W7) which helped to lift key elements out of the background. You can see the outining better on this closeup; look around the flamingoes, mermaid, skirt panels, and mushrooms. I can't tell you how much it helped to add depth of field to this charming, hectic image! Then to lift the mermaid even more, I colored her tail and shell top with glitter pens in clear and dark blue. I wish you could see all the shimmer, she really gleams!


Check out the other amazing creations by the design team, you won't be disappointed! There were some very creative submissions to this week's challenge!
And be sure to submit your own creation for a chance to win a SCORE-BUDDY from the lovely people at
Srappin' Great Deals!!!. So go chop off some heads for your chance to win this awesome prize. You have until the 3rd of Dec to enter your creation at Oh, Alice!

Please leave me a comment before you go, I love hearing from you! It has been so busy I have not had much time for blogging, and I have missed you terribly!

Friday, November 19, 2010

Oh Alice! Running Late

I just walked in the door from a business trip and I'm ready to drop, so I'll have my Oh, Alice card for you later on Saturday. You can check out the rest of the design team in the meantime! Enjoy, and see you later!

Monday, November 15, 2010

Let's Communicate who's the Blog Candy Winner!


Remember I had offered a digi stamp set of my challenge winner set, Let's Communicate, in honor of my Dad's birthday?

There were 17 comments on that blog post and Random.Org selected #14, which corresponds to Sammi!!!

Sammi, please contact me within a week and I will send you instructions on how to get your download from the Amber INK store!

Sammi  said...
Happy Belated birthday to your Dad! I just love the cards you've been making with this set! Well.. If I used this set I think I would make lots of birthday cards for friends.. and I think I would have to try CASEing your card where she looks just like Jess! LOL!
(hugs)
xxx
I hope Sammi does make lots of birthday cards and I would love to see them on her blog, Stuff by Sammi; I'll be watching to see what happens! Here are three cards I made with the set, for inspiration! Clicking on an image will take you to the original post:


Congratulations Sammi, I look forward to hearing from you!

Friday, November 12, 2010

Oh, Alice! CHAPTER 39: Nothin' But Tea and Time on Our Hands

Click to enlarge
"Alice felt dreadfully puzzled. The Hatter's remark seemed to have no sort of meaning in it, and yet it was certainly English. `I don't quite understand you,' she said, as politely as she could.

`The Dormouse is asleep again,' said the Hatter, and he poured a little hot tea upon its nose.


The Dormouse shook its head impatiently, and said, without opening its eyes, `Of course, of course; just what I was going to remark myself.'


`Have you guessed the riddle yet?' the Hatter said, turning to Alice again.


`No, I give it up,' Alice replied: `what's the answer?'


`I haven't the slightest idea,' said the Hatter.


`Nor I,' said the March Hare.


Alice sighed wearily. `I think you might do something better with the time,' she said, `than waste it in asking riddles that have no answers.'


`If you knew Time as well as I do,' said the Hatter, `you wouldn't talk about wasting IT. It's HIM.'


`I don't know what you mean,' said Alice.


`Of course you don't!' the Hatter said, tossing his head contemptuously. `I dare say you never even spoke to Time!'"
Greetings friends in Wonderland! Today we have a fun challenge for you based on a lovely inspiration piece that the Mad Hatter herself just might "need" one of these days!

Alice in WonderlandBut first, a BIG warm WONDERLAND welcome to Tracy Evans, our November/December Guest! Tracy has wow'd us with her projects for a while and we are thrilled to have her here at our Twisted Table.

This week, we have an inspiration piece, again from one of Jess's favorite designers, Tarina Tarantino.It LOOKS like a watch, but in this case, the face of "Father Time" is the Mad Hatter himself. We can just see him, shouting out from this beautiful piece and startling it's owner "YOU HAVEN'T EVEN MET TIME!". Boy, it sure feels like that some days..time simply moves TOO QUICKLY to catch!


My interpretation of the inspiration piece is fairly literal. I wanted to echo the feeling of the carved brown frame around the image on the inspiration piece, so I started by embossing a piece of brown card stock (SU Soft Suede) with this great damask texture plate (SU). I really love the texture plates because they emboss a much larger area than an embossing folder. Because the plate is just on one side of the paper, not two like in an embossing folder, the plates can give a more subtle impression. But I get really deep crisp impressions by misting my paper on both sides with rubbing alcohol before running it through my Cuttlebug; it works MUCH better than misting with water AND the paper dries immediately, so it's a win-win! This allowed me to immediately brush a Versamark Dazzle pad over the high spots, which darkens them and adds a lovely sparkle!

Photobucket
Click to enlarge
I used two nesties at the same time to make the scalloped oval frame, with an smooth oval nestie inside a larger scalloped nestie. I brushed the Dazzle pad over the open area of the scallops before removing it from the dies. Then I had to wipe the Dazzle off the dies, but it was worth it as I wanted a heavy coating on the scallops.

I printed out the Mad Hatter on color laser printer paper using a black and white laser printer, as this method provides a perfect base for coloring with Copic markers. I glue sticked the whole back of the colored image and stuck it to inexpensive white card stock, then cut the image out with a nestie one step larger that the one used to cut the window in the frame and adhered it to the back of the frame. The frame was adhered to the card base with 1/8 inch thick pop dots.  The same technique was used to color, mount and adhere the computer-generated Wonderland label.

To tie in with the beads in the inspiration cuff bracelet, I put a shiny gold brad in each corner and added bling with crystal flourishes. Copic markers were used to color the clear crystal flourishes to match my image and adhered them. Remember that when you are coloring clear items, choose a much darker marker than you would for paper and dab the color on to get more intensity of color.

This whole panel was mounted to the front of a folded card, then the corners were rounded. That way it looks really polished on the inside, as you are not seeing the brads poking through or the embossing.

But I was NOT happy with my card. What was wrong with it, and how to improve it? After some thought, I ripped the card front apart, flipped the embossed panel with its flourishes upsidedown, re-adhered the framed image offset to the left of center and a little lower than before, and made room for my colorful pocket watch! What my card was missing was TIME!

Click to enlarge

Spellbinders 4-Inch by 4-1/4-Inch Cutting and Embossiing Dies, Timeless Heritage I adhered heavy duty aluminum to card stock and ran it through my Cuttlebug with the Spellbinder Timeless Heritage die. I sponged the pocket watch with Stazon inks and highlighted the hours with dark violet Copic marker. I love this die for Alice related projects as it also has a key and a heart-shaped lock, which I used on THIS card. I also love that it has two separate clock hands for use with the watch!  As a finishing touch, I ran a dark violet Copic marker around the edges of the scalloped frame to help it stand out a bit more from the background.

NOW I am happy happy happy with my card, how about you?

Now check out how the rest of our twisted tea party interpreted this inspiration piece!

We can't wait to be dazzled by your inspired creations, just enter them on Oh, Alice! using the InLinkz tool. There's no time limit this week, see you next TIME!

This is also the last day to enter my blog candy drawing for a "Let's Communicate" digi stamp set on THIS post! This is the set I got to design with Amber as a prize for winning the Amber INK challenge a couple months ago!

Please leave a comment on this post before you go - did you like hearing about the changes my card went through?

Stamps: Free digi from Lenny's Alice in Wonderland Website.
Paper: Stampin' Up! -
Soft Suede card stock; HP - color laser printer paper; Georgia Pacific - white card stock.
Ink: Tsukeniko - Versamark Dazzle Pad (Champagne), Stazon Cherry, Royal Purple and Mustard; Copic - Sketch Markers.
Miscellaneous: Recollections - crystal flourishes; gold brads.
Tools: Stampin' Up! - Backgrounds 1 Stampin' Up! Texturz Plates, Texturz Impression Pad, Texturz Silicone Rubber mat; Spellbinders - Classic Ovals Large, Scalloped Ovals LargeTimeless Heritage; We R Memory Keepers - Corner Chomper.

You can help support this blog in these ways:
• Purchase your Stampin' Up! supplies from my sister. You can purchase or contact through her blog, And She's Still Stamping.
• Purchase other listed supplies using the links above.
Thanks!

Thursday, November 11, 2010

Please VOTE for my "Let's Communicate" RAKs!

It's that time of the month again - time to vote for your favorite entry in the Amber INK INKredible 21-day Challenge! There are only three days to vote, so please hop over there now and pick your favorite. Of course I am hoping it will be one of my two entries, either my thank you card to stamping buddy Patie, or my tribute to Jess Diedrich who is the "Mad Hatter" of my beloved Oh, Alice! design team!

Here are my two entries:


Voting just takes a couple clicks - Click HERE to go to the Amber INK challenge blog and then click VOTE underneath whichever project is your favorite! Done!

I am probably an idiot to enter two items and split my own voting block, but this set is just so much FUN to play with! I had to stop myself from entering twelve instead of two, LOL!  You can enter as many items as you want but you can only win one prize, so that's fair.

I hope some of you will consider entering next month's challenge - it is a fairly new challenge blog, so odds will never be better as the field is still small. You only need to use one Amber INK product and some of the digis are as low as 50 cents and iPaper is only $1. The top three selected by YOUR voting win a prize. The top winner out of the three is selected by the design team and gets a stamp set custom designed by Amber!  That is how this Let's Communicate set came to be, and I love it so much. I have more stamp set ideas so I am trying to win again, so I can design another set with Amber! The other two winners get a gift certificate to Amber's store so that's pretty nice too!

Thanks in advance for taking the time to vote. Even if you don't vote for me, I really appreciate your participation in this new kind of challenge blog!!!

Saturday, November 6, 2010

Oh, Alice! CHAPTER 38: Tickets, Please!


Click to enlarge
'Tickets, please!' said the Guard, putting his head in at the window. In a moment everybody was holding out a ticket: they were about the same size as the people, and quite seemed to fill the carriage.

`Now then! Show your ticket, child!' the Guard went on, looking angrily at Alice. And a great many voices all said together (`like the chorus of a song,' thought Alice), `Don't keep him waiting, child! Why, his time is worth a thousand pounds a minute!

`I'm afraid I haven't got one,' Alice said in a frightened tone: `there wasn't a ticket-office where I came from." And again the chorus of voices went on. `There wasn't room for one where she came from. The land there is worth a thousand pounds an inch!'
    -- Chapter 3, Through the Looking Glass
Greetings friends in Wonderland! We are FULL STEAM AHEAD into November and today's Oh, Alice!challenge is JUST the ticket! Our ride this week is sponsored by our own Tasha who is generously donating a $15 gift certificate to Stamping Bella (in honor of their cute new Alice stamp) to one randomly selected winning traveler!

But before we get started, there are some changes at our twisted tea party table! We are bidding farewell to longtime design team members Jen and Suzi, so please leave them some extra love as you visit their last Oh, Alice! DT posts. We will really miss their superb talents! Donna, our amazing October guest designer, is stepping up to the table so we are back to our twisted thirteen. Welcome Donna, we are so glad you are staying where it's always time for tea! Be sure to check back next week for to find out who our guest designer will be for the holiday season!

So, do you have YOUR ticket ready for a ride on the Wonderland Express? I am the conductor this week and I say you can't travel with Oh, Alice! if you don't show us your ticket! You can make a ticket, use a ticket stamp, use a real ticket. Use one ticket or a whole row of tickets! So hop on it and get ready to take a journey through Wonderland!

She's Got a Ticket to Ride!

As I was making my card the Beatles song kept playing in my head. Luckily it's a good tune because I'm not sure how long it will take to get it out! I had to use the Tenniel illustration from just a few minutes later in this week's train scene.

Click to enlarge

I printed the image onto color laser printer paper using a black and white laser. The toner is fused onto the paper with heat, so this method is perfect for coloring with Copic alcohol markers! I then used a glue stick to adhere the colored image to white card stock and I cut and embossed it with a Label 9 Nestie. I ran a warm gray marker around the embossed rim to empasize it.  I wanted another mat, but this was the largest  nestie in the set. My usual technique when I need a mat for the label nesties is simple: I took the same sized nestie that I used to cut out the image, and used a pencil to trace around its outer perimeter with a pencil onto the black card stock and cut it out. This gives the perfect sized mat every time with any label nestie! I got that tip from Becca Feeken of Amazing Paper Grace who is the ultimate queen of nesties!

Next I stamped the tickets onto cream card and colored them with Copics and cut them out. I colored the computer generated sentiments with Copics and glued them to white card stock and cut them out.


Click to enlarge

Next I used my new treasure - the brick embossing folder! I used it on kraft card stock and colored the grout lines with medium gray Copics, then sponged with Tattered Rose and Aged Mahogany. I trimmed out the brick areas and glued it in two sections onto my 5x7 inch kraft card base using Fast Grab Tacky Glue. I sponged the edges of the kraft card base with Walnut Distress Ink. Then I assembled everything on top of the bricks, and I wish you could see all the dimension! The matted image panel is adhered with 1/8-inch thick pop dots. The tickets and "The Wonderland Express" are mounted with 1/16-inch foam tape.  The cut-out typewriter style words are adhered with Fast Grab Tacky Glue.  The finishing touch was a knot of wonderful jute ribbon I found at Wal-Mart, adhered with the same glue.
Get more inspiration from the rest of our Twisted Tea Party:
It's time for you to get those tickets ready so you can travel with us on the Wonderland Express! You don't want to be left behind as this train leaves the station, so enter your new creations by 8 p.m. on Friday, Nov. 12 at Oh, Alice! Good luck, or maybe we should say Bon Voyage, as we can't wait to see where your creations will take us!

Please leave me a comment before you go. Also, there is still time to leave a comment on THIS post for a chance to win a "Let's Communicate" digi stamp set! This is the stamp set I got to design with Amber as my prize for winning the top place in the Amber Ink Challenge!

Stamps: Alice digi from Lenny's Alice in Wonderland site; Invoke Arts - ticket stamps.
Ink: Memento - Tuxedo Balck; Ranger Distress - Tattered Rose, Aged Mahogany, Walnut Stain.
Paper: Recollections - 5x7 inch kraft card and envelope; Papertrey Ink - kraft card stock; Stampin' Up! - black card stock; Georgia Pacific - white card stock; HP - color laser printer paper.
Miscellaneous: Wal-Mart - Jute Ribbon.
Tools: Tim Holtz embossing folder; Spellbinders - Label 9 Nestabilities; Ranger - Inksentials blending tool and foam.
All Stampin' Up! items can be ordered through my sister - please visit her blog to order
Related Posts with Thumbnails