

Showing posts with label Gift Idea. Show all posts

Sunday, May 27, 2012

Alpha Stamps, meet Daily Window Bags!

Daily Window Bags - Classic Tote
The challenge this month at The Altered Alice is anything goes, and we have been sponsored by Alpha Stamps, [Store | Blog], suppliers of amazing collage supplies, exclusive rubber stamps, and wonderful collage sheets in card stock, transparency and digital formats.

In the meantime, I was contacted by Daily Window Bags and asked to decorate two of their wonderful bags. These bags are really special, as each has a clear window in one side made for stamped inserts! I love my bags; they are so well made and have beautiful apple green linings with pockets. I chose the Eight Days a Week purse and the All Around Classic Tote (plenty big enough for scrapbooking supplies of course), and naturally I wanted to decorate them with a Wonderland theme!


I decorated the straps of the All Around Classic Tote with all kinds of Alpha Stamps goodies, glued with E6000 onto black felt strips which are affixed with velcro over the bag's stitched straps.


I had so much fun picking out items for the bag: there is a royal crown for the Queen of Hearts (red added to the brass with a Copic marker); the keyhole and key for tiny door into the garden; a brass filigree fan for the White Rabbit; clock buttons for the White Rabbit's and the Mad Hatter's pocket watches, a brass butter knife for the March Hare who tried to lubricate the watch with the best butter; small silver-plated teacup, teapot and spoon charms; miniature playing cards for the Queen of Hearts subjects; card suit buttons which fit perfectly into lots of sprocket gears and mini-gears to represent the Mad Hatter's clockworks; a chunky corked bottle with the "drink me" potion, a larger clock face and game spinner instead of hands because time is broken and  it's always tea time at the Mad Hatter's, a large wooden teapot and teacup (handles and rims colored with a Copic marker), and an ornate chipboard-reinforced label at the top that is stamped with "Alice's Adventures in Wonderland" from the Alice's Adventures stamp set and then stickled and coated with Glossy Accents. A wire pin holds another key onto the bag handle.


The inserts are a generous 5 3/8" x 7 1/2" size. I used recycled chipboard from packaging as a backing. The background is a page from last chapter of Alice where the King of Hearts is talking at the trial, which seemed perfect for my King of Hearts insert. Images from various collage sheets in their Alice in Wonderland section are in the background. The King of Hearts in the lower left corner is a stamp from the Alice's Adventures set, which has been stamped several times and layered for dimension. All has been sponged with Vintage Photo Distress Ink.

Daily Window Bags - Eight Days a Week purse
I love the Eight Days a Week purse; the buckled straps add a lot of style, and the pockets on both ends are so useful for cell phone and sunglasses! For this window insert, I went with a flamingo/croquet theme. I made the background by stamping the row of flamingos from the Alice's Adventures set then sponging. I love how it turned out, and it is one of my favorite stamps in the set, so different.
I colored in an image from the "Alice Herself" collage sheet. The label is stamped and embellished with tiny brass flamingo charms, as is the ribbon bow at the bottom. The Queen of Hearts in the lower left corner is from the Alice Characters collage sheet, and Alice has been stamped and colored from the Alice's Adventures stamp set.

I LOVE these bags and you will be seeing them again in the future as I make many more inserts for them! Because I glued all my embellishments on the tote bag to black felt strips which are attached with velcro, I can even remove the embellishments to display other themes. I would love to make some Christian-themed inserts based on favorite scriptures for example, or Christmas and other holiday inserts to celebrate the seasons!

Thanks so much to Alpha Stamps for sponsoring this month at The Altered Alice, and thanks so much to Daily Window Bags for introducing me to this fabulous product line!

Please leave a comment and let me know what you think about this project!

Thursday, July 1, 2010

Metal Tooling: Large Chipboard H for Hannah!

I made a large "R" for Rebekah a few months ago, and I really love how it turned out. I thought I would make an "H" for Hannah's birthday! It starts by picking out five to seven words that describe a person or their activities. Once you have the list of words, it is all downhill from there!

Photobucket

Start by tracing the outline of the chipboard letter on a piece of paper. Then draw some bands across, with a line to mark the top and bottom of the band. I like to use curved bands. Then lightly letter a word into each band and see how they fit - you may have to erase and try again. Once you have the word layout, trace around the chipboard letter again, this time on your piece of metal. VERY LIGHTLY on the front, make marks where the bands and letters will go; make the marks as light as possible. Then turn the metal over, and on a padded surface and a ball tip, make raised lines and letters. From the front, on a glass or acrylic mat, refine the area around each letter with a teflon calf's foot tool.

Photobucket

Between each word band, fill in by placing metal over a pattern mold. First use a jumbo blending stump to rub the pattern into the metal, then a rounded teflon tip, finally with a fine point teflon tip.

TIP: PLEASING PATTERN PLACEMENT
A design like this could be pretty chaotic. There are a couple of design primciples at work that make it a very harmonious layout instead!
  1. First, there are repeating elements. The same small scale pattern is used on all four ends. Where patterns do not have an exact match, they have a match that is the same scale and character.
  2. Second, the design is well balanced. The two largest motifs, the stylized floral medallion on the left side and the stylized fleur dis lis on the upper right are diagonally opposite. The small square grid pattern is on both legs of the "H" and the same pattern is used "on point" to create diamonds, also used on both legs. A Moorish tile design on the right is balanced by a Moorish-feeling pattern on the left, so the whole cross bar is covered with similar scale and similar character patterns. The smallest motif, the grid that can be used square or on point was used on and near the ends, including being used as background on the large fleur dis lis
When the design was completely tooled, I covered the surface of the chipboard letter with Scor-Tape. I turned the metal, front side down onto a padded surface, and centered the adhesive covered chipboard letter and pressed it down firmly to the metal. A Tim Holts scissors was used to trim the metal to the edge of the chipboard, then a patterned wheel was run around the edges of the metal to give it a finished look.

 Photobucket

TIP: USE PAINT TO ANTIQUE YOUR METAL TOOLING
Then comes the magic! My shiny tooled aluminum looks like shiny tooled aluminum. Not quite the look I was going for! I dabbed a make-up sponge into black acrylic paint and sponged the chipboard edges and the metal. Paint was sponged on the entire surface, then brushed off the high points with a clean spot on the sponge. Voila - instant pewter! The difference is amazing and it only takes a moment!

I hope you will try making a letter like this! It is fun, quick and easy and is so personal and fun! Leave me a comment, I'd love to hear what you think!

Paper: The Paper Studios - large chipboard letter; Maid O' Metal - aluminum tooling foil
Tools: Ten Seconds Studio - teflon metal tools, molds, pattern wheel, mats, paper blending stump
Miscellaneous: Black acrylic paint, Scor-Tape, Tim Holtz scissors
   

Saturday, May 22, 2010

Quick Gift - Dollar Card Makeover

I found this set of cards in Michael's dollar bins. I love it that the background looks like kraft; in fact they caught my eye because they have a "stamped" look. I added a quick monogram with my Just Rite stampers and voila - a super quick personalized gift that the recipient really enjoyed!

Photobucket

I used the new small 1 3/16 inch Just Rite stamper with a damask border and punched it out. Then I glued a dictionary page to a piece of white cardstock, used a scallop circle punch and sponged the edges in lavendar. I tied some twine around the card and popped on the monogram with dimensionals.  That's it!

Photobucket

Hope you have a wonderful day!

Tuesday, May 4, 2010

FTTC65 - Card with Matching Gift Idea

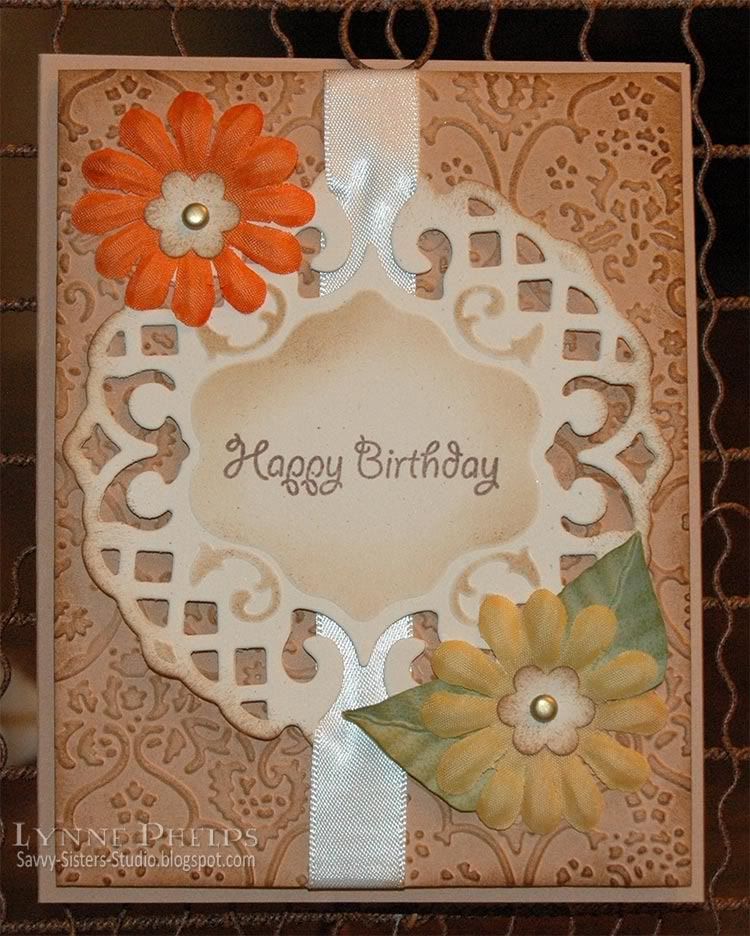
Flourishes Timeless Tuesday Challenge #65 is to make a card with a matching gift idea. Silke Ledlow, the challenge hostess, made a beatiful pillow box and matching card.  I thought what about a card that included a matching gift INSIDE the card? So I came up with this card which has matching earrings hanging inside from a cute hanger:

Photobucket

Do you ever have a card that you are just not happy with? This is a re-make of the card on my last blog post and you can read most of the details there. For this version, I added two leaves to the lower flower and all the sudden everything was in balance! The leaves are super easy, made with my favorite method: punch a circle, fold it in half, and run it through the crimper diagonally. Then trim part of the folded circle away to make a leaf shape.  I sponged a dark olive green ink across the crimped leaves.

I made some earrings in the same colors as my card, and I couldn't find a box, so I decided to include them in the card itself. I am really pleased with the way this earring hanger worked out! My second feline photographer's assistant, Abita, is keeping an eye on things!

Photobucket

The earring hanger base is Mellow Moss cardstock (SU), sponged with Vintage Photo (Distress - Ranger) and punched with the Designer Label Punch (SU). Then the circle was sponged and punched with two small holes to hold the earrings. It is mounted with a really thick 1/8" dimensional to give the earring wires room to hang nicely.

Stamps: Waltzingmouse Stamps - Happy Birthday; Hero Arts - Sentiment.
Paper: Stampin' Up! - Creamy Caramel, Mellow Moss, Natural Confetti.
Ink: Memento - Rich Cocoa; Ranger Distress - Vintage Photo.
Embellishments: Imaginisce - Silk Flowers
Tools: Spellbinders Lattice Pendant; Stampin' Up! Designer Label Punch; All Night Media small flower punch.; Cuttlebug - Textile embossing folder
Earrings: Hobby Lobby - glass beads and copper findings; Blue Moon - antiqued copper double-swirl dangles

Monday, April 19, 2010

Great Gifts - Stamped Picture Frames

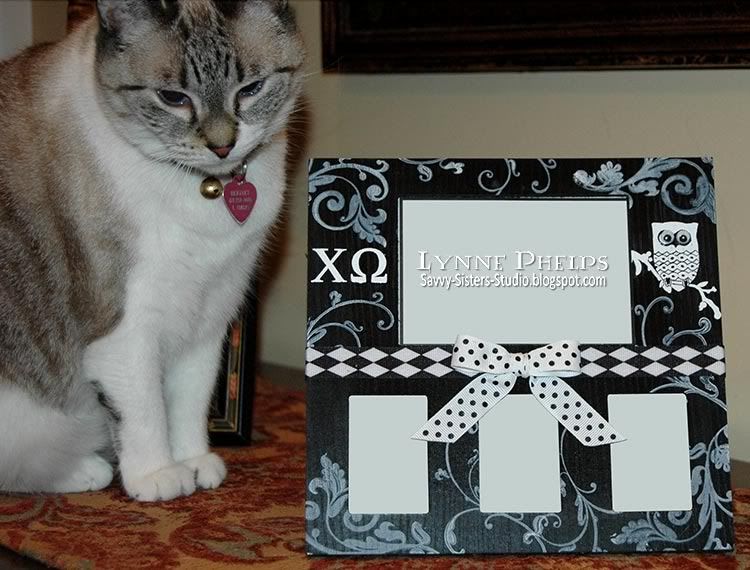
You can take a dollar store frame and turn it into a wonderful gift by stamping on it! I have several examples here that I made for my niece, who is in the Chi Omega Sorority. Their mascot is an owl, and their colors are cardinal (red) and straw (yellow). Check out these charming picture frames ready to hold some of her favorite college memories!

Photobucket

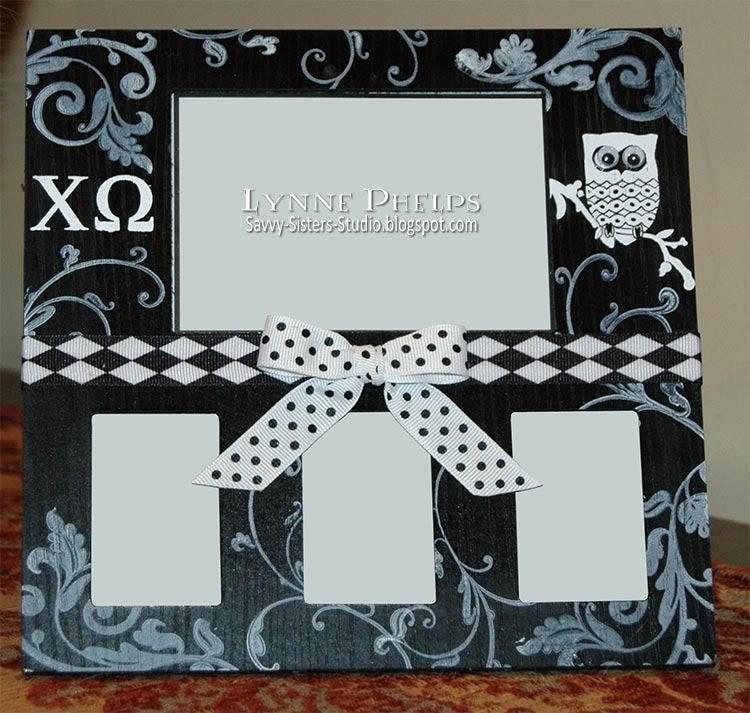
This first frame was from the Dollar Tree. It was really nice for the price - it is real wood stained black and has openings for four pictures. The great thing is the surface of the frame is perfectly flat - excellent for stamping. I stamped the owl (Birds Galore 97625 - Inkadinkado) and Chi and Omega Greek letters (Greek WP32 - IO) in white pigment ink and heat embossed with white embossing powder. Then I stamped my favorite flourishes (Flourishes 97495 - Inkadinkado) set all around the edges with white Stazon. Then I added some fun googly eyes on the owl and black and white ribbon to complete the frame. It is much cuter in real life than in this photo!

Photobucket

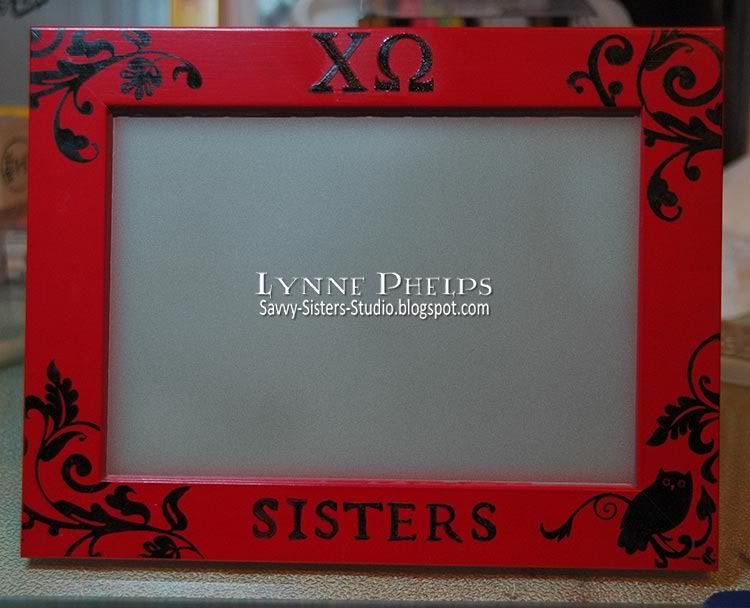
This frame is from IKEA, and its face is also flat - perfect for stamping! I used the same Flourish set as on the black and white frame, which also includes this cute owl on a flourished branch! The flourishes and owl are stamped with black Stazon. The Greek letters and the word "SISTERS" (Alphabet set - Martha Stewart) are heat embossed with black powder.

Photobucket

Another IKEA frame - they come in lots of bright colors! No embossing on this one - it is all stamped with red and black Stazon. The cute owls (Hero Arts) are from a little boxed set of wood mounted stamps.

Photobucket

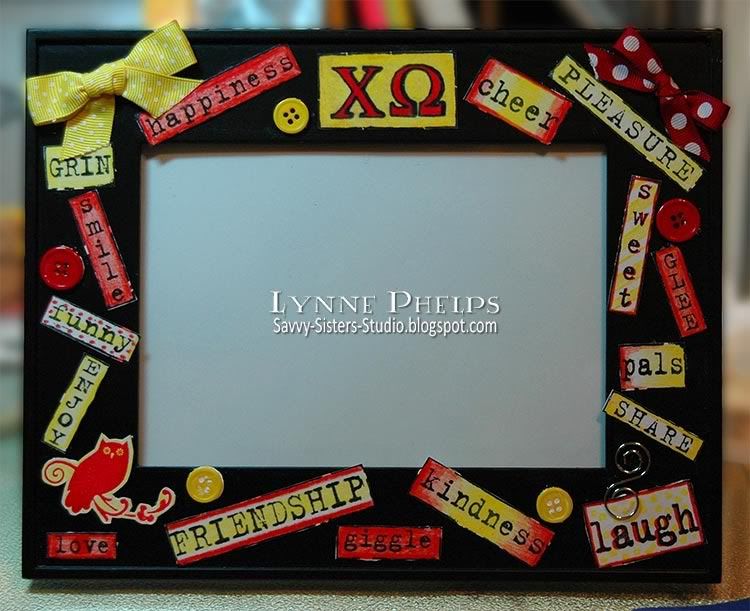
This one is different as the stamping was done on cardstock first. The frame is from Dollar General, and it has a raised rim. The area within the rim is flat, and I glued all kinds of words, ribbons and buttons. The words are all from a single large background stamp (Word by Word - Stampin' Up!) that I colored with Prismacolors and cut into separate words. One thing I would do differently is select a different glue - my tacky glue dried white rather than clear. :-(

Picture frames make wonderful gifts, and are especially fun if you tailor them to your recipient! It would be fun to do some for Mother's Day and Father's Day. Deer and nature sets or tools for Dad, Fashion or Flowers for Mom!

Photobucket

And just in case you were wondering, my feline photographer's assistants are still on the job! Beignet is scrutinizing the whole setup with an eye to every detail!  Now you know why I crop my photos so closely, LOL!!!

Do you have any fun frame decorating techniques to share?  Please leave a comment!

Saturday, March 20, 2010

Metal Tooling - R is for Rebekah!

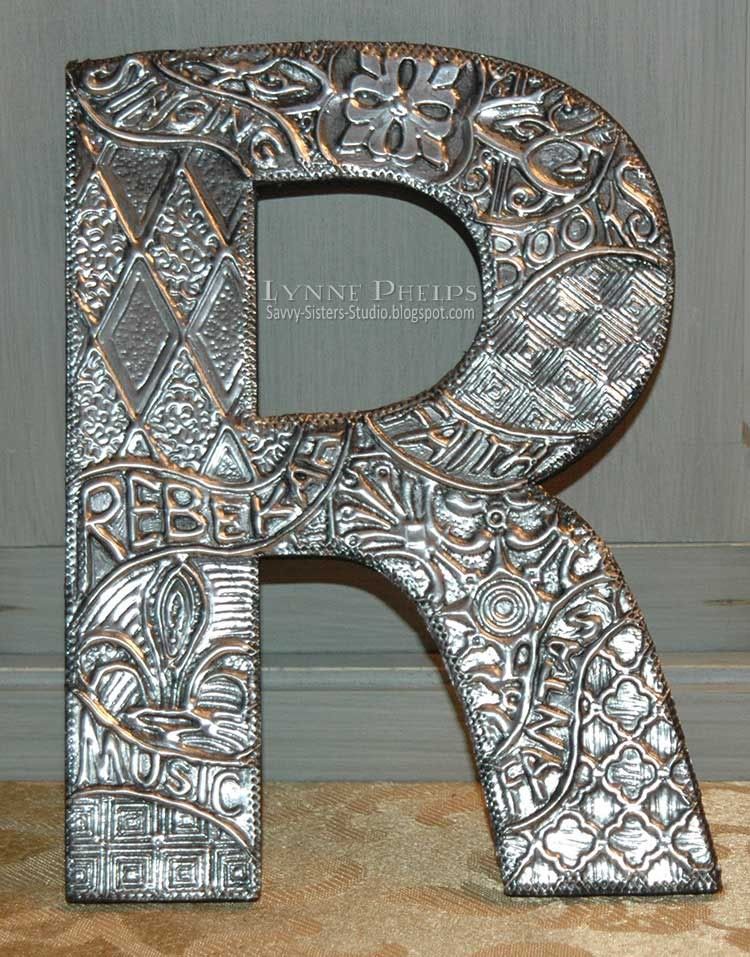
For my niece's Sweet 16 tomorrow (is there anything scarier than a teenager getting their driver's license?) I bought a huge chipboard letter "R" and covered it with metal tooling. I freehanded several words and her name (Rebekah, Singing, Faith, Books, Music, Fantasy), and then filled in the areas between with patterns. It came out GREAT! Look! (Click image to "embiggan")

Photobucket - Metal tooled R for Rebekah

I have loved metal tooling for a long time, but it was a post on Hels Sheridan's Ink on my Fingers blog that sparked this particular project. I had not covered chipboard before, and I assure you I'll be doing it again!  Such fun!  Quick too - the whole project, start to finish, took less than two hours.

First, I drew in wavy lines and the words between them, embossing from the back and refining from the front. Then I used molds from Ten Seconds Studio (cool tools for cool people - hey, I'm cool!) for the areas of pattern between the words. I alternated big splashy patterns with smaller regular patterns.  The teflon tools make it so easy to work on the metal - much less hand fatigue. You can teach yourself all you need to know by watching their Taco Tuesday videos - irreverent, super funny and always inspiring!  I used the "Controlled Squish Technique" (we are very technical around here!) to avoid having high relief areas that would have needed to be filled with spackle on the backside for support. Love that!

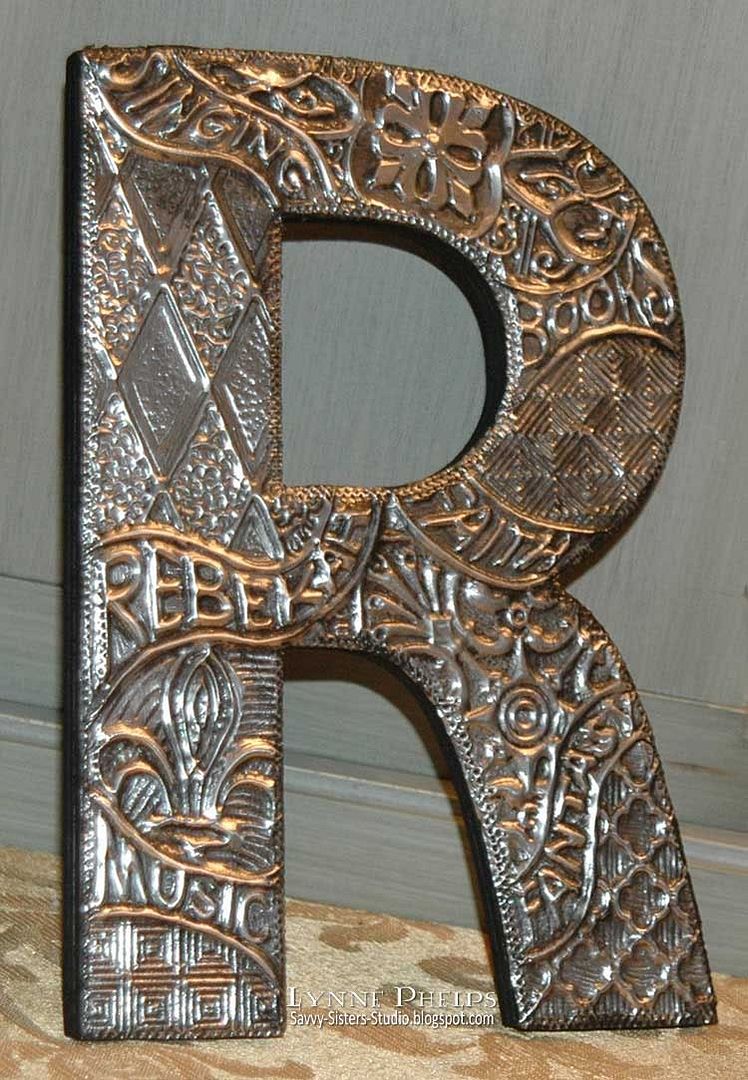
After adhering the metal to the chipboard, I took a patterned wheel and rolled all around the edges, ala Hels Sheridan. It really gives it a finished look! Then I took a makeup sponge loaded with black acrylic paint and sponged the whole thing and the chipboard edges. I turned the sponge to a clean spot and carefully dabbed the paint off the raised areas. LOVE this look. It went from aluminum to instant pewter!

Here is a view at a different angle where you can see the relief better (click to embiggan):

Photobucket

Please leave a comment and let me know what you think - I LOVE hearing from you!
Related Posts with Thumbnails