Showing posts with label Art Journal Pages. Show all posts

Monday, October 29, 2012

Alternative Wonderland in Smeared Ink

The October challenge at The Altered Alice is to create something that twinkles like a bat or shines like a tea tray! The challenge derives from this quote:
...it was at the great concert given by the Queen of Hearts, and I had to sing "Twinkle, twinkle, little bat! How I wonder what you're at!"You know the song, perhaps?' `I've heard something like it,' said Alice. `It goes on, you know,' the Hatter continued, `in this way:-- "Up above the world you fly,Like a tea-tray in the sky.Twinkle, twinkle--"'-- Chapter 7, Alice's Adventures in Wonderland
Our sponsor this month is Smeared Ink, home of edgy, wild and fun designs in rubber and digital forms has released a Wonderland Collection; images are available individually or as a set. The randomly-chosen winner of this month's challenge will receive a $15 shopping spree in their online store.


Smeared and Smudged is an online community of rubber stampers and crafters who enjoy using alternative, gothic, edgy, and unique stamps in their designs. They thrive on different and unusual. They welcome the macabre and devious side of things, and most of all, embrace ALL types and styles of art. Whether or not you “come to the dark side”, your creations should be a reflection of you. At Smeared and Smudged, the most important thing is being yourself. There are lots of ways to interact with the community!
[ Ning Community | Challenge Blog | Facebook Group ]


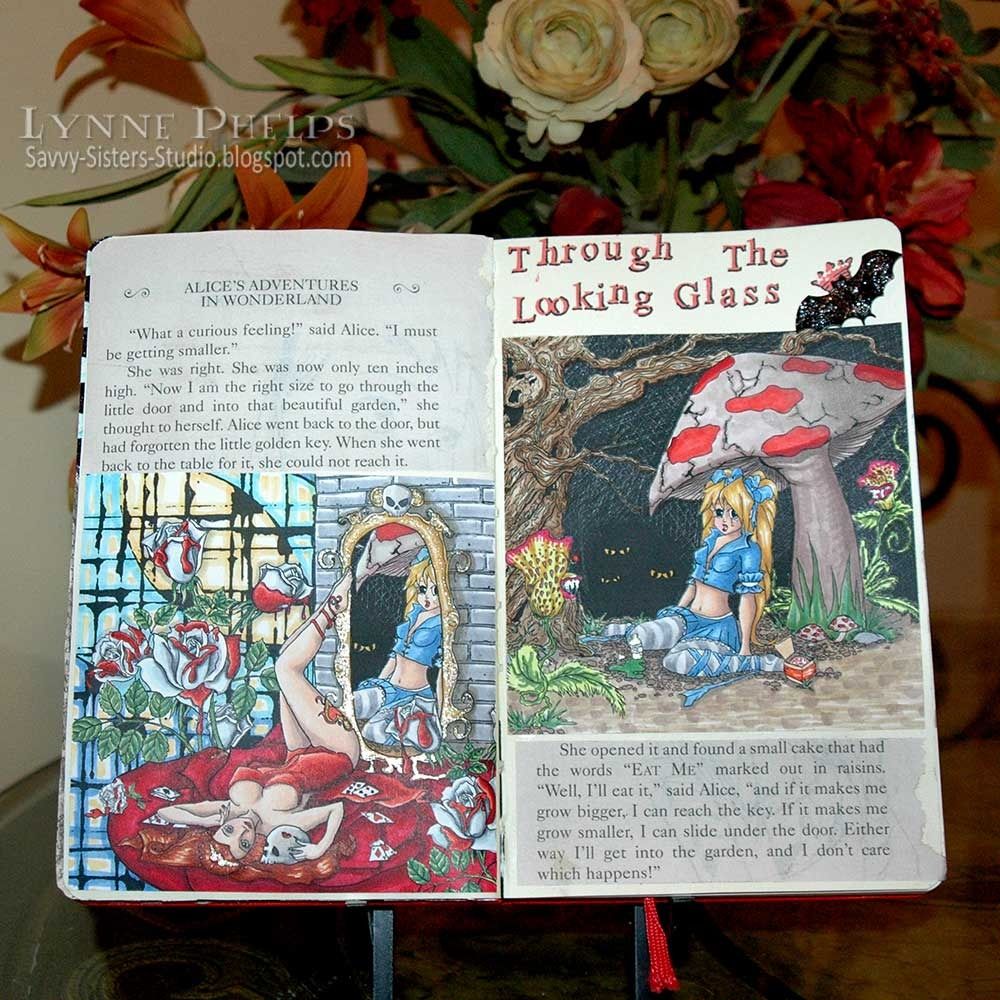
I created a two-page spread in my Alice art journal. I loved the way the Alice image on the right is also seen through the looking glass in the scene with the Queen of Hearts on the left, such a clever touch. Although the images are FAR from my usual style, I do love to color and these incredible detailed images provided hours of coloring fun! These images are racy and a bit on the wild side; an alternative "Smeared and Smudged" Wonderland.
Click to enlarge and see details
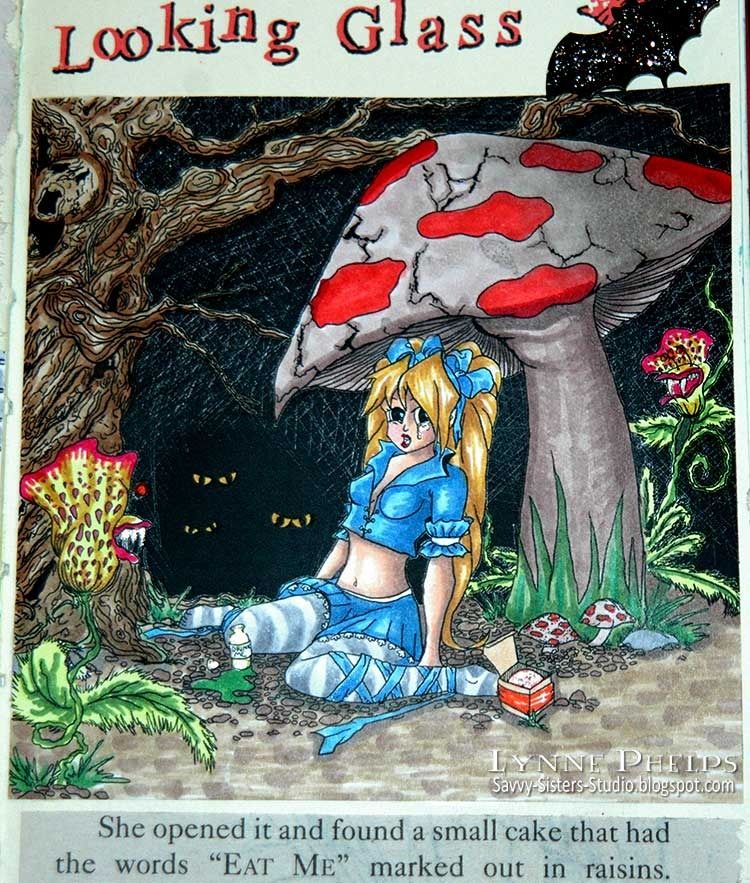
Here we see Alice in distress with watching eyes, tortured tree and carnivorous plants. The small box contains the "Eat Me" cake and the "Drink Me" bottle is a bright green, but the layer of clear sparkling Gelly Roll Stardust reflects the light and obsures the detail. I also added sparkle to the teeth of the carnivorous plants and to Alice's tears. I adored coloring this with my Copic markers. You can see the 3D black glittered bat, a nod to the challenge and to Halloween!

Click to enlarge and see details
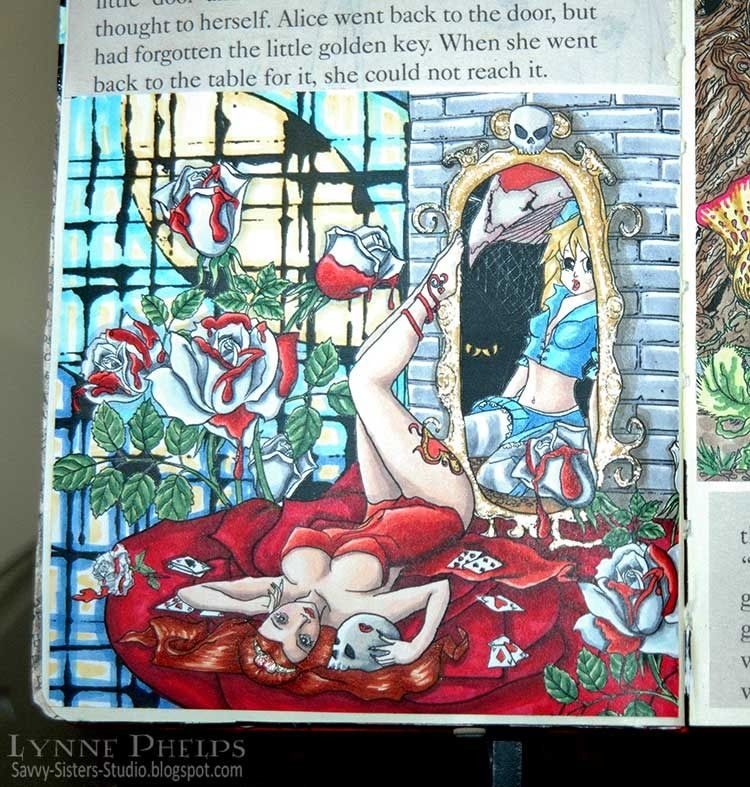
 Aside from the obvious, this image has so many great details. I colored her gown in a warm scarlet red to contrast with the cool violet red of the large rose beneath her. Playing cards are scattered around her and a skull keeps her company as she monitors Alice's progress through her looking glass. I added sparkle to the gold frame of the mirror, it really gleams! A lot of people colored the roses red on this image, but I decided these were the white roses in the process of being changed to red with dripping paint.

Click to enlarge and see details
I hope you enjoyed this month's walk on the wild side of Wonderland with The Altered Alice! Please leave a comment before you go!

Sunday, March 25, 2012

I CAN Slay the Jabberwocky!

I love the final battle in the Tim Burton Alice in Wonderland movie, where Alice is dodging the Jabberwocky and trying to gather her courage to slay this hideous monster. This does not follow the books, but I still love her six impossible things! I used the Jabberwocky and the champion Alice stamps. I LOVE these images and it is rare to find them in Alice stamp collections, but  Red Eowyn has them!

I created an art journal page using water soluble crayons, collaged text, Sharpies and matte multi-medium. I had planned a lovely yellow spread (for our best butter challenge) with stenciled background textures, but things when in a completely different direction when I began to work; The only bit of yellow is her hair! Sorry about that! I began by tearing up old book pages into little scraps and built the rocky crags by gluing them down with a layer of matte medium both underneath and on top. Then I sketched in the massive chessboard. The color is all added by scribbling it on with water soluble crayons and then, instead of painting with water, you paint with matte medium (see this post for a better example of this technique). This melts the color and lets you move it around but also seals the color so it won't be disturbed by subsequent layers of color.  I added the shading to the rocks, the trees and the sky in the same way.


You can see how Alice's armor glitters with clear Gelly Roll Stardust pen. This is where I ran into trouble when I tried to add all the text and details. I couldn't get anything to write on the matte medium coated surface except Sharpies, and they did not want to write for long. I kept having to scribble on a piece of plain paper to get it going again. So I have my bold printed Sharpie text instead of the fanciful doodles I had planned, and on the trees and rocks as well. You can see the difficulty when started with the small text around Alice and the Jabberwocky; I had to switch to the larger Sharpie to get the ink to stick for the list of impossible things.

The text around the characters is bits from the Jabberwocky poem as the Mad Hatter said it in the movie:
The Jabberwock with eyes of flame.The jaws that bite.The claws that catch.
Beware of the Jabberwock, my son,and the Frumious Bandersnatch. 
He took his Vorpal Sword in hand.The Vorpal blade went snicker-snackHe left it dead, and with its head,He went galumping back."
And the six impossible things that Alice says in the movie:

"Six impossible things. Count them, Alice.There's a potion that can make you shrink.And a cake that can make you grow.Animals can talk.Cats can disappear.There is a place called Wonderland.I can slay the Jabberwocky."


I hope you  enjoy this art journal page although it turned out completely different from my vision, and go visit the Altered Alice to see the Best Butter challenge winner and honorable mentions! Please leave a comment before you go, I love hearing from you.

Sunday, February 26, 2012

Wacky Hearts - The Altered Alice Chapter 12

Well, I am squeaking in at the last minute with my February hearts project! I love these wacky Alice characters from The Octopode Factory. I created two pages in my art journal:
This March Hare image is a favorite, and I combined it with the Valentine Hearts Banner. He looks like the morning after a rough road, and I had to put this crazy caption: "She knew it was true love, because she loved him even before coffee."
The images were colored with Copics, and the background paper is Lost & Found from My Mind's Eye. Several layers of grass were cut with a fringe scissors, and a Cheery Lynn leafy flourish adds some interest. Words were stamped with a little wood mounted alphabet by Studio G, a dollar bin find!
I started this spread by sponging the sky area with Tumbled Glass Distress Ink. Then I tore some green paper, crumpled it up, then smoothed it back out before adhering it with a glue stick. I had a blast coloring the
Whimsical Dream Castle with Copic markers. It seemed fitting that the Queen of Hearts would have heart-shaped flowers, so I added the Heart Stems which helped to balance the layout. Letters were stamped directly on the page and the small heart punch is from Stampin' Up!.

I hope you enjoyed these humorous pages! Please leave a comment before you go, I love hearing from you!

Sunday, January 29, 2012

Striped Art Journal Page - The Altered Alice Chapter 11


The challenge this month at The Altered Alice is STRIPES, and our sponsor, Jenny Doh of CRESCENDOh, provided this wonderful Alice in Wonderland by Danita stamp set. I love these simply drawn, whimsical characters! I had a wonderful time making this spread in my Moleskine Sketch Journal.


I used a plastic stencil with squares to make the stripes. I sponged various colors of Distress Ink through the stencil using an ink blending tool. Then I offset the stencil, sliding it over horizontally but leaving it lined up vertically. On the right side, I centered the second set of squares over the divider from the previous stenciling. On the left, I slid the stencil over just far enough  to cover the divider from the previous step. After that I sponged some clocks through the stencil with Pumice Stone colored Distress Ink.

Then stamped all the figures on white card stock, colored them with Copic Sketch markers, trimmed them out and pasted them on with a Zig glue pen.

After that I had fun doodling, snugging up the name of the character to each cutout and selecting the quotes I printed on the blank horizontal stripes, making stripes out of the quotes. Each quote is connected to the character with an underline.


I think this quote by the Tweedles is one of my favorites!

Supplies:
Journal: Moleskine large red sketch journal
Paper: Copic X-Press It card stock, Earth Love patterned paper.
Ink: Memento Tuxedo Black, Distress Ink  in Fired Brick, Scattered Straw, Broken China, Shabby Shutters, Dusty Concord, Ranger Ink Blending Tool, Copic Multiliner Pens.
Stencils: The Crafter's Workshop "Mini Mosaic" and "Time Travel" 6x6 templates

Please leave a comment before you go!

Sunday, October 16, 2011

Angels in Disguise

FYI: Be sure to stop by The Altered Alice; I've added another week of amazing design team projects made with IndigoBlu stamps!

I have quite a collection of angel stamps, and I love this Bible verse from Hebrews 13:2 about angels: "Be not forgetful to entertain strangers, for thereby some have entertained angels unawares." That's one of those quotes that just doesn't sound right to me unless it is the good old King James version!  I know when I reflect on my life there have been definite turning points and people who seem to have been placed in my way for a reason; without those influences my life would have been on a very different course.

Click to enlarge
This page started off as a technique exploration. I wanted to try using Liquitex Clear Gesso on the page instead of regular. Clear gesso is very different as it seals the surface AND gives the surface a lot of tooth to hold pencil or charcoal; it almost feels like the fine side of an emory board. I painted it on with a foam brush, first in one direction then another, which resulted in a linen finish.

Click to enlarge
Then I sponged on PanPastels in a beautiful gradient. The aqua shade in the center is actually more vibrant than it appears. Then I sponged various colors of PanPastels through a stencil at the top and bottom and outlined the areas with a clear Gelly Roll Stardust pen. I was hoping that the extra tooth of the surface meant that I would not need to fix the pastels, but I still needed to spray the surface with a fixative to prevent smearing.

Click to enlarge
Next I used a wing stencil with a product I now LOVE - Delta Texture Magic. It gives so much dimension; I spread it through the stencil with an old credit card. It has a really different texture and is fairly low moisture. I was pleased at how quickly it dried compared to modeling paste, and it has a very interesting texture!

Click to enlarge
I stamped "Angel in a Garden" by Postmodern Design and painted it with watercolors. When dry, I went over the halo, wings, and robes of the angel with the clear Gelly Roll Stardust pen. I hope the above photo gives you some idea of how shimmery this is in real life! I trimmed it out and adhered it to my page.

Click to enlarge
I wrote in the Bible verse with a purple Copic Multiliner SP but the dark color was too harsh. I rubbed some PanPastel over the words and that really helped to soften the text. I highlighted some areas with the clear Stardust pen and other areas with a white Gelly Roll pen.  The layout needed some horizontal elements, everything was so up and down, so I ruched some ribbon, adhering it to Scor-Tape as I ruffled it up. I love the ruched ribbon, it adds a lot of movement, which reminds me of angel wings, and the satin folds remind me of folds of the angel's robe.

It still wasn't right. it looked like an overgrown card, not a journal page. Then I realized it needed some journaling! I keep a lined journal where I write down poetry and quotes that I like, and I have quite a few angel quotes. I am much happier with the page now that it tells more of the story. Click on the photos above to see the details!

Around the top I wrote this quote that I love by Eric Honeycutt:
"The wings of angels are often found on the backs of the most unlikely people."

Above the angel wings I drew another white line with a white gel pen. In between I wrote a quote by James Russell Lowell:
"All God's angels come to us disguised."

At the bottom, I could not fit the entire passage I wanted to use, so I just used the last part of this quote by George Eliot:
"The golden moments in the stream of life rush past us and we see nothing but sand; the angels come to visit us, and we only know them when they are gone."
I do have a pretty amazing card to share with you, I just haven't had a chance to get good pictures. That will be up next!

Supplies: (you may not see the list in a reader or email; click on the title of this post to go to the blog)

Please leave a comment and let me know what you think about angels, influences on your life, or any of the techniques used. Your comments are what makes this effort worthwhile!

Sunday, October 9, 2011

A life without BOOKS...would kill me!

I am an avid reader. I have thousands of books; I am afraid to be more specific than that, lol! We moved all the time when I was a kid, and being quiet, chubby and wearing glasses pretty much ensured I was not at the top of any popularity list. Books were my friends, and they were friends who could come along with me no matter where we lived. When I found this quote by Heinrich Mann I knew I wanted to build an art journal page around it: "A house without books is like a room without windows."

Click to enlarge
I started by sealing the page in my 7x10 inch journal with gesso. Then I tore up book pages and decoupaged them onto the page with matte multi medium.  Then I scribbled Neocolor II watercolor crayons in various shades of green, but instead of activating them with water, I used more of the multi-medium. It worked like a dream and had the benefit of making the watercolor impervious to subsequent applications as it was now sealed with acrylic!  This allowed me to then paint in a brown path over the greeen without mixing the green into it. I used an ultra-fine Sharpie to sketch in cobblestones and clumps of grass.

Click to enlarge
Then I turned my attention to the sky. I scribbled in a sunrise sky with all different colors of watercolor crayons, then wet my brush with matte medium instead of water. I LOVE this technique. The medium is wet so it activates the watercolor, but it is like mixing up an acrylic glaze in all different colors right on the page! Heaven!  I stamped the quote with a little Studio G wooden letter stamp set that I found in the dollar bin at Michaels. I did not even try to keep them straight; I prefer the crooked look. I used black Stazon to ensure it would stick to the acrylic medium.

Click to enlarge

I love this set of Zettiology house stamps by Teesha Moore. Each one looks like it has its own story inside! I really like the way they all have faces and text inside. I stamped them with Versafine on cream cardstock and glued them down with the matte medium. It still needed something, so I added this tree with a leaf stencil by troweling gesso through the stencil using an old credit card. When it dried the white looked too stark, so I colored it with Copic markers! Love the way this turned out.

Click to enlarge
Supplies: (Note - if you are reading this in email or a reader, you may have to go to the blog to view the supplies; just click the title of this post.)
I would love to hear your comments on my page!  Thanks so much for stopping by.  I'll have a pretty incredible card to show you next time, back to my roots!

Friday, September 30, 2011

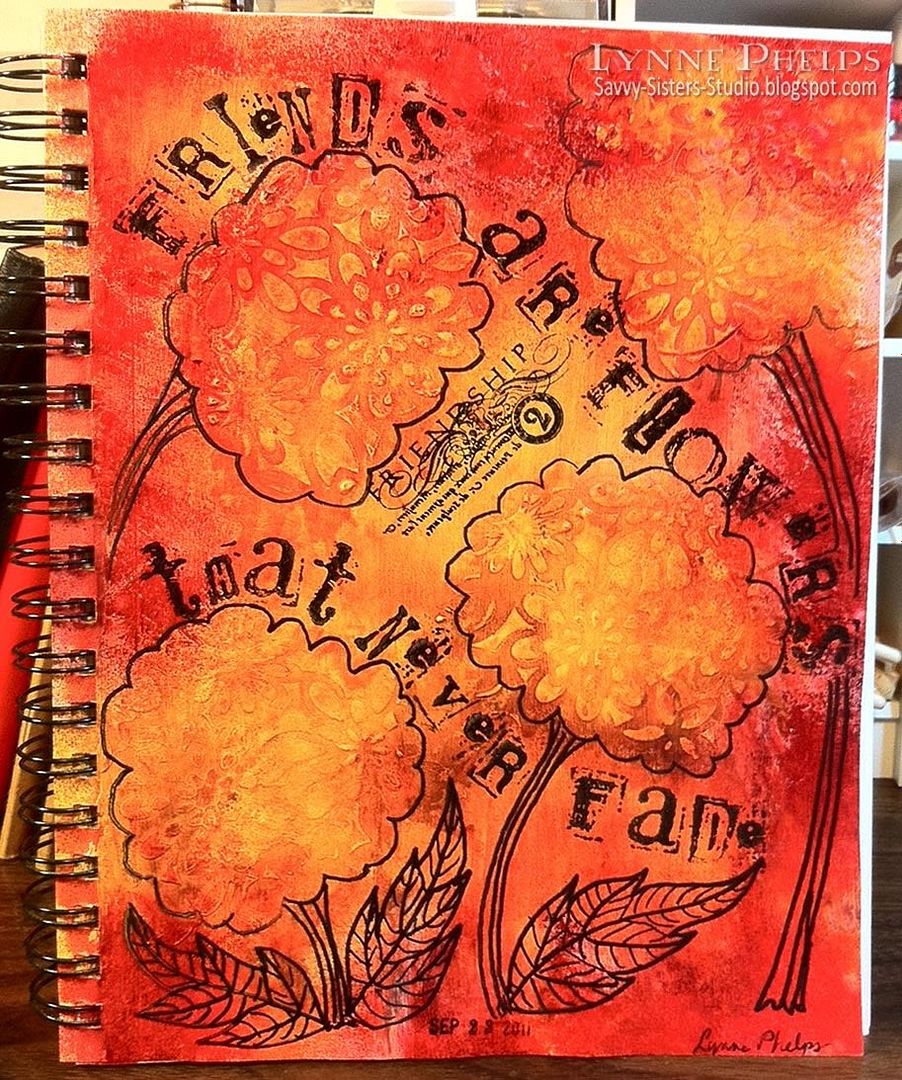
Friends are Flowers that Never Fade

Last Friday my little stamping group decided to play with spray inks. I had not used spray inks prior to this and it was quite a learning experience! We started by putting a coat of gesso on the page. This allows the ink to move around freely, it won't soak into the page.  The actual colors are deeper and richer than shown. Sorry about the photography, my iPhone doesn't come near my Nikon DSL but I was in a hurry! :-)

Click to enlarge
We used Ranger Color Wash Spray and Tim Holtz Distress Stains. After I had some red and yellow swimming around on the page of my 7 x 10 Canson Mixed Media journal, I heat dried it and added some texture with stenciling. Molly had a Crafters Workshop flower patterned stencil, so I used a credit card to swipe some gesso through the openings. I put several random splotches around the page. It looked really cool! Then more spraying fun. Note: gesso comes in various thicknesses. I was using the Claudine Helmuth gesso which is very thick and comes in a jar, not a bottle.

However, I had not really thought it through. I was thinking the acrylic gesso would act as a resist, but of course gesso is a primer and it is made to hold the paint that goes on top of it. I want to try this again with some acrylic paint, which I think will resist the subsequent layers of color. Still, the dimension of the gesso flowers caused the spray inks to pool around each raised area which gave a neat effect!

Then I added the words with my all time favorite alphabet set, the retired Stampin' Up! Collage letters and numbers. The Friendship stamp is part of a series of words by Kelli Everett from The Uptown Design Company, now sadly out of business. I used Stazon black ink; the stickiness of the ink was a plus on the non-porous surface. I used a black Sharpie to doodle flower outlines, stems and leaves.  A date stamp was added last.

Supplies: (Note - if you are reading this in email or a reader, you will have to go to the blog to see the supplies, just click the title of this post.)

Linky Tools - Personal Link Library!
There has been a lot of buzz about InLinkz new "Link Manager" tool.  I sent owner and programmer Brent Riggs a request to add this functionality to Linky Tools.  Three days later Brent contacted me to test the new functionality, and there is no extra cost or separate subscription! I can't tell you how wonderful it is working with Linky Tools.  I will do a separate post about the new Personal Link Library functionality; it is so cool. I just add all my supply links with thumbnail one time and it is so fast to do. Then I can pull those links onto any list I like! You'll be seeing lots of neat supply lists like this from now on. What tickled me (even more than the amazing responsiveness and quick turnaround) was that Brent featured my blog in one of the demonstration videos. I hope you'll check it out, my 90 seconds of fame, LOL!

This was a really fun project. The quote seemed perfect as I was having nice messy fun with friends while making flowers! This page will always bring back memories of a fun evening.

Please leave a comment; your comments are what keep me blogging!
:-)
Edited to add:
Several people commented on the alphabet I used - Stampin' Up! Collage Alphabet and Collage Numbers. Although they are retired, the two sets are readily available on eBay. Click here to see the search on the US eBay, or search for this string in your country's eBay: 
"stampin up" ("collage alphabet", "collage numbers") 
This will search for the alphabet OR the numbers set, so you will see both! They are available at all price points.

Wednesday, September 14, 2011

Twelve Things to Remember. . . We will never forget.

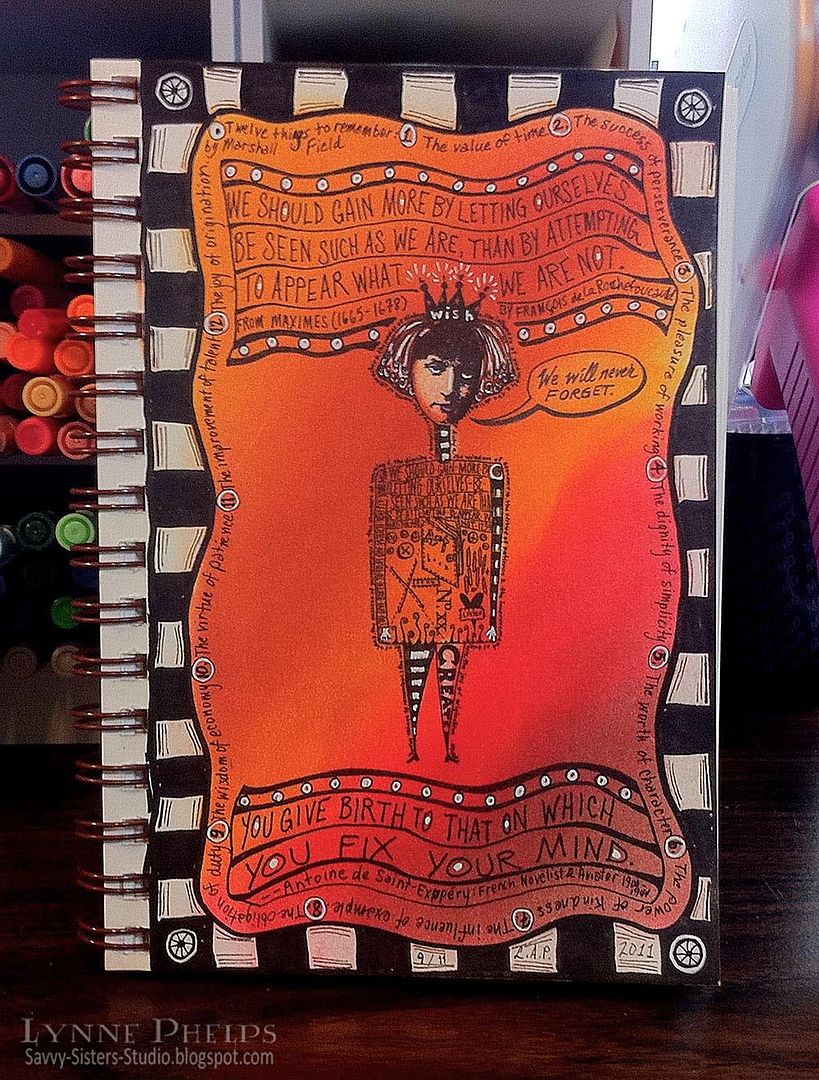
Last week I visited my friend Molly and showed her some of the fun things you can do with PanPastels. I quickly created this vivid background in a Strathmore Mixed Media Visual Journal using the Sofft Tools oval sponge and the 20 painting colors set. They are completely erasable, so after I used a fine black Sharpie to draw my checkerboard border, I just erased the pastel and brought it back to a bright white page! The eraser was not the best, sure wish I'd had my kneaded eraser handy!
Click to enlarge

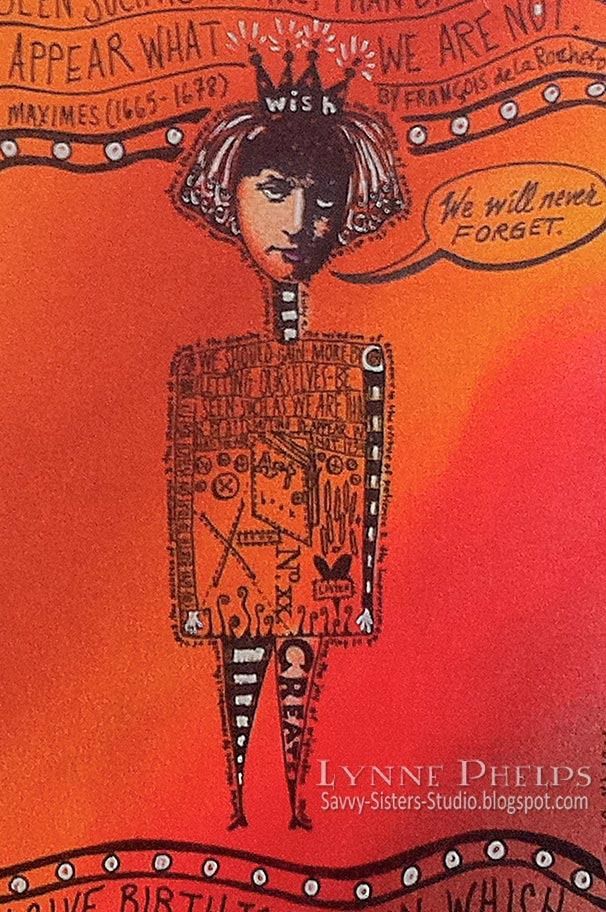
Molly had just received a Zettiology order, and I could not resist stamping this cool Teesha Moore image in the center! I used the eraser to create highlights in her face, legs, and striped sleeve. Then I used a fixative so I could add more layers without smearing. 

There are three really good quotes worked into this stamped image, but they are so tiny you can hardly read them. I decided to write them larger on my page AND site the sources. I am fanatic about listing the authors of things, and I like to list dates also when that adds interest. 

Can you see all the quotes? One is on her chest, another down the left sleeve, and the third is writing tiny, tiny, tiny around the whole figure:

Click to enlarge
I added white gel pen highlights to the figure with a Sakura white Gelly Roll pen. A little shine on her nose, highlights in her curls, and gleams in the whites of her eyes, white gloves, a dazzle on her tiara, it all really brought her to life! 

Click to enlarge
The quote on her chest reads "We should gain more by letting ourselves be seen such as we are, than by attempting to appear what we are not." was in the "Maximes" of François de La Rochefoucauld which began in 1665 and reached their final form in 1678. Isn't it fascinating how human nature doesn't change? This advice sounds as fresh today as it did in the seventeenth century! I wrote it in at the top with various black Copic Multiliner SP pens, then I doodled lines and added some white dots and outlined them as well.
Click to enlarge
All around the checkerboard border, I wrote in "Twelve Things to Remember" by Marshall Fields, the great Chicago retailer. It echoes the way it is written all around the edge of the figure. They are also sometimes called "Twelve Priceless Qualities of Success."

Twelve Things to Remember:
  1. The value of time
  2. The success of perserverence
  3. The pleasure of working
  4. The dignity of simplicity
  5. The worth of character
  6. The power of kindness
  7. The influence of example
  8. The obligation of duty
  9. The wisdom of economy
  10. The virtue of patience
  11. The improvment of talent
  12. The joy of origination
All things worth remembering, worth valuing, worth preserving.

Click to enlarge
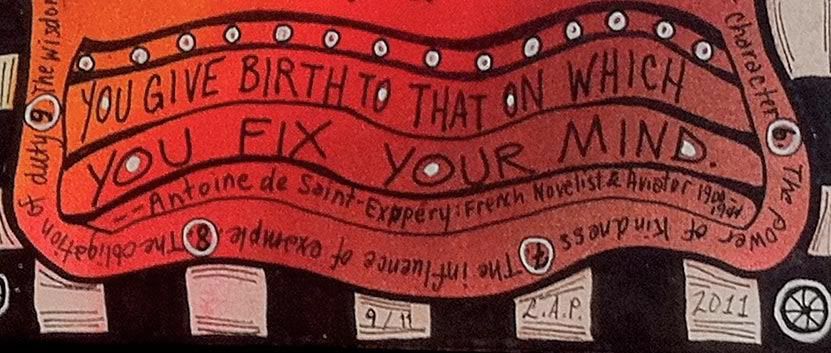
The quote down the left sleeve says "You give birth to that on which you fix your mind." by Antoine de Saint-Expupéry, a French novelist and aviator who lived from 1900-1944. Another quote that is as fresh now as it was then. Of course the point of the quote is to fix your mind on good things, lofty goals, to dream great dreams. But it also works in reverse. Serial killers dream terrible dreams and fix their mind in directions they should never go and give birth to atrocities. Terrorists in some cave or compound fixed their minds on how to devastate America and gave birth to the destruction of World Trade Center, the Pentagon, the high-jacked plane of heroes. We all need to exercise some mental discipline to maintain decency, kindness, and civilization. We need to strive to fix our minds towards the good and so give birth to creativity, to joy and not to tragedy.

I still remember the day it happened. I was at work in a 50-story skyscraper in New Orleans. A friend called and said, "Get out of there! If the planes come to New Orleans it is your building they will hit!" I said what are you talking about and she said "Find a TV!" We all watched in horror in the conference room. Not one face without tears. Just the beginning. . . .

This page did not start off having anything to do with 9/11, but I finished it on the tenth anniversary of the tragedy and it seemed to apply. It was certainly on my mind as I researched all the quotes and added all the text. So I added the speech bubble to the figure. "We will never forget."

9/11/2001:
WE WILL NEVER FORGET.

Sunday, September 11, 2011

Week 2, CHAPTER 7: Text as Nonsense

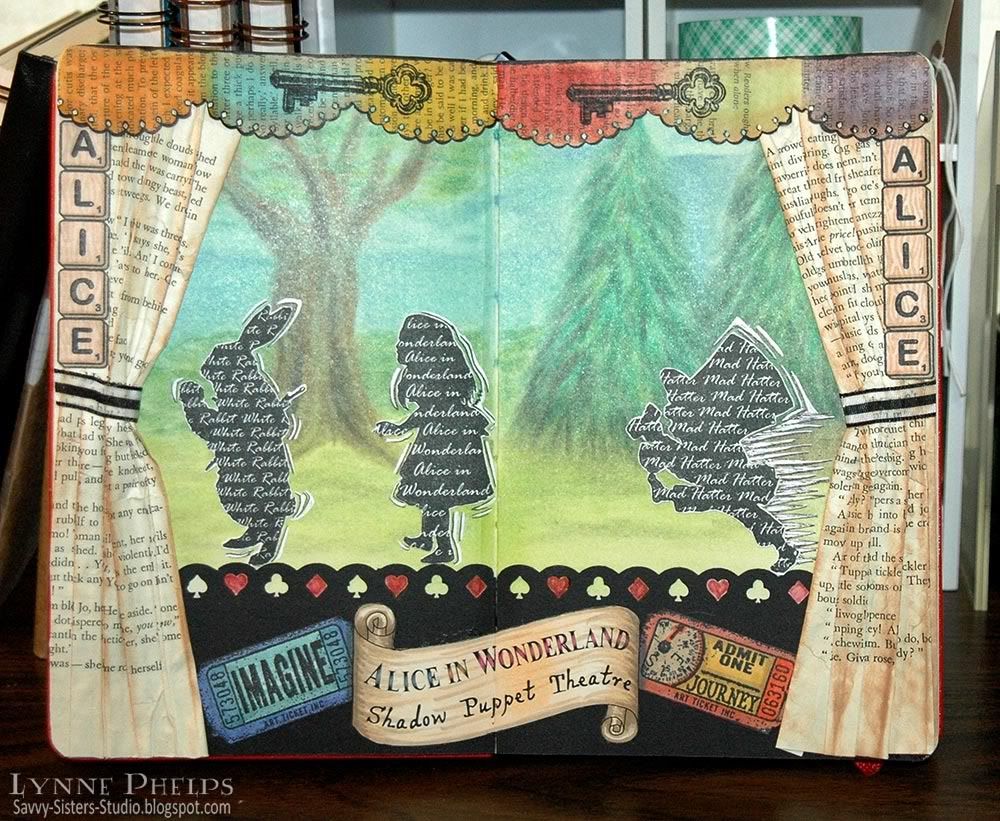
I couldn't resist making a second project this month for The Altered Alice CHAPTER 7 Challenge: Text as Nonsense. I am in love with the wonderful silhouette stamps on the Alice 2 plate from our sponsor, Stamp Attack!

Click to enlarge
I created the first page in my new Moleskine sketchbook. I got two of them: a red sketchbook for Alice projects and a black sketchbook for everything else. (They were almost one third off at Amazon, just click the link at left!) The paper is so smooth and heavy, a dream to stamp on, and it smells wonderful!  You may laugh but I just kept sticking my nose into the pages and inhaling the wonderful aroma of this paper! They were so beautiful and pristine that it took me a while to actually get the courage up to sully a page with one of my artistic attempts. But now I'm over that, lol!


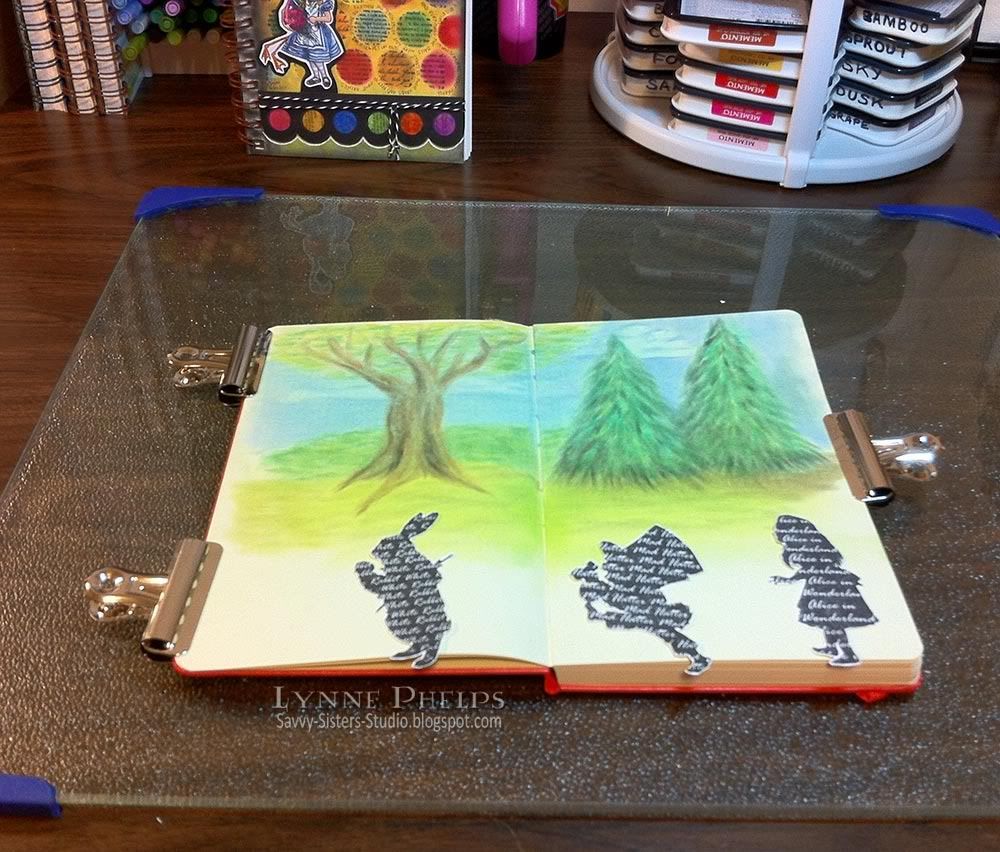
I began by painting a backdrop for my "shadow puppets" with PanPastels. The grassy area was done with the oval sponge and all the rest was done with the Sofft Tool palette knives. LOVE them!! I started off with the 20 set of pure mass colors (the "Painting" set of 20) but I am going to order the tints and shades next, plus the palette trays.  The bulldog clips just help to weight down the pages while I'm working on it. I knew the curtains would cover the sides and the stage would cover the bottom. The silhouette images were stamped with black Versafine.

The front of the stage was punched with an EK edger punch of card suits and I scribbled red marker in the heart and diamond openings. I created the scroll with the title in Adobe Illustrator. The admission tickets are an old Art Tickets set that is still available from Invoke Arts.


I ran book pages through my crimper in all different directions to soften the paper fibers before I tried to pinch and glue the curtains into place. They are sponged with Distress Tea Dye ink on the folds. The tiebacks are ribbon. The ALICE Scrabble tile word and the key stamped on the curtain valance are also from the Stamp Attack Alice 2 plate.  I love making these curtains; you can see my first attempt on this circus tent page!

I hope you enjoyed my little Wonderland Shadow Puppet Theater. Please leave me a comment and think about playing along in this month's challenge!
Related Posts with Thumbnails