Saturday, September 25, 2010

Oh, Alice!CHAPTER 32: Journey to the Center of the Earth...or Down the Rabbit Hole!

Alice in Wonderland
Click to enlarge
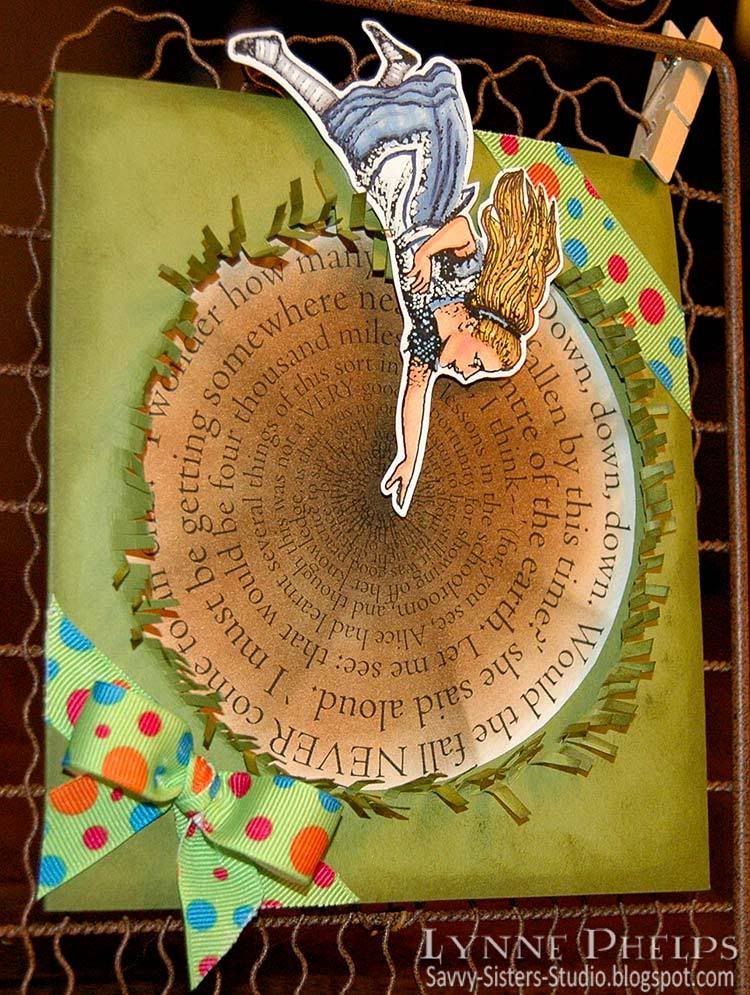
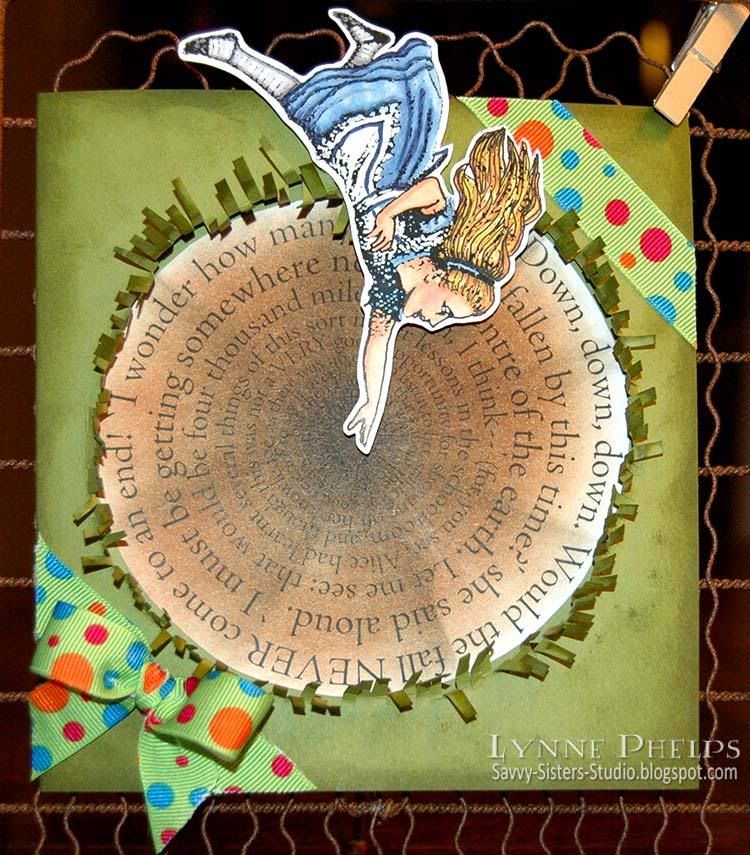
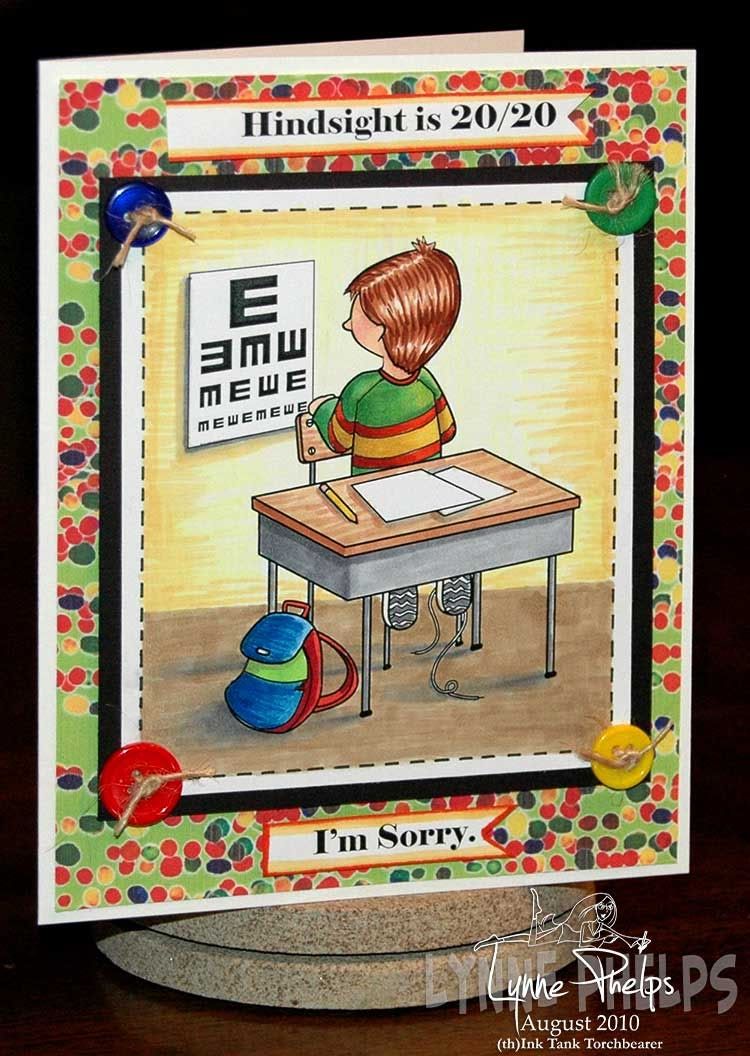
Down, down, down. Would the fall never come to an end!
"I wonder how many miles I've fallen by this time?' she said aloud. `I must be getting somewhere near the centre of the earth. Let me see: that would be four thousand miles down, I think--'"
(for, you see, Alice had learnt several things of this sort in her lessons in the schoolroom, and though this was not a very good opportunity for showing off her knowledge, as there was no one to listen to her, still it was good practice to say it over)
"yes, that's about the right distance--but then I wonder what Latitude or Longitude I've got to?' (Alice had no idea what Latitude was, or Longitude either, but thought they were nice grand words to say.)...
Hello from DOWN the RABBIT HOLE today, everyone! Your mission, should you choose to accept it, is to create a card with a WINDOW or a HOLE in it!

My Card:

I started by typing the text of the above paragraph in a spiral and printing it out on my black and white laser onto color laser printer paper. I sponged it with Distress Ink in various shades of brown to give it a feeling of depth, then I cut it out.  I cut the hole in my green card base smaller, so it left room to cut a grassy fringe all the way around the hole and ruffle it up to bend it back away from the hole. (I tell you what, that Martha Stewart fringe scissors has just moved to the top of my wishlist!!!) I sponged the "grass" and the edges with darker green ink.  I pasted my spiral text inside the card, matched up with the aperature in the front of the card. I printed Alice and colored her with Copics, then I covered the whole back with glue stick and pasted it to a piece of white card. This made it stiff enough to cut out and pop up on thick dimensional foam around the outer edge of the hole.  I adhered some ribbon to the two opposite corners and added a bow and it was done!

Alice in Wonderland
Click to enlarge


I am very happy with how it turned out, especially the sponging of the text to give the illusion of depth in the rabbit hole!  I hope you like it too! It has a lot more dimension in real life, I wish you could see it!

I have entered this card in the following challenge:
Check out the rabbit holes the rest of the Oh, Alice! design team have fallen into!
There is no time limit with this challenge, so we hope you will take the opportunity to jump down the rabbit hole with us and enter your new creation on Oh, Alice!

Please leave me a comment, it really makes my day when you do! Blogging is pretty lonely without comments and I appreciate each and every one. :)

Stamps: digi Alice
Paper: Stampin' Up! Old Olive card; HP - color laser printer paper; Georgia Pacific - white card.
Ink: Ranger Distress Ink - Peeled Paint (green), Walnut Stain (dk. brown), Vintage Photo (med. brown); Copic - alcohol-based Sketch markers.
Miscellaneous: Ribbon.
Tools: Bow-Easy; Ranger Inksentials - Foam Blending Tool.

I love Stampin' Up! card stock and their fabulous color palette! If you need any, please consider buying from my little sister, Janet! Check her blog for the latest specials: And She's Still Stamping.  Thanks for looking!

Thursday, September 23, 2010

I'm Singing for Joy - My Very Own Amber INK Set!!!!

PhotobucketI'm singing for joy as the winner of Amber INK's very first 21 Day Challenge!  Amber promised the prize would be amazing! Stupendous! Of incredible super-duper prizelike proportions! So what did I win? Are you ready?

MY VERY OWN STAMP SET DESIGNED BY AMBER!!!!!!  I get to design a stamp set and Amber will draw it, and I hope scores of you will decide that you, too, must have it! Maybe it will become your favorite go-to set, as I am sure it will become mine!

So, what did I ask for, is that what you are wondering?  Well, my favorite Amber INK stamps are the Amber Girls! I love them; they're hip, they're sassy, they've got style, they have great hair, and they are so much fun to color. But you know what? They are too darned skinny (and I am too darned plus sized, are you with me?) Lookee:


Amber INK
Click to enlarge
 

This is my favorite Amber INK set - Rainy Day - she is so much fun to color and/or paper piece! My other favorite Amber Girls can be seen  here (my prize winning entry!) and here.

So when Amber told me I got to design my own set, I already knew what I wanted - an Amber WOMAN set! Full-figured and fashionable! More to love! With great hair! And communicating - I wanted the set to be called Let's Communicate!  I sent my ideas in to Amber and she approved!

I got to see the first rough sketches today, and you can too! They are amazing!  Click any one to go to Amber's "Workroom" where you can see the full size sketches and watch the set as it develops!

Amber INK     Amber INK     Amber INK

So, what do you think? Do you like my idea for a digi stamp set?  Do any of you out there like the idea of a fun, fashionable and full-figured stamp line?  Also, what sentiments do you think should be included for the bubbles?  PLEASE comment - I really REALLY want to know what you think! 

Amber INKIs this the most amazing challenge blog ever or what?  I think you need to enter - the challenge this month is Halloween and with 21 days to enter (followed by three days of voting) you've got time!  Trick or Treaty Amber Inky! The three runner-ups get goodies too, so get crackin' - and check out all of Amber's adorable Halloween iPaper and digi stamps!  After all, the grand prize will be really and truly extremely INKredible!

Sunday, September 19, 2010

Passing the Amber INK Torch!


I have had SUCH FUN during my month as a torch bearer for Amber INK's Blue Team! You can see all my Amber INK projects here. I have more creations planned, and I love Love LOVE the new INKredible 21 Day Challenge Blog, so you will continue to see projects from me in the future although my time as part of the Amber INK Th(INK) Tank has passed. Thanks again to Amber and Pam for such a fun month!


I am SO PROUD to tell you that the torch for Amber INK's Blue Team has been passed from me to the fabulous Charmaine, a.k.a. CharmWarm, of Oodabug Alley!!!  Amber INK fans will recognize Charmaine from the Grand Opening Blog Frolic as well as being one of the competitors in the very first Amber INK INKredible 21 Day Challenge, and I hope you will continue to follow the Blue Team during Charmaine's lap with the torch! Go Blue!  You can see all of Charmaine's Amber INK projects here, and the whole new Th(INK) Tank line up here.


I would also like to thank Suzi McKenzie, from The Manic World of Mrs. Weyremaster, for passing the torch to me. Suzi was the very first person to carry the torch for the Blue Team and she set a high standard! She did the most amazing underwater scene using the spotlighting technique, which you can see here, and all of her Amber INK projects can be seen here. Thanks again Suzi for the torch and the inspiration!

I will have some more exciting Amber INK news tomorrow, so stay tuned!

Saturday, September 18, 2010

Oh, Alice! CHAPTER 31: Fighting for the CROWN

Photobucket
`Why the Lion and the Unicorn, of course,' said the King. `Fighting for the crown?' `Yes, to be sure,' said the King: `and the best of the joke is, that it's my crown all the while! Let's run and see them.' And they trotted off, Alice repeating to herself, as she ran, the words of the old song: -- `The Lion and the Unicorn were fighting for the crown: The Lion beat the Unicorn all round the town. Some gave them white bread, some gave them brown; Some gave them plum-cake and drummed them out of town.'
Hey everyone! Oh, Alice! has a wonderful challenge today and the prize at stake is from the Mad Hatter herself! Jessica will be giving away an {Ippity} prize pack of stamps plus a nice array of 6x6 designer papers to ONE lucky winner this week who is "Crowned" by Random.org!

Speaking of crowns, THAT's this week's challenge, brought to you by our very own Twisted Sis Sammi: Use CROWNS and/or MYTHICAL Creatures on your card or creation today!

My Card: Alice, a Gryphon, and the Mock Turtle...

When I thought about mythical creatures and Alice, the Gryphon immediately came to mind. A gryphon has the head, shoulders, wings, and front legs of a bird of prey and the hindquarters of a lion! The other creature, the Mock Turtle, exists only in the world of Alice in Wonderland. Turtle meat was expensive, so in the author's time Mock Turtle Soup was popular, which was made with veal rather than turtle meat. Therefore Carroll's Mock Turtle has the body and flippers of a turtle but the head, feet and tail of a calf! I added a crown to Alice's head for today's challenge.


Photobucket
Click to enlarge
i printed the combined image onto color laser printer paper and coloired it wth Copic markers, highlighting the crown with a gold glitter pen. I rounded the corners, then I mounted it to black card and rounded those corners also. The background papers are two sides of the same sheet, with edges roughed with a distressing tool up and sponged with Distress Ink. All layers were adhered with foam mounting tape, then a wonderful pearl flourish was applied.

Can you say blog candy winner? Oh, yeah, that's me! I won a bunch of lovely items from Kim Hughes, a Zva design team member! Thanks Zva and THANKS Kim!  I had never used these flourishes before and it was so easy to apply. Thanks even more to Kim, the Basement Stamper, for telling me she saw my name as the winner of the blog candy!!!

I have entered this card in the following challenges:
 Here's some mystic madness brought to you by our Twisted team:
That's some ROYAL work, huh? Be sure to upload your card or creation at Oh, Alice! by Friday, September 24th to be eligible to WIN the {Ippity} prize pack! Have a very regal day in WONDERLAND!

Please leave me a comment and let me know what you think! I love hearing from you!

Stamps: Free Alice image from Lenny's Alice in Wonderland site, Free crown image.
Paper: Value Pack - ivory card and envelope; Stampin' Up! - black card stock; K&Co. - patterned paper, front and back of same sheet.
Ink: Copic - Sketch markers, gold AtYou Spica pen; Ranger Distress Ink - Broken China.
Miscellaneous: Zva Creative - PE-02CB-136 two pearl flourishes.
Tools: We R Memory Keepers - Corner Chomper; Stampin' Up! - distressing tool; Ranger Inksentials - Ink Blending Tool and foam squares.

Wednesday, September 15, 2010

Amber INK: You're Still Lookin' Good!

First, I want to thank everyone who voted for my cards in Amber INK's very first challenge; YOU helped me get into the top three! Now the incoming September design team will select a winner from the top three, which will be announced on the 20th when the new release comes out! I would LOVE to win the very first challenge at Amber INK's INKredible 21 Day Challenge Blog!
Photobucket
Click to enlarge

One of my favorite images in this release is this little mermaid with her tongue sticking out in concentration! She comes with a whole set of different images; for this one I used the rocks, two fish, the mirror,bubbles, and the baby mermaid.

Photobucket
Click to enlarge

I had fun creating this scene. I positioned the mirror to reflect a fish - he looks quite startled at his reflection! I printed it with a black and white laser printer on color laser printer paper, then I colored it with Copic markers. I shaded the tail with colors of hot pink, orange, and gold, which is a little hard to see after I gave it a coating of gold glitter glue. The tail had the same treatment but was coated with rust glitter glue, as was her top. The seaweed has green and the fish have gold glitter glue. I guess you can see the trend here?  In addition the mermaid's eyes, the mirror, the fish's eyes and the bubbles have a coating of glossy effects! I'm telling you, this thing is a wonder to behold in person! You can see it in the glare of this flash shot:

Photobucket


To frame the colored image, I cut a fancy edge on some hot pink card using a seashell border punch, then sponged the edges with orange. I zig-zagged some ribbon onto the bottom, ruching it partway and laying it smooth the rest of the way, then cutting a notch into each end.

Photobucket
Click to enlarge

I computer generated the sentiments, sponged them with orange and adhered them to the pink panel, making the notch cut into the bottom sentiment nestle into the notch in the ribbon. The top one was anchored on the left with a button tied with black twine, adhered with a glue dot. I edged the colored image with a copper leafing pen, glued it to a piece of white card to stiffen it, then adhered it to the pink panel with thick foam mounting tape. Then the whole thing was mounted to a mustard colored card base with edges sponged in orange.

PhotobucketThis is my farewell post as a Torch Bearer. I'll be handing my torch over to someone really special, I hand picked her as my successor and I know you will love her style! Check back on the 17th to see who I picked, and we'll see who the challenge winner is on the 20th! I may die of suspense between now and then, LOL! Plus we'll see all the fabby new stamps from Amber INK!

Please leave a comment and let me know what you think about my little mermaid card, the challenge, torch bearers or anything at all!

Stamps: Amber INK - "Baby Mermaids - Friendship"
Paper: Stampin' Up! - More Mustard, black and pink card stock; HP - Color laser printer paper; Georgia Pacific - white card stock.
Ink: Copic - Sketch markers; Ranger Distress Ink - Marmalade; Krylon - metallic Copper Leafing Pen.
Miscellaneous: Ribbon, Ranger - Glossy Accents, Frosted Lace Stickles; Hampton Arts - Gold, green,and rust glitter glue.
Tools: Martha Stewart Crafts - Shell & Sand Dollar border and corner punches; Janome Sew Mini sewing machine; Ranger Inksentials - Ink blending tool and foam pad.
 

Saturday, September 11, 2010

Less than 12 hours to VOTE in Amber INK Challenge!


NOTE: I have two posts today - please scroll down for my Oh, Alice! entry.

Please hop on over to Amber INK's INKredible 21-day challenge and vote for your top three favorites!  Of course I would be THRILLED if you would vote for any of the three projects I entered:

Original Post: A book is a present you open again and again

Photobucket

Click to enlarge

Original Post: Book plates and Owls book card

Photobucket
Click to enlarge

Original Post: School kiddo about to learn how to read!

Photobucket
Click to enlarge
Thanks so much for your support, and I sure hope you will play along with us next month! It is such a fun challenge. You do have to use at least one Amber INK product, but some of the images cost as little as 50 cents so you can do this! And check out the iPaper - Amber has some FABULOUS designs! So go vote at http://amberinkchallenges.blogspot.com/
  

Oh, Alice! CHAPTER 30: Hey there, Nice Stems...

Photobucket
Click to enlarge
"Just as Alice said this, she noticed that one of the trees had a door leading right into it. `That's very curious!' she thought. `But everything's curious today. I think I may as well go in at once.' And in she went.
Once more she found herself in the long hall, and close to the little glass table. `Now, I'll manage better this time,' she said to herself, and began by taking the little golden key, and unlocking the door that led into the garden.
Then she went to work nibbling at the mushroom (she had kept a piece of it in her pocked) till she was about a foot high: then she walked down the little passage: and THEN--she found herself at last in the beautiful garden, among the bright flower-beds and the cool fountains..."
PhotobucketHello out there! It's a lovely day here in Wonderland and Oh, Alice! is celebrating the summer with a nature theme today! Well, TREES and FLOWERS to be more exact! We scored a GREAT sketch sponsored by PAGEMAPS today that is just perfect for today's theme.

I did a pretty literal interpretation of the sketch on my card. I couldn't find an illustration of the door in the tree, but when I think of trees in Wonderland, I think of the Cheshire Cat sitting in the tree! So that's where I started! I printed out the illustration with my black and white laser onto color laser printer paper and colored it with Copic markers, highlighting the cat's smile and eyes with a white gel pen.  At the same time I was setting up the illustration on the computer, I also typeset the words of the conversation Alice is having with the Cheshire Cat to use on the bottom layer of the sketch. I colored that with Copics as well.
Photobucket
Click to enlarge
For my other two layers, I cut out the shapes and ran them through an embossing folder. The edges and some of the raised area were sponged with Distress Inks, as was the card base. Each layer was adhered with foam mounting tape to give it some depth.  I used a little fingertip sponge dauber to add some white clouds. As an afterthought, I remembered I needed an embellishment on the left and I did not want to use a bird. Instead, I ran a strip of adhesive from the top of the card to the top of the second layer and stuck down a ribbon, making loose pleats. Then, as I stitched the pleats down, I centered the loose ribbon of each pleat, thus creating little box pleats. I really like how the ribbon turned out! The only problem was that the embossed mustard colored layer was really overwhelming the whole card especially in person; it was the first thing that your eye was drawn to when you looked at the card. In real life it is more golden than orange as it appears here.

To break up the mustard layer, and to add more stems in keeping with today's challenge, I punched branch and foliage shapes from various greens and added some leaf veins with Copic markers. I also punched some butterflies from dictionary paper I had adhered to card stock, and edge the butterflies with an orange marker.

Photobucket
Click to enlarge
I really like how the punched leaves help to break up the intensity of the embossed mustard layer and act as a bridge between the forground quote and the background dotted hill, so adding a lot of depth. Because they don't introduce any new colors they help to reinforce the color scheme. I'm pretty happy with it now, but I know some may like the simpler version better. Which version do you prefer?

Take a look at what the Design Team did with this amazing sketch:
Now, there's no time limit for you to play along this week, but be sure to link your project on Oh, Alice! so we can come share some love! Enjoy a wonderfully wacky Wonderland week!!

Please leave me a comment and let me know which version of my card appeals to you more! Can't wait to hear your opinions!

Stamps: Free digi from Lenny's Alice in Wonderland site.
Paper: Stampin' Up! - Mellow Moss, More Mustard, Cool Caribbean; HP - Color laser printer paper; Dictionary paper scrap; Georgia Pacific - White card stock.
Ink: Copic - Sketch markers, black Multiliner; Ranger Distress Ink - Broken China, Peeled Paint, Marmalade; White gel pen; Colorbox - white pigment inkpad.
Miscellaneous: Ribbon
Tools: Martha Stewart Crafts - Three Butterfly punch, Foliage punch, Branch punch; Cuttlebug - Swiss Dots embossing folder; Stampin' Up! - Square Lattice embossing folder; Glue Stick; Sewing Machine; Foam mounting tape; Ranger - Inkssential Blending Tool and foam squares; Tsukeniko - fingertip sponge dauber.

Tuesday, September 7, 2010

Hind Sight is 20/20

When I first saw this turned around little guy in the August release from Amber INK, the first phrase that popped into my head was "Hind sight is 20/20." We always see so clearly when we look back on things from the perspective of experience. Who had not done things that, upon reflection, they wish undone?  So I decided to use this little turned around dude to make a fun "I'm sorry" card.

Photobucket
Click to enlarge

I created my own little eye chart to make a visual representation of my computer generated sentiment. I angled it a bit to match the angle the desk is at. My only sorrow is I did not keep to that same angle when I colored the floor. I wanted to add a faux "stitched" outline after the combined image was printed, so I drew it in by hand using a ruler and a Mulitliner pen. All coloring was done with Copic markers. The background paper is one of Amber INK's digi iPaper offerings, love those dots!

And my BIG NEWS:

Photobucket

Most of you know I LOVE to color with any medium: Prismacolor pencils, watercolors, pastels, etc., but my true love is coloring with Copic markers!  I was recently certified as a consumer instructor by Copic!!! I hope to start offering coloring classes in the Middle Georgia area on the weekends. Please contact me if you would be interested in learning coloring techniques from me. I have a fine arts and graphic design background and would love to share not only blending techinques but also how to do shading, shadows, lighting and texture. I have not gotten all the details worked out yet so your opinions would be of great interest to me!

Another lovely piece of news is that I have a birthday coming up this week and my Dad is giving me an airbrush compressor to use with my Copic markers!  I am so excited - after being trained on using the airbrush in the certificaton training, I will soon have one of my own!  Thanks in advance, dearest Dad!

Once I have all the kinks worked out, I hope to start traveling further afield to offer classes on the weekends. I used to teach all kinds of classes at the local scrapping and stamping store, and I have missed it so much since the owner closed it down due to illness. We all miss Anne very much!

Photobucket
Click to enlarge


I am entering this card in the following challenges:
  • Amber INK's INKredible 21-Day Challenge: #1 - Books (I think my little dude is going to be learning to READ shortly!!!)
  • Allsorts Challenge Blog: New Beginnings in honor of back to school week (Although my sentiment is not about a new beginning, I am using a "First day of School Kiddo" stamp from Amber INK)
  • Crazy 4 Challenges: Book Related
  • Creative Card Crew: Back to school
  • Moving Along with the Times: #62 - Stitches, Real or Faux (I added my faux black stitched outline with a pen)
  • Stampavie and More: #107 - School
Please leave a comment - I would really like your opinion on my Amber INK card. Do you love this little dude as much as I do? Also let me know what you think about my dream of teaching!

Saturday, September 4, 2010

Oh, Alice! CHAPTER 29: What makes YOU Shine....or SPARKLE?...

"`Why, what are YOUR shoes done with?' said the Gryphon. `I mean, what makes them so shiny?'
Alice looked down at them, and considered a little before she gave her answer. `They're done with blacking, I believe.'
`Boots and shoes under the sea,' the Gryphon went on in a deep voice, `are done with a whiting. Now you know.'
`And what are they made of?' Alice asked in a tone of great curiosity. `Soles and eels, of course,' the Gryphon replied rather impatiently: `any shrimp could have told you that.'
`If I'd been the whiting,' said Alice, whose thoughts were still running on the song, `I'd have said to the porpoise, "Keep back, please: we don't want YOU with us!"'
`They were obliged to have him with them,' the Mock Turtle said: `no wise fish would go anywhere without a porpoise.'
`Wouldn't it really?' said Alice in a tone of great surprise."
Blacking was shoe polish, and whiting is a fish, if that helps you make sense of our shiny story! Our first challenge of September starts with some exciting news! Today we are still sad about the departure of some of our friends (dear Kim and Kristie) from our Twisted little table, but we are thrilled to welcome some new members! A glistening welcome to Andi Murdock and "Creepy Glowbugg" Gloria! We also are thrilled to be bringing back Emma Eads as our faithful "Dormouse" and welcome to Kellie Winnell as our September Guest Tea Party Member. We know they are going to shine, so be sure to visit Oh, Alice! to see all their creations, plus see who won last week's challenge....

Speaking of shine...and sparkle....we welcome SPARKLE CREATIONS as our sponsor this week! Sparkle is offering a wonderful prize-a $20 credit to the Sparkle Creations store to one random winner this week, IN ADDITION to a coupon code for ALL WHO ENTER this week's contest! How generous is that? On your HONOR, just enter 10OHALICE after you link your card here to enjoy a 10% discount until September 13th.

My Vintage Fairy Tale White Queen Card:
Unfortunately I missed the deadline to request one of the charming Sparkle images from our generous sponsor. I have had this image from an online coloring book site for a while and I thought she would make a great White Queen, so I decided this was the right challenge to use her!

Photobucket
Click to enlarge

I stamped this wonderful flourished banner, then used a Multiliner to write "The White Queen" in the center. I used a glue pen to add some icey blue glitter to the W and Q. I shaded it with blue and gray Copic markers then carefully trimmed it out.

I printed the image with my black and white laser printer onto color laser printer paper, then colored her with Copic markers. I used a ball point glue pen to pinpoint where I wanted to adhere the silver glitter on her crown. Then I did the same to adhere icey blue glitter to her necklace and the bodice of her dress. Liquid Pearls was added last to the trim at the top and bottom of her bodice. The final touch was a silver paint pen to rim the edge of the panel. I wanted to pop it up, so I adhered the whole thing to a piece of white card.

Photobucket
Click to enlarge


On my pale blue background panel, I used Versamark clear ink to stamp a large flourish and heat emboss it with clear detail powder. It was too subtle, so rather than start over I ran the panel through the Cuttlebug with an embossing folder. I highlighted the embossing with a Versamark Dazzle pad, brushing it directly onto the raised areas for some lovely shimmer. I edged this panel with the silver paint pen, then I wrapped some silver ribbon around it - uh oh, too garish!!! I put a white ribbon on top so just an edge showed; much better! I tied a bit of twine around to pinch the ribbons where I wanted to place a bow. I made a tripple looped bow from white organza ribbon and wrapped a bit of the silver ribbon around the center. I adhered the White Queen image and sentiment with pop dots and it was done!

I am pleased with how it turned out, especially with the banner, as I wanted it to look like an illustration from a vintage fairy tale book!

I have submitted my sparkly White Queen to the following challenges:
Be sure to visit Oh, Alice! to see more sparkly creations from our TWISTED tea party! Remember, you have until Friday, September 10th at 8pm CST to link your creation on the Oh, Alice! challenge blog. Winner will be posted on Saturday 9/11's post and good luck to all who enter! Have fun and GET SHIMMERY, SPARKLY and FABULOUS in Wonderland this week!

Please leave me a comment, I really LOVE hearing from you!

Stamps: Hero Arts - background flourish;  See-D's - Once Upon a Time set (banner); Hello Kids online coloring book image.
Paper: HP - color laser printer paper; Papertrey Ink - Spring Rain card stock; Georgia Pacific - white card stock.
Ink: Memento - Tuxedo Black; Versamark - clear, Frost Dazzle; Copic - alcohol Sketch markers.
Miscellaneous: Ribbon; Krylon - silver leafing pen; Paper Studios - clear self-adhesive crystals.
Tools: Cuttlebug - Victoria embossing folder; Bow-Easy.
    

Wednesday, September 1, 2010

Savvy Sister Janet is a Stampin' Up! Demo!

My dear little savvy sister Janet has rejoined Stampin' Up!, and I have created a blog for her! Please go check out "And She's Still Stamping..."  at andshesstillstamping.blogspot.com.

She loves sunflowers, so I had fun creating this blog header for her to match a background we found in Blogger. And check out her cute shopping icon when you get there!

Photobucket

I still LOVE Stampin' Up! and I like the new catalog offerings better than I have in years, I have a huge list, LOL! They have done a "color renovation" and the new paper and ink colors are luscious and sophisticated - they still have the best color palette in the business. They have just stuffed a lot of wonderful items in the clearance bin, including many of the retired paper colors!

The Holiday Mini catalog was just released today. They have some wonderful new embellishments, dies, and embossing folders so be sure to check that out.

If you don't have a demo, please consider making Janet your demo for U.S. sales. This is our "soft opening" and we'll have some grand opening specials later this fall, so stay tuned.

Last, I'll be creating some SU only cards for Janet to feature on her blog, so that will be a lot of fun. I am nominating myself to her "design team" and I think this will be a fun bonding experience for the two of us, a design team of two!

Come back and let me know what you think of her blog design after you've checked it out!
Related Posts with Thumbnails