Showing posts with label Backgrounds DIY. Show all posts

Sunday, April 22, 2012

Ace of Rabbit!

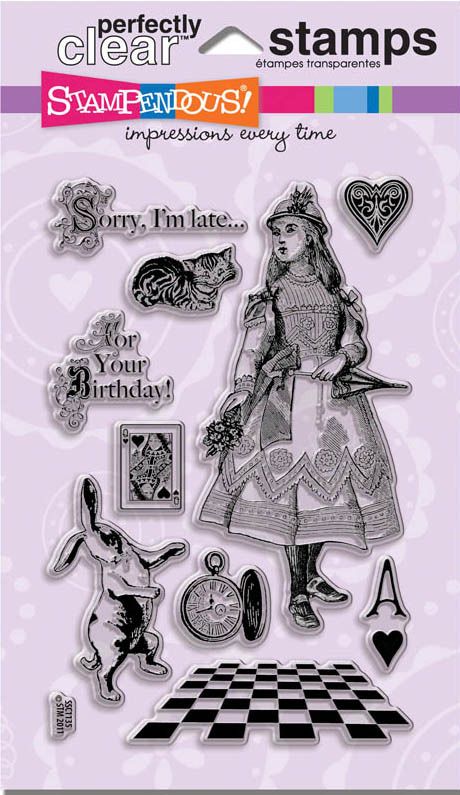
Ever since I saw this wonderful Alice stamp set by Stampendous, I wanted to make an Ace of Hearts card with the White Rabbit holding the heart! I finally had some time to make it happen and I'm so pleased with how it turned out.  This is my second entry for our Stampendous sponsored challenge on The Altered Alice to show us your Sunday best with a splendidly dressed project!

I began by stamping the White Rabbit and Alice on scraps of Kraft card stock and then coloring them in with Prismacolor pencils. I love this look as the pencils are thickly pigmented and fairly opaque. I trimmed out Alice, leaving a margin of the Kraft showing all the way around, and I trimmed the White Rabbit and chomped the corners for the middle of my playing card. I love it that this stamp set includes the card corner stamp, the A with the heart underneath! I sponged the edges of everything with Fired Brick Distress Ink. I tucked a real playing card behind just for fun and to create some interesting angles.

I cut a Spellbinders Fancy Tag and sponged it with Antique Linen and Fired Brick Distress Ink, and stamped the beautifully lettered stamp from the set that says "Sorry I'm late. . . " and threaded some red ribbon through.
For the card base, I made my own patterned paper on Kraft by stamping most of the fun small images in this set, alternating the heart and Queen of Hearts mini playing card in Lady Bug Red Memento ink and the cute Cheshire Cat and the pocket watch in London Fog Memento. I stamped the tile floor stamp across the bottom in Tuxedo Black Memento ink. I embossed a strip of black with a Cuttlebug border embossing folder with the card suits, which I colored with Copics and sponged with Fired Brick Distress Ink. I mounted Alice, the cards, and the fancy tag with dimensional foam tape. I finished it up with criss-crossed ribbon and a multi-loop bow.

Be sure to hop on over to The Altered Alice and see all the amazing entries in this month's contest. There is still time - show us your Sunday best with a "splendidly dressed" card, using ribbon, lace, frills, however you interpret your Sunday best! Stampendous is going to one of these fabulous Wonderland stamp sets to each of THREE WINNERS, so get busy and enter the April contest at The Altered Alice! And check out the Stampendous blog and website!

I hope you enjoyed my Ace of Rabbit playing card! I'd love to hear your comments!

Thursday, June 17, 2010

Waltzingmouse June Customer Blog Waltz!


Welcome to the June Waltzingmouse customer blog waltz! Instead of hopping from blog to blog, we WMS fans waltz our way through! This month's theme is masculine cards.  I have also entered this in the brand new Waltzingmouse Sketch Blog competition for their second week's sketch! Have you visited this brand new WMS sketch blog? Sketches are card layouts, and everyone makes a card from the same layout and submits them. WMS stamps are not required for their new sketch blog challenges, but you get a bit extra if you win and have used Waltzingmouse stamps.  Last, I am submitting this card for Stamping Sisters in Christ Challenge #43, to create a masculine card.

Photobucket

Nothing says masculine to me like chrome diamond plate! I taped a piece of aluminum HVAC tape to a piece of cardstock, burnishing it down smooth. Then I ran the aluminum covered cardstock through my Cuttlebug in the diamond plate embossing folder. Doesn't it look real? I love it, but it was very difficult to photograph, hence all the angled photos! The background was created with several of Waltzingmouse's plaid building stamps in various widths, stamped on a light taupe card stock. I used nice manly shades of brown, olive, tan, and rust. Not a bright or pastel anywhere! The diamond plate was adhered to the plaid panel after the plaid had been sponged round the edges with Walnut Stain.

The center medallion started with a Label Three die cut, sponged with Walnut while still in the die. It was fastened to the plaid panel with antiqued copper brads. Then I stamped the grid background stamp in tan on light taupe card stock, sponged it with Corduroy and Peeled Paint along the very edge, grunging it up a good bit! Last, I cut one of the Ribbon Tag Trio from ivory card stock, sponging it with Peeled Paint while still in the die, edging it with Walnut Stain, and stamped in Copper with the sentiment.

I attached the screw head brads and the buttons tied with jute string to the grid circle, which I mounted with pop-dots to the label. Then I threaded twine and jute string through the ribbon tag, and attached it at an angle to the circle with a pop-dot. I fanned out the ends of the string for fun and to emphasize the angle!

Photobucket

When I made the background plaid, I had some strips I trimmed away. I attached one of the strips to the inside right margin of the card to carry the theme inside!

To see more of the Blog Waltz entries, go to the Waltzingmouse House Forum, where the links list thread will open at 10 a.m. Eastern time!  You need to go through a one-time simple free registration with no awkward questions, then you can see everyone's links to their projects. Please join us, it is so much fun!

Stamps: Waltzingmouse Stamps - Off Beat Backgrounds, Pic-Nic Patterns, Fancy Phrases.
Paper: Georgia Pacific - light taupe card stock; Stampin' Up! - Really Rust card stock.
Ink: Ranger Distress Ink - Walnut Stain, Corduroy, Peeled Paint, Scattered Straw; Memento - Rich Cocoa, Bamboo Leaves; Palette - Haystack; Marvy Matchables - Copper.
Embellishments: Jute string; hemp twine; The Paper Studio - buttons, antique copper mini-brads; Karen Foster - screw head brads.
Tools: Spellbinders - Labels Three, Ribbon Tag Trio; EK Success - 2¾ inch circle punch; Cuttlebug - Diamond Plate embossing folder.
   
Related Posts with Thumbnails