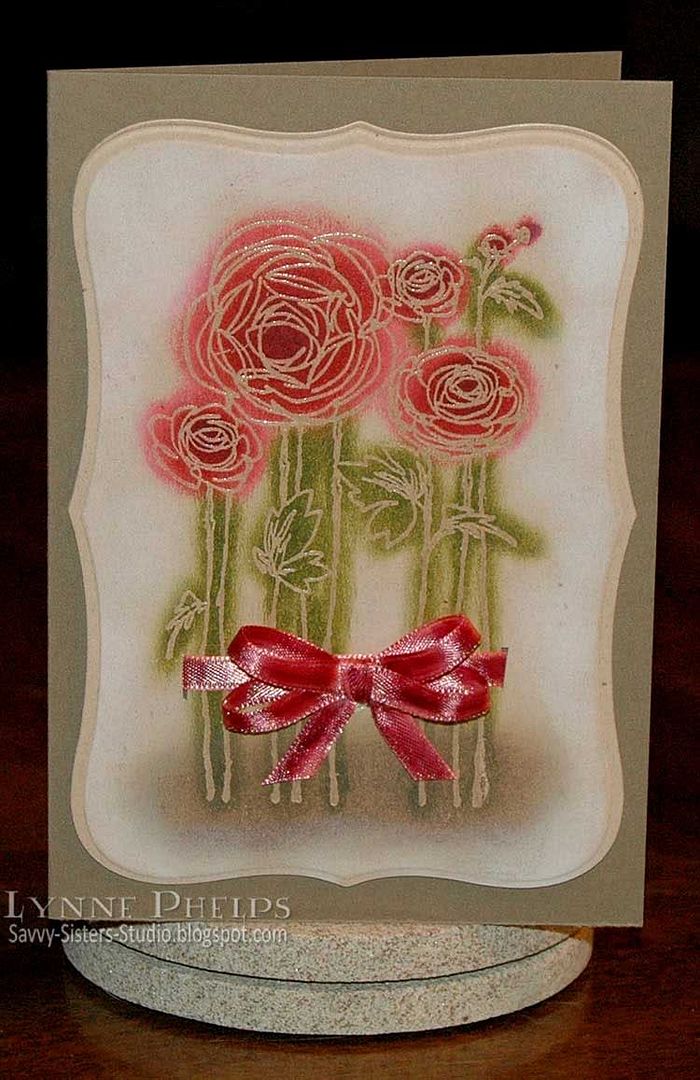
I started by die-cutting a piece of natural confetti card. I thought the rustic flecks in the paper would compliment this quick technique. I sponged a bit of white ink around the edges before removing it from the die. Then stamped the flowers with clear Versamark ink and heat embossed with clear detail powder. Now the flowers would retain the color of the paper, as the clear enamel coating would resist the sponging to come.
I used a Q-tip to sponge various colors of ink on the flowers and leaves. I used a craft knife to cut a small slit on either side of the stems for a ribbon to pass through. I used Copic markers to tint the pale ribbon to match my flowers. I ran a lighter color down the two ribbon edges and a darker shade down the middle. LOVE that look, it makes my 99¢ ribbon look expensive and hand-dyed!
I mounted the image panel to my card base and it was done! 15 minutes and what a cheerful, pretty bunch of flowers to show for the time spent! If I had skipped the die cutting it would have been 10 minutes, can't beat that.
Please leave me a comment, I'd love to hear what you think of this super-quick technique!
Stamps: Stampendous
Paper: Stampin' Up! - Natural Confetti (discontinued), Soft Suede card stock.
Ink: Versamark; Ranger Distress Ink - Peeled Paint (green), Corduroy (brown), Worn Lipstick (pink), Fired Brick (red) and Aged Mahogany (burgundy); Copic - Sketch markers (to die ribbon).
Miscellaneous: Ribbon.
Tools: Q-tips; Spellbinders - Label 8 Nestabilities die; Bow-Easy.








.jpeg)






Wow this is fantastic! Love the effect this technique gives
ReplyDeletelove tasha xx
What a great quick card, I like that you don't have to colour it exactly!
ReplyDeleteWOW This is so beautiful! Love the look of this watercolor/sponged effect!
ReplyDeleteGorgeous card, Lynne! Love the resisted image, the colors you used and the CAS way you finished the card.
ReplyDeleteHugs and smiles
oh Lynne, this is gorgeous!!! love the way you threaded the bow around the stems of the flowers! You should come join in on the Stampendous challenges!
ReplyDelete