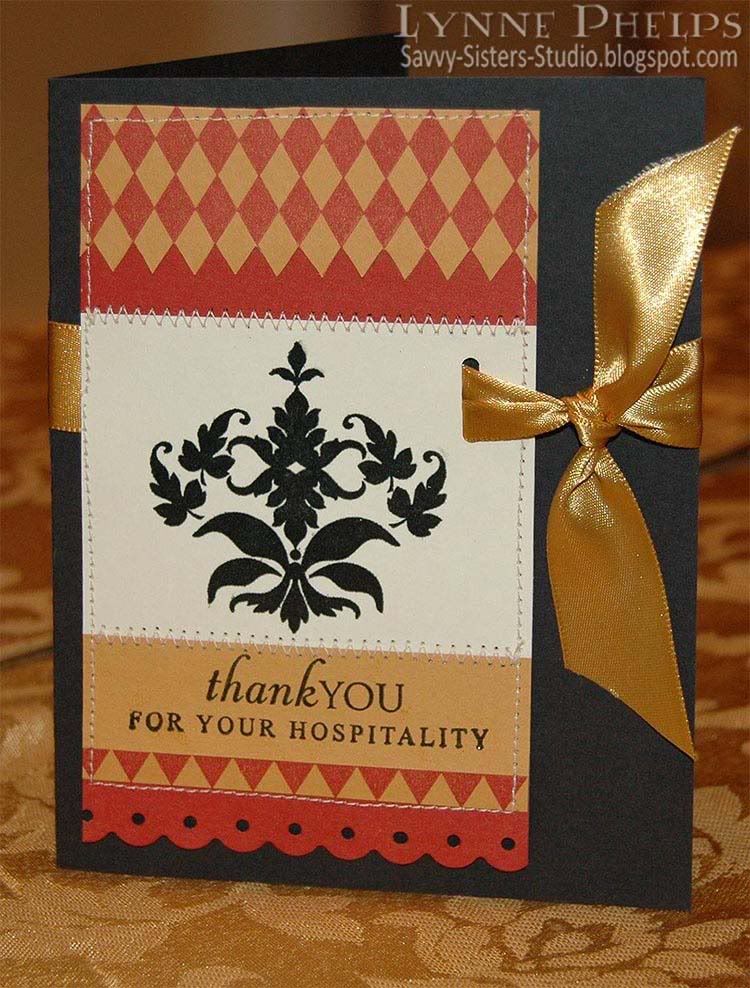
The base is a black 5" x 6.5" card. I stamped the damask image (Papertrey Ink - Damask Designs) by first inking the stamp with Versamark, then with black dye ink (Memento - Tuxedo Black). I heat embossed it with clear detail powder (Ranger). I used the same technique to stamp the sentiment (Papertrey Ink - Home Made). I then stamped a harlequin diamond image (Stampers Anonymous) in red dye ink (Marvy - Crimson Lake) on ochre cardstock (Stampin' Up! - More Mustard). I did not have any cardstock in the red I wanted, so I used the Crimson Lake ink pad in a direct-to-paper technique on another piece of More Mustard cardstock, which I used under my harlequin zig-zag edged piece and at the border-punched bottom edge (Fiskars). This way it perfectly matched the stamped image.
After that, I took a scrap piece of cardstock and assembled all my pieces on it. I cut up my stamped diamond piece to create a zig-zag edge, and trimed another small strip so I would have a row of triangles. I sewed a straight-stitch around the edge, then zig-zag stitched between the pieces. I LOVE this look! I finally broke down and bought a Janome Sew-Mini at Hancock Fabrics and love the texture it adds to the card!
I punched a slot (Stampin' Up!) in the focal point piece, then cut a slit in the fold of the card base so I could wrap the ribbon all the way around the front of the card. I then tied a knot and trimmed the ends of the gorgeous gold 7/8" double-faced satin ribbon (Hobby Lobby).
I am so happy with how this card turned out that I don't want to give it away! But I will, I sure hope they love it. Do you have any cards you have been unable to give to the person for whom you made them? Please leave me a comment and let me know!













Hi! I saw your card/link on split coast stampers. Can you take a picture of the inside of your card (if there's anything in it)? I always have such a hard time trying to figure out what to put in there (if there isn't a lot for me to say in my own words). I'd love to hear any suggestions! Thanks! Brie
ReplyDeleteI always like to wrap my ribbon around the whole card front, as this brings some of the outside in! I cut a slit with an Xacto knife on the spine of the card to allow the ribbon to pass through.
ReplyDeleteI stamped "Many Thanks" on the right side in white pigment ink, and clear embossed it. I put another strip of my harlequin diamond stamped paper, cut small to be a row of triangles (just like near the bottom of the front panel) underneath the stamped sentiment. I often put scraps leftover from the card front on the inside!
Then I wrote my note underneath with a white gel pen.
This is so pretty! Love the pop of the black damask image! :)
ReplyDelete