My order came in just in time for me to make a birthday card, not only for WMS but also for my sister. This card uses the two-stripe plaid stamp from Off Beat Backgrounds, the medium plaid stripe from Pic-Nic Patterns, and a frame and sentiments from Fancy Phrases. The Fancy Phrases fit perfectly into Spellbinders' Fancy Tags dies; mine have not arrived yet so I simply trimmed out the frame with a scissors.

First I stamped the plaid. It is so much fun to do, and you can coordinate it with any color scheme. I went with pink, rose, and soft green for my sister's card. I took a small paper doily and scored it from point to point all the way around. Then I cut the center out so I could make fan-fold pleats all the way around. I adhered the folded doily to a punched circle to hold it and cover up the inside edges. I saw this idea on the Bits and Pieces blog and ran out and bought a pack of doilies the next day at my local Wal-Mart!
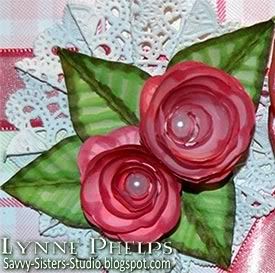
Next, I made some of the spiral cut roses you are seeing a lot out there. Did you know Sizzix actually makes a Bigz die for these now? Not having the die (or the money for one!!), I just drew a spiral on printer paper with a pencil and cut it out with a scalloped scissors. I carefully erased the pencil marks then colored the whole thing with light pink Copic markers and edged it with a deeper rose along the spiral cut. There are a lot of tutorials out there, but what I used is this Sizzix PDF on how to assemble the flower.
 I used a pearl bead in the center of each, isn't that a pretty touch? I wanted to control how the bead hole was oriented, so I put it on a pin, applied a blog of Diamond Glaze glue on one side of the bead, and lowered it into the center of the flower. This allowed me to keep the bead hole horizontal, so the hole does not show from the top.
Remember your crimper? That tool that has been gathering dust since embossing folders were created? Pull it back out as your leaf maker! I punched a 1¼ inch circle, folded it in half and ran it through the crimper at an angle diagonal to the fold. Then, while still folded, I cut the sides down to make a half teardrop shape. Open up the fold and you have a perfect textured leaf. You could stop there, but since when do I know when to stop? So the edges, center fold, and ridges were accented with Copic markers!
For the sentiment, I stamped the medium sized plaid stripe in soft green, then stamped the frame and sentiment on top with rose. I wanted it to stand out more from the base plaid, so I filled in the area between the frame and the edge of the paper with a pink Copic marker and edged it with a rose marker. It is mounted on a ⅛-inch thick dimensional. I also ran the rose Copic along the edge of the ribbon on the front to make it match the plaid a bit better.
Can't forget the inside:

I stamped some of the plaid stripes down the sides and used another Fancy Phrase sentiment, plus one of the little flourishes that comes with the set. I am not sure what the marks are at the bottom of the card - they are not there IRL (in real life); perhaps I need to clean the lens!!!
To see other entries in the blog waltz, just stop by the Play Room forum at the Waltzingmouse House - everyone has listed their entries in the Play Room! Come on in, registration is free and easy and you get to see a lot of good cards, not to mention chances at some very nice blog candy! The blog waltz will kick off Monday, May 17th at 10 a.m. EDT when the blog waltz forum thread opens and we start adding our links!
I hope you are enjoying Waltzingmouse's 1st birthday! Congratulations Claire!
Stamps: Waltzingmouse Stamps - Fancy Phrases, Off Beat Backgrounds, Pic-Nic Patterns
Paper: Printer paper for plaid, roses; 5 x 6 inch ValuePack white card.
Ink: Memento Dye Ink - Angel Pink, New Sprout, Rose Bud; Copic alcohol markers
Embellishments: Paper Doily, Pearl Beads
Tools: ScorePal; Scalloped Scissors, Bow Easy, Crimper


Oh that plaid is crazy great!!! Especially in that pink and green. Oh, and how about your flowers...Love them too!
ReplyDeleteSuper cute and clever! Love those beautiful roses, your amazing plaid background and what a clever girl you are for using your crimper on the leaves. Must go dig my crimper out of my forgotten craft tools pile! LOL
ReplyDeleteOh my goodness - there is so much loveliness to look at-- it is beautiful! Gorgeous soft colours and those flowers are just perfect!!
ReplyDeleteYour card is stunning! Love the plaid,how you folded your doily and the flowers! Great job!
ReplyDeleteWhat a special card, your sister will love it! Love that big perfect bow! Thanks for the tip about the crimper for leaves, will have to dust mine off!
ReplyDeleteAwesome card.... great stamping and super flowers you've made. Especially love how you've done the inside...GREAT design!
ReplyDeleteHugs
Angela xxx.
Gorgeous, love the flowers so pretty. Pauline
ReplyDeleteFirst, I just love your cat in the background!! What a cutie! And your card is fabulously beautiful too!
ReplyDeleteSo pretty! Love the big bow and using the crimper on your leaves!
ReplyDeleteWow so much loving attention went into every detail! I enjoyed reading your blogpost about how this card was created. It's a beautiful card but after reading how much work was put into it I am even more impressed! Thank you for the inspiration!
ReplyDeleteOh and I forgot to add that I love you've got kitty in the photo looking at your card. Priceless! What a cutie!
ReplyDeleteVery pretty - love the dimension.
ReplyDeleteYour card is gorgeous, Lynne. I love all the details, especially the flowes. The inside is beautiful too.
ReplyDeleteThanks for all the tips on making the flowers. I like the pearl bead in the center. Great use of the plaid. Your sister will love this card for sure!
ReplyDeleteI'm a huge "Pink & Green" color combo fan! And you've executed it wonderfully :)
ReplyDeleteI see pink and green plaid in my future!!
Thanks for sharing.
Lynne, I love how you worked that plaid! It took me a moment to see how you did it, it's fabby! I love how much attention to detail there is, all the wee extra touches on the flowers and leaves for example! so creative! Thank you for waltzing with us!
ReplyDeleteVery pretty card! Love the pink & green color combo - my fave :) & that sentiment showcased in that tag looks awesome!
ReplyDeleteLynn your card is just so pretty! I love your plaid and the cutwork doily - how creative! I have to try one of those swirly flowers too - Thanks for the inspiration! I'll be stalking your blog in the future for sure!!!!
ReplyDeleteGotta love plaid!
ReplyDeleteYou card is beautiful and all of your extra details are amazing!!!
ReplyDeleteThis card is lovely and what I especially like about it is the simple stamping on the inside - well actually all of it~!
ReplyDeleteOh I LOVE the spiral roses! And the plaid background is fabby too.
ReplyDeleteLovely roses. And I love that plaid!!
ReplyDeleteSuch a nice card. The flowers are amazing and the color choices with that ribbon is wonderful.
ReplyDeleteWow! LOVE the roses and the doily! The crimped leaves is genious! Thank you SO much for the detailed explanations!!!
ReplyDeleteBeautiful card, great colors & the wee flowers are fab!
ReplyDeleteGorgeous, Lynne! I love your very springy plaid! I also love your paper roses, the pearls in the center are very elegant! So glad you could waltz along with us!
ReplyDeleteOh my goodness - this is amazing, so much detail - LOVE it all!! The plaid is drop dead gorgeous - I really must have a go!!
ReplyDeleteWell! Very pretty, Lynne.
ReplyDeleteI'll be getting my doilies out-lol! I also like the way the roses have been cut out. I don't usually follow the scallop. And your plaid!
Thanks for the multi-inspiration :)
Hi Lynne! You asked me about my card...I used a multi-colored pad. Thank you for commenting!
ReplyDeleteSo you are also mad for plaid! This is a pretty card and your sister is lucky to get it. Really enjoyed this informative blog post - so many tips and helpful hints. Thanks for generously sharing.
ReplyDeleteLove the plaid background and your roses are simply stunning
ReplyDeleteYour plaid is Fab! I will have to remember the crimping tip for the leaves--very clever.
ReplyDelete