


Core'dinations cardstock has a different colored core, making it perfect for sanding the raised embossed areas. This shade was from the letter-sized Coffee pack which included several shades of light to dark brown with paler colored cores. Marco's Paper has all the colors! When you sand the embossing, it tends to just sand the edges of the raised areas, which was not the look I wanted. I got MUCH better results by leaving the paper in the opened folder while sanding. This meant all the raised areas where firmly supported from the back, so I was able to sand the whole top of the raised area. Then I cut a slit in the card's spine to allow me to tie a pale yellow double-faced satin ribbon around the card front with the sanded panel.
The Cloisonné Vase is a special stamp from Michael Strong. I heat embossed it with gold, colored and shaded it with Copic markers, and shaped it into a curve before mounting it on dimensionals.
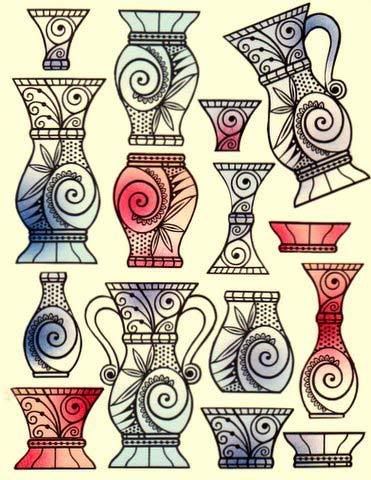
This great stamp is designed to be cut up and reassembled to make a ton of different shapes! The stamp is trimmed and mounted on EZ-Mount when you buy it and the prices are very good and the shipping is very low. He has a whole line of these wonderful Cloisonne stamps - I want the Cloisonné Pot next, which is nearly as versatile as the vase - as you can see here! And there is also a mini version that includes both stamps at a smaller scale.
I used glue dots to attach buttons to the center of some paper flowers, and used the Branch and Frond punches (Martha Stewart) to create some foliage. To get the colors I wanted, I just colored the leaves with Copics.

Several of you have asked me to start posting photos of the inside of my cards. For this one, I used another part of the same vase - I stamped the vase one time and used part on the front, part on the inside, leaving the handles and the base of the vase unused. I added more punched foliage, then scattered some stamped flowers from Bella Blossom and Baroque Motifs (Stampin' Up!).

The Happy Birthday sentiment is from Damask Designs (Papertrey Ink) and added a funny comment about age being unlisted (Hero Arts). I sprinkled some more of the flowers to tie it all together.

And of course you can't forget the envelope!
I joined Patie, her daughters, a bunch of stamping friends had a wonderful brunch at Greek Village, which has amazing breakfasts on the weekend. I wish I could display ALL the fabulous cards everyone made for Paie! I hope the rest of Patie's birthday was just as wonderful! Happy birthday Patie, can't wait for our next stamping get-together! Everyone is going to bring all their newest stuff to show and share!
Please leave a comment - that's what makes blogging worthwhile!


OMG what a beautiful card, I am sick that I had other plans an was unable to attend, but I know Patie had a wonderful time, and I am looking forward to the next get together so we can share all the goodies we got at the convention. I want to see that card in person too. And I think I am going to need that stamp also. Thanks Lynne.
ReplyDeleteGreat card Lynne...you do such amazing creations.
ReplyDeleteThanks for the tip about leaving card stock in folder after embossing to sand. Can't wait to try that one. Beverly
Lynne, I love your website! Very cool to see my birthday card, you always have such great ideas and helpful tips for the stampin' ladies. It was so great to have you a part of my birthday surprise! Look forward to seeing you soon. Patie
ReplyDeleteBeautiful!!!
ReplyDeleteI saw your card on Pinterest. I'm so glad it was saved there since Photobucket is holding hostage here. It is so beautiful and lovely. Thank you for sharing the details about how you made it and all the tips.
ReplyDelete