Saturday, February 27, 2010

Adorable Kitty - Free Digi Stamp from Motivet

Freebie alert! Go to the Motivet blog to download a copy of this adorable kitten digi stamp. For those of you not familiar with digital stamps, they are jpeg files of black and white line art. Print them on your printer on paper or cardstock, then treat them as you would any stamped image. I can't wait to see what everyone will do with this adorable kitten!

Enjoy!

Thursday, February 25, 2010

Birthdays - Time Keeps Ticking Away!

When it comes to having birthdays, my Dad always says "The alternative is grim!"  I guess I would rather have a birthday than not, although I've converted to having anniversaries of birthdays!!  This card really focuses on TIME, which seems appropriate on a birthday, where we celebrate how much time has passed!

Photobucket - Birthday Time Card
I have been inspired by Michelle Zindorf's tutorials and have been bitten with the emboss-resist bug! Images in the main area were stamped, clear embossed, colored with Prismacolor pencils, colored over with a Versamarker, then clear embossed again. I worked from the foreground to the background, so the large clock face in the center and the weathered wood background were stamped last. I guess you can tell how much I love collage stamping and this emboss-resist technique makes it so much fun!

I love this "It's About Time" stamp set (SU), especially because the clock hands are on two separate stamps so you can set them on the right month and day. They are showing from inside the card through two large hole punches (upper left and lower right corner).

Photobucket - Time Birthday Card with Envelope
Of course you can't forget the envelope!

Stamps include It's About Time and Circle of Friendship (SU), Roman Numeral Clock Face (Magenta), Weathered Wood (Judikins), Spectacles and "As time goes by" stamp from Michaels

This card is also my entry for Stamping Sisters in Christ Challenge #27:
SCRIPTURE:
Esther 4:14 “For if you remain silent at this time, relief and deliverance for the Jews will arise from another place, but you and your father’s family will perish. And who knows but that you have come to royal position for such a time as this?"

CHALLENGE:
Make a card or project using a time piece or in some way denoting time or the passage of time. Let imagination be your guide! There are no rules!
I think this card is all about the passage of time! What do you think?  And remember - birthdays are good for you - the more you have, the longer you live!

Monday, February 22, 2010

Waltzingmouse Spring Blog Hop!

ETA: Edited to add that I've entered this card in the Flourishes Timeless Tuesday(FTTC55) to make, stamp or add flowers in some way. I think this Celtic Flower qualifies!
Welcome to the very first Waltzingmouse Stamps Customer Blog Hop. The theme is Spring, a welcome thought with all this cold weather. If you came here from Mona Pendleton's blog, Cupcake's Creations, then you are in the right place. If not, you may want to start at the beginning on Claire Brennan's Waltzingmouse Makes blog!

Photobucket - Celtic Flower Card Front
I don't have any of Claire's darling Spring sets - yet - so I turned to my all-time favorite sets, Celtic Heritage and Irish Blessings. I think you can find a way to use these sets for ANY occasion - I even used them for my Christmas cards last year!

I sponged Carribean Blue (Marvy dye ink pad) onto the white background, moving around a scallop circle punched paper as a mask to create clouds. I swiped the edges with a Crimson Lake ink pad (Marvy) and topped it with a patterned paper panel (K&Company Mat Pack) which also had edges swiped with Carribean Blue and Crimson Lake. Then I had fun creating my flower - I stamped the heart four times using Crimson Lake and "rocking and rolling" the edges with English Red (Marvy). I stamped the solid lunette twice with Pond Green (Marvy). I curved the beautiful braided border on the acrylic block and stamped with Pond Green to create a stem. The leaves and stem were sponged with Old Gold (Marvy) to make them more yellowy to match the patterned paper better.

Photobucket - Celtic Flower Brad Center
I used a 60% off coupon at Michals to purchase an i-Top brad making tool (Imaginisce) -what can I say, the price was right! It is a lot of fun, but be sure to watch their YouTube videos to get all the tips, it makes a big difference. I stamped the small lunette twice in Pond Green (Marvy) to make a full circle, then sponged it with yellow and gold. I cut it out with the template and then dampened the paper before using it in the brad maker. I covered it with Diamond Glaze (Judikins) to make it shiny. TIP - don't press your finger into it when you test to see if it is dry - just ignore that fingerprint!

Photobucket - Celtic Flower Card Inside
On the inside, I pasted a leftover piece of the patterned paper and a strip of striped blue ribbon. The sentiment, "Friends are flowers that never fade" (Hero Arts) seemed perfect for this happy card!

Your next stop on the blog hop is the Stamping With Val blog!

I hope you enjoyed my Celtic Flower! Please leave a comment - your comments are what make blogging fun. Thanks so much for hopping by!

Monday, February 15, 2010

Flowers for Patie's Birthday!

You know when you create a card for a stamping buddy they will appreciate it when you use new or different products! This card for Patie includes a new Asian embossing folder (Cuttlebug), a versatile Cloisonne vase stamp (Michael Strong) and (new to me) Core'dinations cardstock.
Photobucket - Birthday Card for Patie

Core'dinations cardstock has a different colored core, making it perfect for sanding the raised embossed areas. This shade was from the letter-sized Coffee pack which included several shades of light to dark brown with paler colored cores. Marco's Paper has all the colors! When you sand the embossing, it tends to just sand the edges of the raised areas, which was not the look I wanted. I got MUCH better results by leaving the paper in the opened folder while sanding. This meant all the raised areas where firmly supported from the back, so I was able to sand the whole top of the raised area. Then I cut a slit in the card's spine to allow me to tie a pale yellow double-faced satin ribbon around the card front with the sanded panel.

The Cloisonné Vase is a special stamp from Michael Strong. I heat embossed it with gold, colored and shaded it with Copic markers, and shaped it into a curve before mounting it on dimensionals.

Photobucket

This great stamp is designed to be cut up and reassembled to make a ton of different shapes! The stamp is trimmed and mounted on EZ-Mount when you buy it and the prices are very good and the shipping is very low. He has a whole line of these wonderful Cloisonne stamps - I want the Cloisonné Pot next, which is nearly as versatile as the vase - as you can see here! And there is also a mini version that includes both stamps at a smaller scale.

I used glue dots to attach buttons to the center of some paper flowers, and used the Branch and Frond punches (Martha Stewart) to create some foliage. To get the colors I wanted, I just colored the leaves with Copics.
Photobucket - Flower closeup

Several of you have asked me to start posting photos of the inside of my cards. For this one, I used another part of the same vase - I stamped the vase one time and used part on the front, part on the inside, leaving the handles and the base of the vase unused. I added more punched foliage, then scattered some stamped flowers from Bella Blossom and Baroque Motifs (Stampin' Up!).
Photobucket - Card inside
The Happy Birthday sentiment is from Damask Designs (Papertrey Ink) and added a funny comment about age being unlisted (Hero Arts). I sprinkled some more of the flowers to tie it all together.

Photobucket - Card and envelope
And of course you can't forget the envelope!

I joined Patie, her daughters, a bunch of stamping friends had a wonderful brunch at Greek Village, which has amazing breakfasts on the weekend. I wish I could display ALL the fabulous cards everyone made for Paie! I hope the rest of Patie's birthday was just as wonderful! Happy birthday Patie, can't wait for our next stamping get-together! Everyone is going to bring all their newest stuff to show and share!

Please leave a comment - that's what makes blogging worthwhile!

Friday, February 5, 2010

Mourning Collage for my Mother

After being a primary caregiver for Mom during her illness and death, I was pretty churned up. I found it tremendously helpful to work through some of that grief by making small private artworks to both honor her and to express some of what I was feeling. I took some of my favorite stamps,  a couple photos that seemed to work with my idea, and a copy of the program from her funeral service (which also contained the obituary I had just written) and got busy. This is what resulted - I can't tell you how much I treasure this piece. So special and so intimate that I am sharing with you after six years, because I wanted to share it with Laura Fredrickson of Scrapnextras who recently lost her own beloved mother.  Look:
(Click photo for larger view)
Photobucket

I took an inexpensive 8½ x 11 inch document frame from Wal-Mart. I selected this frame becuase it had a fillet that was about half an inch deep, so it had a built in shadowbox space. I have a wonderful good quality set of Italian Maimeri Venezia watercolors which I purchased from Marina Lenzano of Cherry Pie Art Stamps. I also purchased from her the wonderful metallic powders made to mix with them. All the coloring and shimmer you see was done this way. I watercolored the mat, torn pieces from the program, and some beautiful images that I stamped on heavyweight textured watercolor paper. I added emphasis here and there with a white gel pen.

Some of the details:

Photobucket
This scrap was torn from the cover of the funeral service program, which contained her obituary, a poem written in her honor, some appropriate Bible verses, as well as the order of service. I liked it that the title was "A Celebration of LIFE" - because Mom's life was certainly worthy of celebration!

Photobucket
This fabulous sentiment is the same one I use inside my favorite sympathy card: "Christ has made of death a narrow starlit strip between the companionships of yesterday and the reunions of tomorrow" from Wordsworth Stamps. God knows I hope for the reunions of tomorrow! When Mom died, I did not want to hear that it was God's will, or all for the best.  I wanted to hear that I would one day see her again!! I can assure you that that desire has made me a much better Christian, so I can be sure I'll wind up in the good place, as I'm sure she went to heaven.  The starry Milky Way background stamp and the full moon stamp are from Stampscapes.  I found this photo of Mom walking down a path in Ireland, looking back from further down the lane, and I thought it was perfect - she was further along in the journey towards heaven than we are. leading the way.  In Photoshop I colorized and masked everything except her to fit with my sorrowful blue color scheme, printed it on glossy photo paper and trimmed it out. The white handwriting down the right side says "Forever in our hearts."

Photobucket

Photobucket
I tore scraps from the obituary and watercolored them, than scribbled to emphasize certain elements with a white gel pen. Some of the elements included a thank you to the hospice nurses and health aids who enabled us to keep Mom at home until the very end. Support your local hospice workers, they are truly angels on earth. It takes STRONG special people to provide their patients with such loving personal care, knowing they will so soon be gone.

Photobucket
This AMAZING angel image is another stamp from the talented Marina Lenzano of Cherry Pie Art Stamps. I had the good luck to visit her home and see where she designs and presses her stamps. I have hundreds of Cherry Pie stamps - they are some of my very favorites! I watercolored it with the metallic powders mixed in with the paints. I tore the shape out, pulling the margin towards me to create a deep deckle and painted the deckled edge also.  Below that is another scrap from the program with a Bible verse from Matthew: "Come to me, all you who are weary and burdened, and I will give you rest." This is one of my favorite verses when people have died after a painful illness. I can assure you that death was a blessed release for my mother, and indeed for all of us, by the time the end arrived.

Thoughts:

Some items I would change. I used the same image of her on the path twice. Since then, I have received a copy of her college portait, and I would like to replace the photo in the upper left corner to have the two faces, young and old, instead of the path photo.  This is the portrait I would like to include with her older portrait:

Photobucket

After all this talk of death, I thought I would leave you with a photo of my Mom with one of her granddaughters that really captures her spirit. She was so warm and charming, a wonderful hostess, and such a joy to be around. She was also into crafts and needlework and artwork. We all still miss her SO  MUCH.  But time lets you think of the good times instead of focusing so much on the hole their departure leaves in your heart.

Photobucket
Love you Mom!!!

Tuesday, February 2, 2010

Bella Blossom Thank You

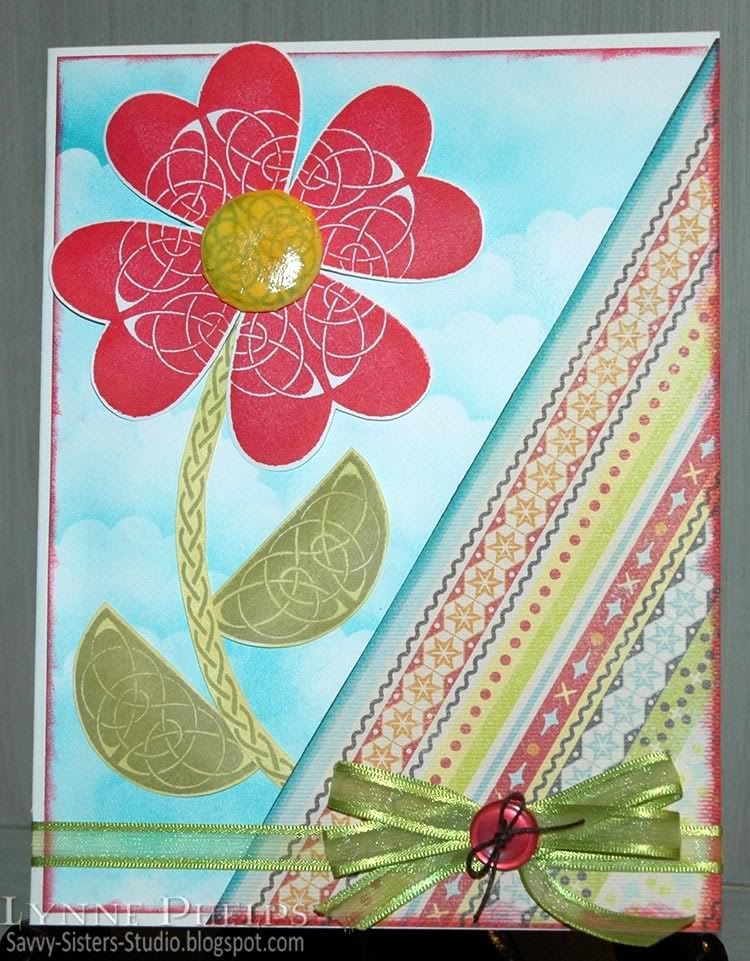
The minute I saw this fabulous flower in the Stampin' Up! catalog, I knew I had to have it! It appeals to me in every way. So I used it on one of my Christmas thank you cards and am so pleased with how it turned out. I hope you like it too!
Photobucket - Bella Blossom Thank You Card
The card base is Bravo Burgundy (SU) trimmed with a corner rounder punch (EK Paper Shapers). I inked the blossom stamp (Bella Blossom, SU) first with VersaMark, then with two different shades of dye ink (Marvy Matchables) . This allowed me to heat emboss it with clear detail powder (Ranger) as the VersaMark slows down the drying time of the dye ink. I love this trick, which I learned from Michelle Zindorf's blog. It also makes stamp clean up a breeze, as the colored ink does not actually come into contact with the rubber. 

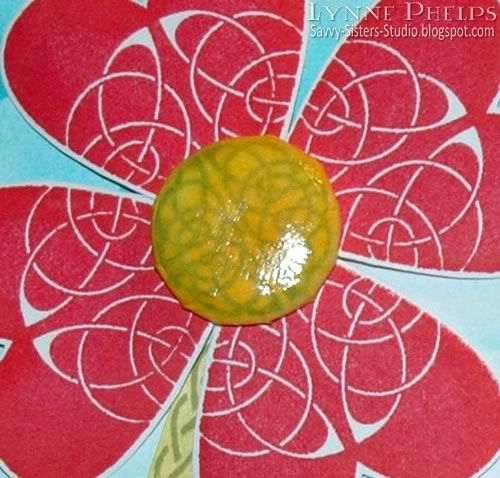
I used my Scor-Pal to score two lines across the bottom of the ivory flower panel. I laid a strip of Scor-Tape between the raised lines and covered it with coarse crystal glitter. I also scored a box around the flower. I used a border punch along the bottom (Loops - Martha Stewart) - my new favorite, it is so fun, and has a matching corner punch! I used a smaller corner rounder punch (EK Paper Shapers) on the top corners to tie it in with the card base.  I used a leafing pen (Pale Gold - Krylon) around the edges of the card base to make it look more finished, but it still needed something so I pulled out the buttons and ribbon!

I cut a slit in the fold of the card base with an Xacto knife, just slightly wider than the ribbon, and used a slot punch 
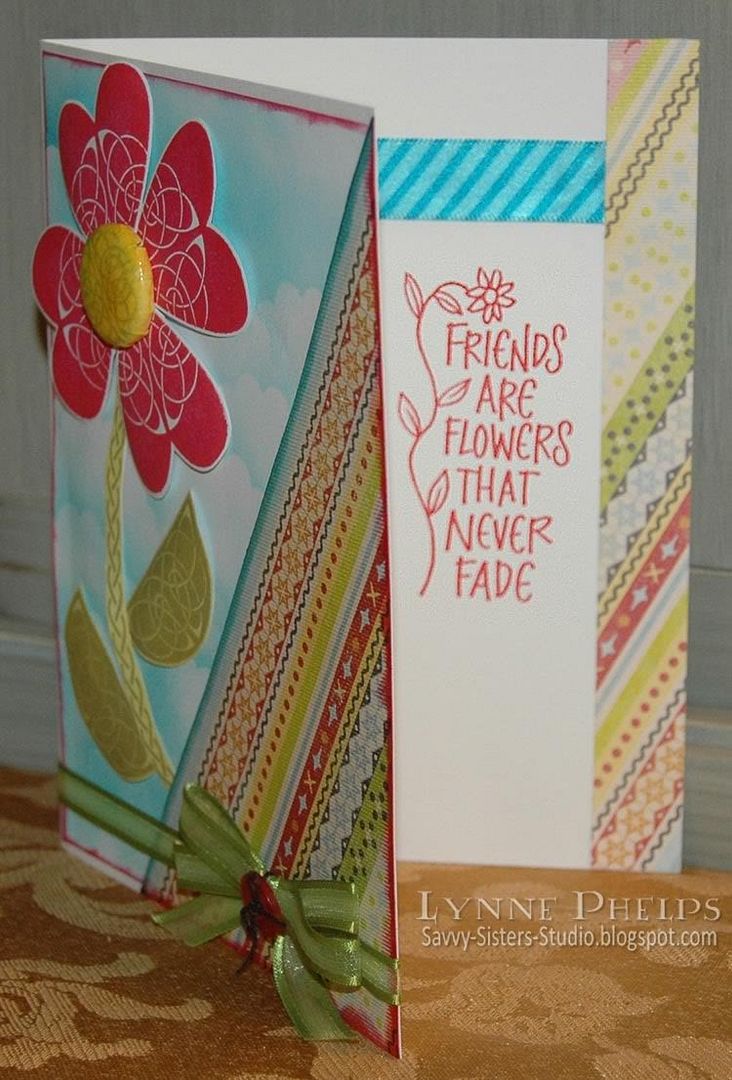
(SU) in the ivory panel to allow the ribbon to come through. Then I looped the the bright olive organza ribbon completely around the whole card front and tied it in a square knot, as I love seeing the ribbon on the inside of the card too! I ran some fine twine through the holes of a large button, tied it in a bow and adhered it to the center of the knot with a glue dot. I stamped "Thank You" from the same stamp set in white pigment ink and clear embossed that as well.  I like the vertical element it adds, running up the side of the card base. The thank you sentiment is stamped inside using white pigment ink and clear embossing to match the thank you on the card front.


Photobucket
I always like to tie the envelope into the theme, so I stamped and clear embossed the smaller bloom that comes with the stamp set to tie it all together.

Mailing Tip: The clear embossing will prevent the dye ink on the outside of the envelope from running, should it be delivered in the rain! Also, when my cards have a lot of dimension, I line the front of the envelope with a piece of cardstock, sometimes in a pretty color. I insert the card with all the 3D elements facing the cardstock lined envelope front. This helps to prevent the sorting machines from ripping it up.  Also, I stamp the back of my cards with a "Created by Lynne Phelps" custom made stamp, and this way, the first thing they see when they pull out the card is that it was handmade just for them!  Maybe that keeps it out of the trash can a bit longer - I can only hope, LOL!

I hope you enjoyed seeing this card. Thank you so much for looking, and please leave a comment, as that's what really makes blogging fun!  Please tell me about your tips for getting your embellished cards through the mail without damage! 
Related Posts with Thumbnails